
Curves
Curves reshapes the tones of your photo with points on a line, for all channels or for red, green and blue separately. Use it for precise contrast, to lift or crush a range of tones, or for color effects.
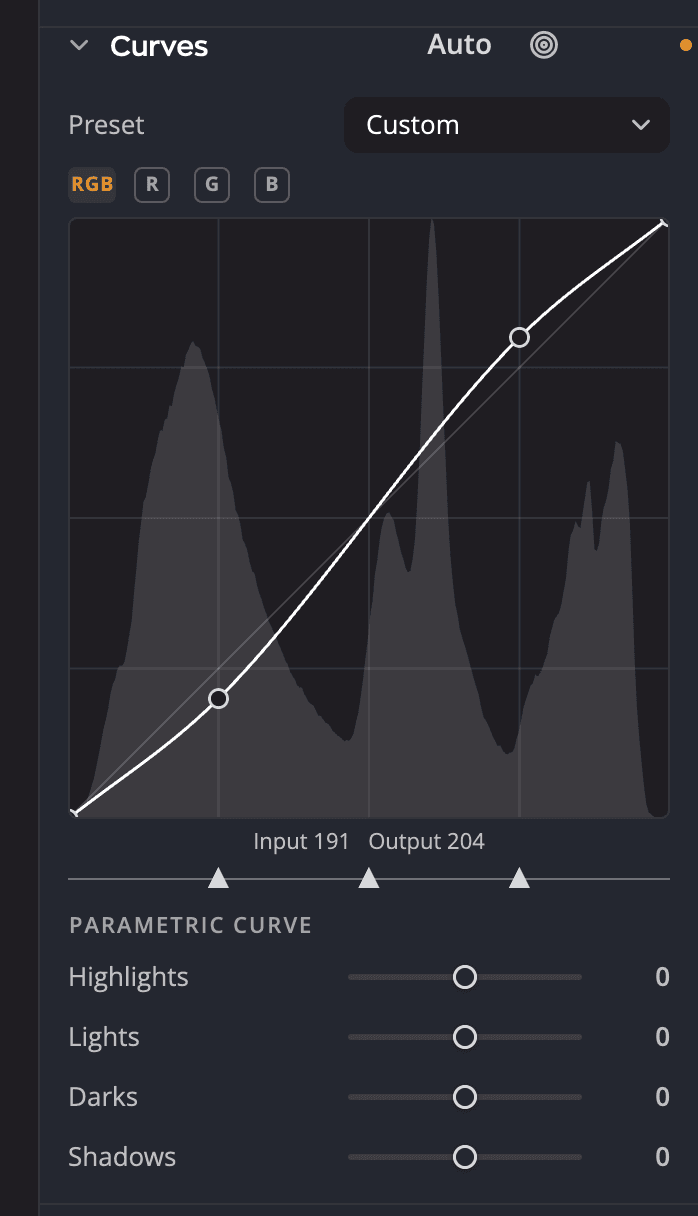
| # | Control | What it does |
|---|---|---|
| 1 | Preset | Applies a built-in or saved curve, or imports one |
| 2 | Channel chips | All channels, Red channel, Green channel or Blue channel |
| 3 | Plot | The tone curve. Click to add a point and drag to move it. |
| 4 | Input and Output | The selected point's values |
| 5 | Parametric Curve | Four sliders that shape regions of the curve |
| 6 | Region splits | Where the four regions meet |
The panel's header holds Auto and the targeted adjustment tool.
Draw a curve
- Choose a channel chip. All channels changes brightness and contrast; a single color channel shifts color.
- Click the line to add a point, then drag it. Dragging up brightens that tone; dragging down darkens it.
- Add more points as you need them. The readout shows the selected point's Input and Output.
A gentle S shape, with the shadows a little lower and the highlights a little higher, adds contrast.
To remove a point, double-click it, or drag it off the top or bottom of the plot. The two end points stay.
Shape the curve on the photo
Click the targeted adjustment button in the header, then drag up or down on the photo. Radiant Raw moves the point at the tone you pressed on, or adds one there if there is none. ⌥-drag (Alt-drag on Windows) moves the Parametric Curve region that holds that tone instead. Each drag is one undo step. Click the button again to stop.
Parametric Curve
These sliders raise or lower whole regions of tones. Each runs from −100 to +100 (default 0).
| Slider | What it does |
|---|---|
| Highlights | The brightest region |
| Lights | The light midtones |
| Darks | The dark midtones |
| Shadows | The darkest region |
Under Region splits, drag Split 1, Split 2 and Split 3 to move the borders between the regions. They start at 25, 50 and 75, on a scale of 0 to 100.
The Parametric Curve works together with the points you draw.
Presets
Open Preset and choose:
| Preset | What it does |
|---|---|
| Linear | A straight line: no change |
| Medium Contrast | A gentle S-curve |
| Strong Contrast | A stronger S-curve |
| Lighter | Brightens the midtones |
| Darker | Darkens the midtones |
| Negative | Inverts the tones |
The Preset row reads Custom once you change a curve, and shows — before you start.
- Save current curve as… saves your curve under Custom, so you can use it on other photos.
- Delete a custom curve preset… removes one you saved. Pick it in the list, and Radiant Raw asks Delete “My curve”? Click Delete to remove it. You can't undo this. While you have no saved curves, the row is grayed.
- Import curve file (.acv)… loads a curve saved by another app, such as Photoshop.
Auto
Click Auto in the header for a curve set from this photo. Its tooltip names the method it uses. Auto measures the photo as it looks now, with your other edits. Clicking it twice gives the same result: the second click finds nothing to change.
When Auto is done, a message over the photo names the method, for example Curves Auto: set by Enhanced Contrast Per Channel. Click Undo in it to take the curve back. See When you click Auto.
⌥-click Auto (Alt-click on Windows) to open Auto Color Correction and choose the method yourself. Each method previews live; click OK to keep it as one undo step. Save as defaults sets what Curves' Auto applies from now on. It doesn't change Levels' Auto. See Levels for what each method does.
The curves Auto draws fit this photo alone, so Sync doesn't copy them to other photos. Click Curves' Auto on each photo instead.
Tip
Curves and Levels can do some of the same work. Set black and white points in Levels first, then use Curves for contrast and color.