
The filmstrip, ratings and flags
The filmstrip along the bottom of the develop window holds every photo you opened. Use it to move between photos, choose which ones to work on, and rate, flag and label them as you go.
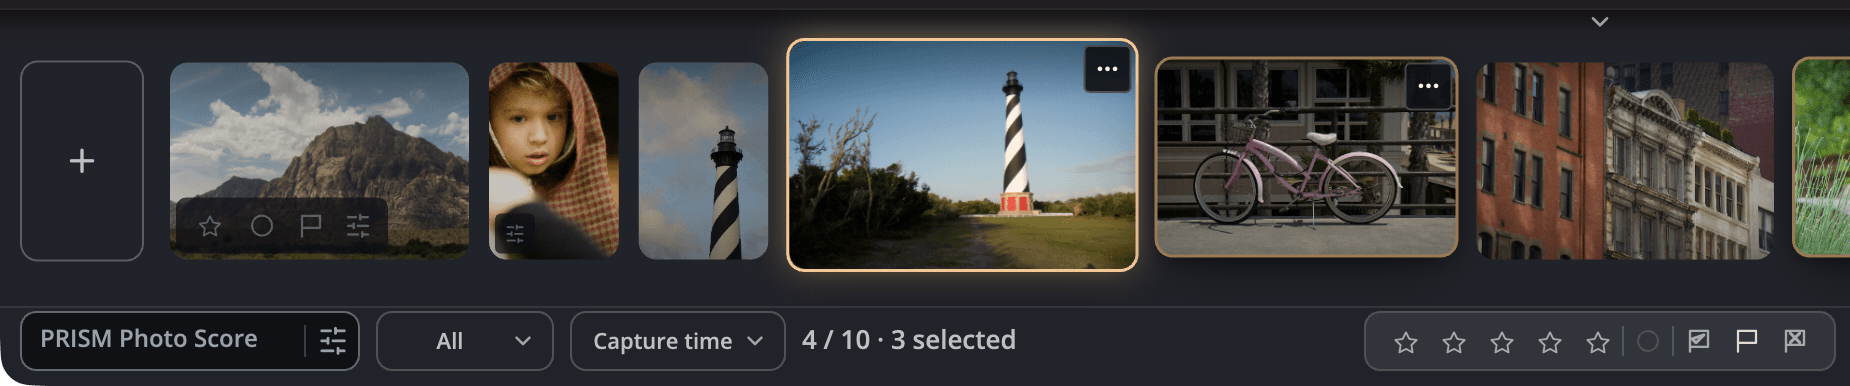
| # | Control | What it does |
|---|---|---|
| 1 | Tiles | One per photo. Click a tile to open that photo. |
| 2 | + (Add photos) | Opens more raw files in the same window |
| 3 | File name | Opens a list of the photos in the filmstrip, so you can go straight to one |
| 4 | Selects | Shows only some of the photos |
| 5 | Sort | Changes the order and the shape of the tiles |
| 6 | Counter | Where you are, for example 12 of 45, and how many photos are selected |
| 7 | Marks | The rating, label and flag of the photo on screen. Click one to change it. |
The Copy, Paste, Copy Settings…, Sync all and Sync forward buttons at the right copy develop settings between photos. While several photos are selected, Sync selected takes the place of the two Sync buttons. See Copying and syncing settings. When the window is narrow, the buttons show only their icons, and then the Sync buttons fold into one Sync menu.
Move between photos
- Click a tile, or press ← or → (↑ and ↓ work too).
- Press Home or End for the first or last photo, and Page Up or Page Down to page through the filmstrip.
- Click the file name in the status row and choose a photo from the list.
Select several photos
| To | Do this |
|---|---|
| Add a photo to the selection, or take it out | ⌘-click its tile (Ctrl-click on Windows) |
| Select a run of photos | ⇧-click the last tile in the run |
| Extend the selection one photo at a time | ⇧ with an arrow key |
| Select every photo | Edit > Select All Photos |
Selecting tiles doesn't change the photo on screen. A plain click selects one photo and opens it.
Show only some photos
Click Selects and choose All, Picked, Rated 1★ or more, No flag or stars or Rejected. The filmstrip hides the rest. If nothing matches, click Show all photos.
Note
Export counts only the photos in view while a Selects filter is on, and asks before it starts.
Sort the filmstrip
Click Sort and choose Manual (Open Order), Capture Date, Import Date, Modified Date, File Name or Star Rating. Choose Reverse Order to flip the order. Tile style is in the same menu: choose Fluid (each tile keeps its photo's shape) or Square (every tile is cropped to a square).
The tile menu
Click ⋯ on a tile, or right-click it:
| Command | What it does |
|---|---|
| Reveal in Finder (Show in Explorer on Windows) | Shows the raw file in its folder |
| Remove from Batch | Takes the photo out of this window. The file isn't touched. |
| Export This Photo | Saves and exports this photo alone, using your Output settings |
| Open Stack / Close Stack | On a photo in a stack: shows the stack's photos in the filmstrip, or folds them back behind the cover |
| Set as Stack Cover | On a photo in an open stack: makes it the photo a closed stack shows |
| Remove from Stack | On a photo in an open stack: takes it out of the stack |
| Reveal in Radiant Flow | Opens Radiant Flow on the photo's folder, with this photo selected |
| Copy Settings… | Copies chosen groups of settings from this photo |
| Paste Settings | Pastes them onto this photo, or onto every selected photo when this photo is one of them (⌘V) |
| Reset This Photo | Returns this photo to its starting point, in one undo step |
| Copy Metadata | Copies this photo's caption, creator, rights and location. See Copy and paste metadata. |
| Paste Metadata | Pastes everything you copied onto this photo alone, after you check the changes (⇧⌘V) |
| Paste Metadata to Selected Photos… | With more than one photo selected: pastes onto every selected photo |
Rate, flag and label
Press a key, or click the rating, label or flag in the status row and choose from its menu.
| To | Press |
|---|---|
| Rate 1 to 5 stars | 1 to 5 |
| Clear the rating | 0 |
| Pick, Reject, Clear flag | P, X, U |
| Label Red, Yellow, Green, Blue, Purple | 6, 7, 8, 9, − |
| Clear the label | ⌥⌘0 (Alt+0 on Windows) |
- A key sets its value. Pressing it again leaves the value as it is, so use 0, U or ⌥⌘0 to clear.
- Hold ⇧ with a key to set the mark and move to the next photo.
- If the photo on screen is part of a selection, the mark goes to every selected photo.
- Press ⌘Z (Ctrl+Z on Windows) to undo a mark.
The keys work everywhere in the window, including in Lights Out and in the crop tool. In the crop tool, X still rejects; the crop's own swap key is ⌥X.
Where marks are saved
Radiant Raw writes ratings, flags and labels into an .xmp file next to each raw file. It never changes the raw
file itself. Radiant Flow and most photo apps read the same file, and marks you set in Radiant Photo show here
too.
If Radiant Raw can't write the .xmp file, it tries once more. If that fails too, it puts the marks back and says
The marks on DSC_0412.NEF couldn't be written, so they were put back.
A raw file Radiant Flow sent from a Lightroom Classic catalog opens with the rating, flag and color label it has in
the catalog, where they differ from its .xmp file. Opening it doesn't change the file. A mark you change goes to
the catalog. When Radiant Raw may change the file, it writes only that mark into it. If the .xmp file can't take
the change, the mark stays as you set it and no message appears, because the change already went to the catalog.
Only a mark that couldn't reach the catalog either is put back, with the message above. If another app changes a
mark in the file while the photo is open, Radiant Raw shows the new one.
Lightroom Classic keeps a photo's stars when you reject it, but Radiant Raw shows a rejected photo with no stars. When you pick a photo rejected in Lightroom Classic, or clear its flag (P or U), its stars come back.
Radiant Raw shows orange, gray and pink labels set in other apps, but it can't set them. Undo can't put one of those colors back.
Fade the marks on tiles
Choose Settings > General > Marks on tiles. Turn on Fade marks until you point at them to dim ratings, labels and flags until you hover over, focus or select a photo. How visible faded marks are sets how dim they get, and How fast marks return is Standard or Quick.
Best of a burst and closed eyes
While PRISM Photo Score is on in Settings > General, the tiles of photos Radiant Flow has scored can carry two more marks. Neither one ever rates or rejects a photo.
★ BEST. When Radiant Flow scores your photos, it also groups shots taken close together into bursts and picks the best frame of each. The filmstrip puts ★ BEST on that frame's tile. Radiant Raw doesn't choose a frame itself, and Radiant Photo marks the same frame. Hold the pointer over the mark to see how far the best frame leads the next one, for example Best leads by 9.4 points. When the two are 5 points apart or less, the star is hollow and the tooltip says Too close to call: the top two are 3.1 points apart. Look at both. The lead shows only when every photo of the burst is in the window.
A burst has no mark when one of its photos isn't scored yet, when the top two have the same score, or when a score changed after Radiant Flow picked the best frame. If the window holds only part of a burst, the mark shows only when its best frame is there. A window with one photo shows no mark.
With PRISM Photo Score on in the View menu, hold the pointer over the score card beside the photo to see the full card. On the best photo of a whole burst it adds a line such as Best in this burst · leads by 9.4 or Best in this burst · Too close to call. If some faces didn't have their eyes checked, it says how many did, for example 3 of 4 checked. When every face was checked, there's no such line.
Closed eyes. When the main person in a photo has their eyes closed, its tile shows a small closed-eye mark in its top corner. Hold the pointer over it to read Eyes closed, and a screen reader adds eyes closed to the photo's name. Only the main face counts.
Check every face
In a group photo, one person blinking can spoil the shot. The face row shows every face in the photo at once, so you can check eyes without zooming around.
Choose View > Show Faces. The face row covers the filmstrip at the same height, so the photo and the panels don't move. A screen reader calls it Faces in this photo. The row takes the keyboard. Press Esc, or choose Show Faces again, to bring the filmstrip back. The command is grayed while the filmstrip is hidden or folded.
Each face has a ring:
| Ring | What it means |
|---|---|
| Red | Eyes closed. |
| Green | Eyes open. |
| Dashed, with no glyph | Radiant didn't check this face's eyes. It never means the eyes are closed. |
A small eye glyph in the crop's corner says the same thing, so you can read the row without color. Faces with closed eyes come first, then open eyes, largest face first, then the faces that weren't checked. The face you're on has a second ring in your accent color. When the score carries each face's sharpness, an inner ring shows it. A face your crop leaves out isn't in the row.
At the start of the row, the header counts the faces, for example 4 faces, 1 with eyes closed and 3 of 4 checked. Then it gives the photo's sharpness, for example Sharpness 74.
| To | Press |
|---|---|
| Move to the previous or next face | ← / → |
| Go to the first or last face | Home / End |
| See the face's nearer eye at 100% | Space. Press Space again to go back to Fit. |
| Go to the previous or next photo | ↑ / ↓. The row stays up and starts at the first face. |
| Close the row | Esc |
- Click a face to choose it and zoom to its eye.
- While you're zoomed in, ← and → take the photo from face to face at the same zoom. At Fit, they stay at Fit.
- In a right-to-left language, ← and → are mirrored.
- Your rating, flag and label keys still mark the whole photo, never one face.
Show Faces has no shortcut out of the box. To give it one, open Settings > Keyboard Shortcuts.
When there are no faces to show
- Faces show here once this photo is scored. Radiant Flow hasn't scored this photo yet, or the photo changed after it was scored. The row fills in by itself when the score arrives.
- No faces found in this photo. The photo is scored and has no faces.
The faces and their eyes come from the photo's PRISM score, the same in Radiant Flow, Radiant Photo and Radiant Raw. Radiant never recognizes who anyone is: faces are numbered, never named. A screen reader reads the header when the row opens, then each face as you move to it, for example Face 2 of 4, eyes closed. Space zooms to it.
Make room for the photo
| To | Press |
|---|---|
| Show or hide the filmstrip | ⇧⌘Space (Ctrl+Shift+Space on Windows) |
| Fold the filmstrip down to its edge, keeping its place in the window | ⇧Space |
| Change its height | Drag its top edge |
View > Panels > Cycle Layout steps through three layouts: everything, the filmstrip only, and the photo alone.