
White Balance
White Balance removes color casts, so whites look white and skin looks natural. Raw files let you change it freely, with no loss of quality.
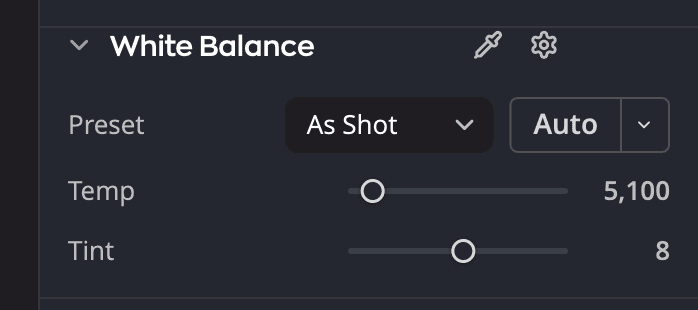
| # | Control | What it does |
|---|---|---|
| 1 | Temp | Moves the color from blue to yellow |
| 2 | Tint | Moves the color from green to magenta |
| 3 | White balance eyedropper | Click it, then click something in the photo that should be neutral gray or white. |
Choose a preset
Pick the light the photo was taken in.
| Preset | Use it for |
|---|---|
| As Shot | The camera's own setting. Every photo starts here. |
| Auto | Radiant Raw's best guess for this photo |
| Daylight, Cloudy, Shade | Outdoor light |
| Tungsten, Fluorescent | Indoor lamps |
| Flash | Flash photos |
| Custom | Shown when you set Temp or Tint yourself. You can't pick it from the list. |
Set it with the eyedropper
- Click the White balance eyedropper.
- Click something in the photo that should be neutral gray or white.
- Radiant Raw sets Temp and Tint, and the eyedropper puts itself away. To cancel before you click, press Esc or click the eyedropper again.
Fine-tune
| Slider | Range | What it does |
|---|---|---|
| Temp | 2000 to 50000 K | Moves the color from blue (lower) to yellow (higher) |
| Tint | −150 to +150 | Moves the color from green to magenta |
Both sliders reset to the photo's As Shot values, not to a fixed number.
How Auto measures
The Auto button sits beside the preset. Click the ▾ on it to open the Auto white balance method menu:
- Neutral areas looks for things that should be gray. Best for most photos.
- Edges and detail measures color around edges. Use it when nothing in the photo is gray.
You can also choose Develop > White Balance Auto, or press ⇧⌘U (Ctrl+Shift+U on Windows). It does what the Auto button does.
Choosing a method runs it once. Click its pin, Set as default, to make Auto use it every time.
Auto measures the photo as shot, so it lands on the same values whichever preset you start from.
What Auto tells you
When Auto is done, a message over the photo gives the values and the method, for example White Balance Auto: 6,400 K, Tint 0 (Neutral areas). Click Undo in it to go back. See When you click Auto.
- When a photo has few neutral areas, Neutral areas takes out only part of the cast, because the color may be the light of the scene, such as a sunset. The message then reads White Balance Auto: cast partly corrected, 4,800 K, Tint +6 (Neutral areas). Point at it to read why.
- When nothing in the photo is neutral, Neutral areas leaves White Balance as it was and says White Balance Auto: left the photo as it was. Click Try Edges and detail in the message to try the other method once. Your default stays as it was.
- When a single color fills the photo, Edges and detail has nothing to measure, so Radiant Raw leaves White Balance as it is. Point at the message to read why.
White Balance Auto after Levels or Curves Auto
Levels' or Curves' Auto can take out a color cast too, with Enhanced Contrast Per Channel or with Neutral Midtone Snapping on. When you click White Balance's Auto after one of them, White Balance takes out the cast itself. Then that Auto runs again over the new white balance. It all comes back with one Undo.