
Histogram, scopes and Info
The histogram shows how the tones in your photo are spread, and Info shows how it was taken. The histogram sits at the top of the right panel, above the pages, and Info takes the place of the page while it is open.
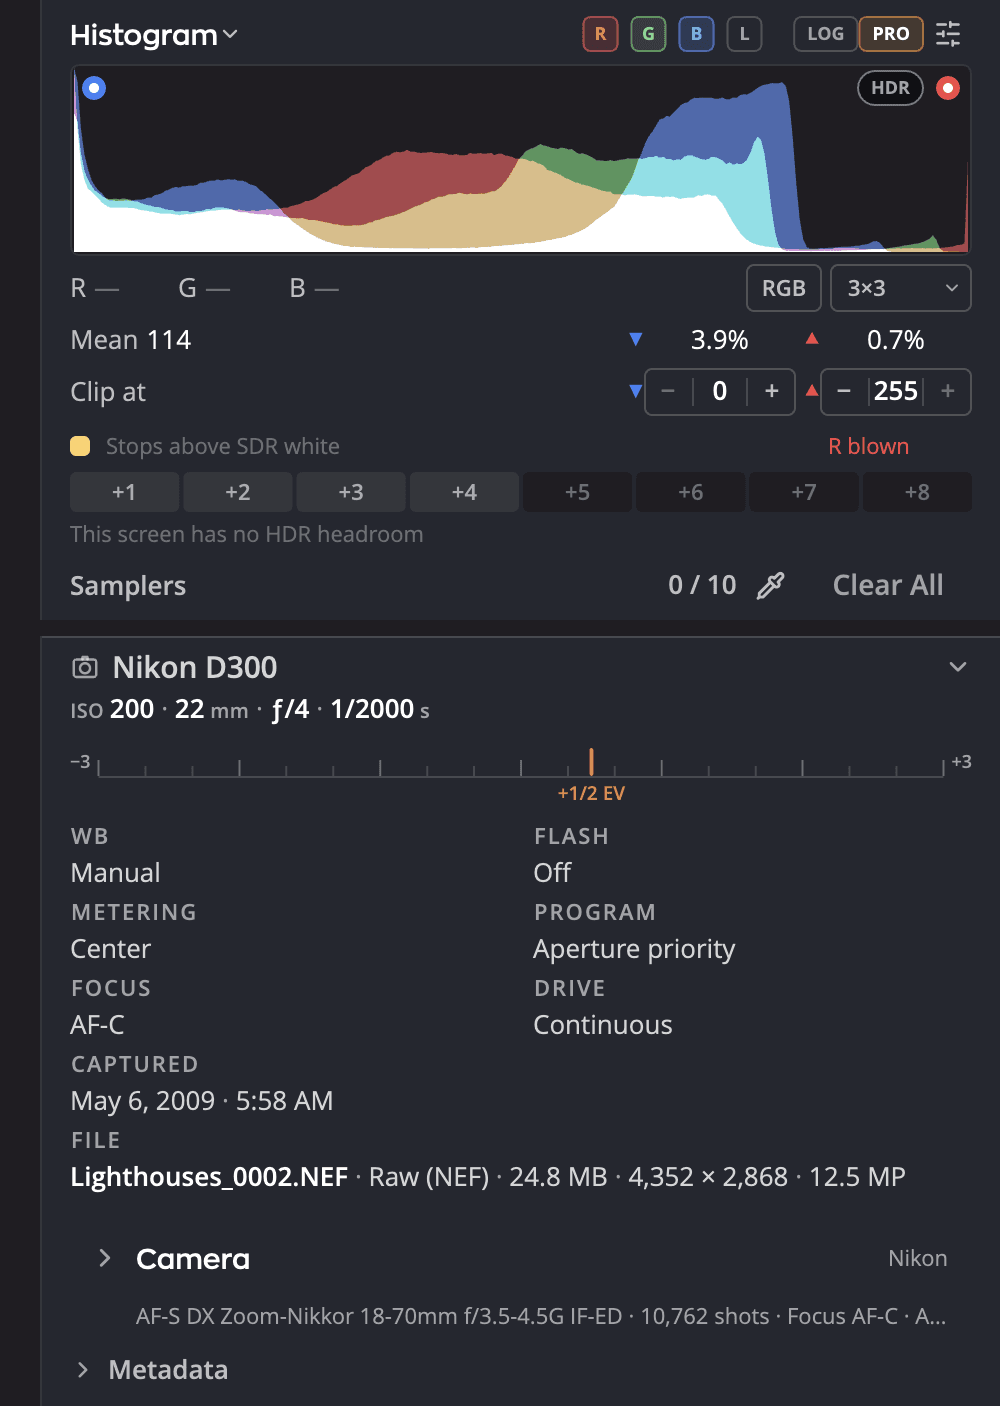
| # | Part | What it does |
|---|---|---|
| 1 | Scope title | Click Histogram to choose another scope |
| 2 | Channel chips | Show or hide each channel |
| 3 | Clipping capsules | Show shadow clipping (left) and highlight clipping (right) on the photo |
| 4 | Stats line | Mean brightness and how much is clipped, or the pixel under the cursor |
| 5 | Capture card | The camera settings. Click it for the full card. |
| 6 | Camera and Metadata | The camera's own data, and the photo's caption, keywords and copyright |
To show or hide either part, click Histogram or Info at the top of the right rail. You can also choose View > Panels > Histogram or Info. Press ⌘I (Ctrl+I on Windows) for Info. View > Panels > Info Only, ⌃⌘I (Ctrl+Shift+I on Windows), hides the histogram and the page so Info fills the panel. It turns off again when you quit.
Info and the pages are one or the other. Turning Info on puts the page away, and clicking a page or pressing its key turns Info off. The histogram stays as it is. Radiant Raw remembers Info, so it opens that way the next time.
Read the histogram
- Clipping: click the left capsule to tint crushed shadows on the photo, and the right one for blown highlights. Press J to turn both on or off.
- Tone bands: with Pro histogram on or off, the plot is split into Blacks, Shadows, Exposure, Highlights and Whites. Drag a band sideways to adjust that Tone slider without opening Tone, at the speed Lightroom Classic uses. Hold Shift for finer steps, or ⌘ (Ctrl on Windows) for finer still. Double-click a band to reset it. Each drag is one undo step. A Histogram works the same way in the Scopes window and in the corner card of Scopes on Photo, except while a tool on the photo is active.
- Pixel readout: hover over the photo to read the pixel under the cursor. Click the readout to switch between RGB, %, HSV and Lab.
- As shot: click the scope's title and turn on As shot to draw a dashed outline of the photo at its default settings behind the live histogram. It shows on every histogram, Scopes on Photo and the Scopes window included, and Radiant Photo shares the switch. It's off until you turn it on.
Click PRO (Pro histogram) in the histogram's header for the rest:
| Option | What it does |
|---|---|
| Pro histogram (the PRO pill) | Adds channel toggles to the header, and the stats and readout rows under the plot |
| Logarithmic histogram scale (the LOG pill) | In the header, on the Histogram. Lifts small counts in the shadows and highlights so you can see them. |
| Scope trace gain | In the header, on the other scopes. How bright the scope's trace is drawn. |
| Sample size | Under the plot. How many pixels the readout and every eyedropper average. |
| Readout space | Under the plot. How the pixel readout is shown. |
| Clip at | Under the plot. The levels that count as clipped: 0 is pure black, 255 is pure white. Double-click to reset. |
When the panel is too short to show the header, right-click the plot for the same switches.
The colors used for clipping are set in Settings > Color > Clip warning colors.
Use a scope instead
Click the scope's title and choose Histogram, Waveform, Parade or Vectorscope. The same menu shows the scopes on the photo or in a window of their own.
- Show Scopes on Photo (⌃⌘G, Ctrl+Shift+G on Windows) draws the scope over or under the photo. Choose Band, Full frame or Corner, then set its Opacity, Band height and Position (Over the photo or Below the photo). When you zoom in, a band measures only the Visible area.
- Show Scopes Window (⌃⌘W, Ctrl+Shift+W on Windows) opens the scopes in a window that floats over the photo, inside Radiant Raw's window. Choose a Layout: One scope, Two, side by side, Two, stacked, One plus two or Two by two. Drag it to move it, and double-click it to fill the canvas.
- Link with Photo (on by default) links the scopes and the photo both ways. The pixel under the pointer is marked in every scope, and color samplers are numbered in them. Hovering over a scope lights the matching part of the photo, except on a vertical Waveform or Parade.
- Pin as Reference keeps this photo's scope trace as a gray ghost in every scope, so you can match the next photo to it. Clear Reference removes it. It also goes when you quit. A Waveform pinned in one orientation shows no ghost in the other.
All of these are also in View > Scopes.
Show two scopes at once
With PRO on, click the scope's title and choose Show Second Scope. A Vectorscope appears under the first scope, or the Histogram when the first scope is the Vectorscope.
- Click the second scope's title to choose another scope for it.
- Choose Scope Settings… from the second scope's title menu to adjust it. The card is tagged Second Scope, and its settings are separate from the first scope's.
- The channel chips apply to both scopes.
- Hide Second Scope, in either title menu, goes back to one scope. Turning PRO off hides the second scope too.
Turn the waveform for portrait photos
On the Waveform or the Parade, choose Scope Settings… from the scope's title menu and set Orientation to Vertical. The photo's rows then run from top to bottom and brightness from left to right, so the trace of a portrait photo lines up with the photo. Horizontal is the default.
Only the first scope in the panel has this setting. The second scope, Scopes on Photo and the Scopes window always run across the photo.
Measure colors with samplers
Press I, or choose Develop > Color Sampler, then click the photo to place up to 10 samplers. Each one reads its color under Samplers, below the histogram, and stays in place as you edit, so you can watch a color change. Samplers are listed only with Pro histogram on. Turning the sampler on turns Pro histogram on and shows the histogram. When you put the tool away, Pro histogram goes back to how you had it. Click a row to switch its readout space, or click Clear All to remove every sampler.
Info
The compact capture card shows ISO, Aperture, Shutter speed, Focal length and Exposure compensation. Click it for the full card: WB, Flash, Metering, Program, Focus, Drive, Captured and File. When the photo has a location, the card adds GPS with Show on map.
Open Camera to read the photo's maker notes, the camera maker's own data.
Choose what Info shows
Info has three parts: the capture card, Camera and Metadata. To choose which ones show and in what order, open the Customize sections card:
- Right-click the capture card, or the Camera or Metadata header, and choose Customize Info Panel….
- Choose View > Panels > Customize Info Panel….
On the card, uncheck a part to hide it, and drag a row by its grip to move it. The capture card is listed as Camera summary. A hidden part stays on the card, so you can check it again, and hiding it loses nothing it holds. The header's menu does the same one step at a time: Hide Camera, Move Up and Move Down. Radiant Raw keeps one order for you on this computer.
Solo Mode at the top of the card is on at first: Opening a section closes the others. Opening Camera closes Metadata, and opening Metadata closes Camera. The capture card and the histogram above it stay as they are. Turning Solo Mode on with both open keeps the upper one open. Turning it off opens and closes nothing.
A Metadata part that holds typing you haven't saved is never closed by Solo Mode, and you can't hide it until you save or revert. Its checkbox and the menu row say Save or revert Metadata first. You can still move it.
Reset on the card puts back the default order with every part shown. A message says Info sections reset to the default order, with Undo.
Add a caption, keywords and copyright
Open Metadata to edit the photo's IPTC information:
| Group | Fields |
|---|---|
| Description | Title, Headline, Caption, Keywords |
| Creator & contact | Creator, Job title, Email, Website |
| Rights | Copyright notice, Credit line, Usage terms, Copyright status |
| Location taken | City, State / province, Country, Country code |
| AI & Data Mining | AI training and Other constraints |
Click Save to keep your changes or Revert to drop them. To reuse your details, click Save as card…, then Apply card on the next photo.
If you move to another photo before you click Save, Radiant Raw saves your typing to the photo you left. That includes a keyword you typed but didn't add yet. To drop your typing, click Revert before you move on.
Some photos come from a Lightroom Classic catalog that Radiant Flow opened. For them, a keyword you type can match more than one keyword in the catalog. Radiant Raw then asks Which “Paris”? and you pick one. If you cancel, nothing is saved. After a click on Save, your typing stays, so you can try again. After a move to another photo, a message tells you that nothing was saved.
Note
For a raw file from your camera's own format, Radiant Raw saves metadata in a sidecar next to the photo. The raw file
itself is never changed. A DNG file follows Save to in Settings > Sidecars: while
Inside the photo is checked, the metadata is saved inside the DNG, and in its .xmp
sidecar too while Sidecar (.xmp) is checked. If the DNG can't take the metadata inside, for
example because the metadata already in it can't be read, it goes to the .xmp sidecar instead. With
Sidecar (.xmp) unchecked and no .xmp there yet, Radiant Raw keeps it in its own copy and says
Metadata saved in this app, not in the file, because the photo can’t hold it inside and Sidecar (.xmp) is unchecked in Save to. See
Where your settings are saved.
Copy and paste metadata
Copy one photo's caption, creator, rights and location, then paste them onto the rest of the shoot. It works as in Radiant Photo and Radiant Flow.
- Go to the photo whose details you want.
- Choose Edit > Copy Metadata. A message says Metadata copied.
- Go to the photo that should get the details, and choose Edit > Paste Metadata, then a row:
| Row | What it pastes |
|---|---|
| Everything (⇧⌘V, Ctrl+Shift+V on Windows) | Every group below. |
| Title & Caption | The title, headline and caption. |
| Creator & Contact | The creator, job title, email and website. |
| Rights & Licensing | The copyright notice, credit line, usage terms, source and license. |
| Location (place names) | The event and the place names, such as the city and the country. Not the coordinates. |
| GPS Coordinates | Only the GPS coordinates. |
Before anything changes, the Paste metadata dialog lists every field that will change, with its value now and its new one. (empty) means the field has no value yet. Click Paste to write the changes.
Important
A metadata paste can't be undone with ⌘Z (Ctrl+Z). When it replaces values the photo already has, the dialog says so in red. Only a paste that replaces nothing offers Don't ask me again, which skips the dialog for such pastes next time.
To paste onto several photos, select them in the filmstrip and choose Edit > Paste Metadata to Selected Photos…. It pastes what you chose last time in the Paste Metadata submenu, and its dialog says how many fields change across how many photos. A message then says how many photos changed. The filmstrip's tile menu has the same commands.
- Blank fields never delete. A field that is empty in the copy leaves the photo's own value alone.
- Keywords never travel, and neither do Copyright status and the AI & Data Mining choices. Ratings, flags and labels stay too.
- A location a photo has stays. A photo that already has GPS coordinates, such as from its camera, keeps them, and Radiant Raw says The location was skipped where a photo already has one.
Typing you haven't saved in Metadata is saved before a copy or a paste. A paste saves where Save saves, as the note above says. For a photo from a Lightroom Classic catalog, the change goes to the catalog.
The paste commands are grayed out until you copy. If a photo has nothing to copy (keywords don't count), Radiant Raw says This photo has no metadata to copy. If a photo already has everything you copied, it says This photo already has everything on the clipboard.