
Checking focus
Radiant Flow has three ways to check focus before you keep a photo. The Magnifier magnifies part of the photo, Focus Points draws the camera's autofocus boxes, and Focus Peaking marks the edges that are sharp.
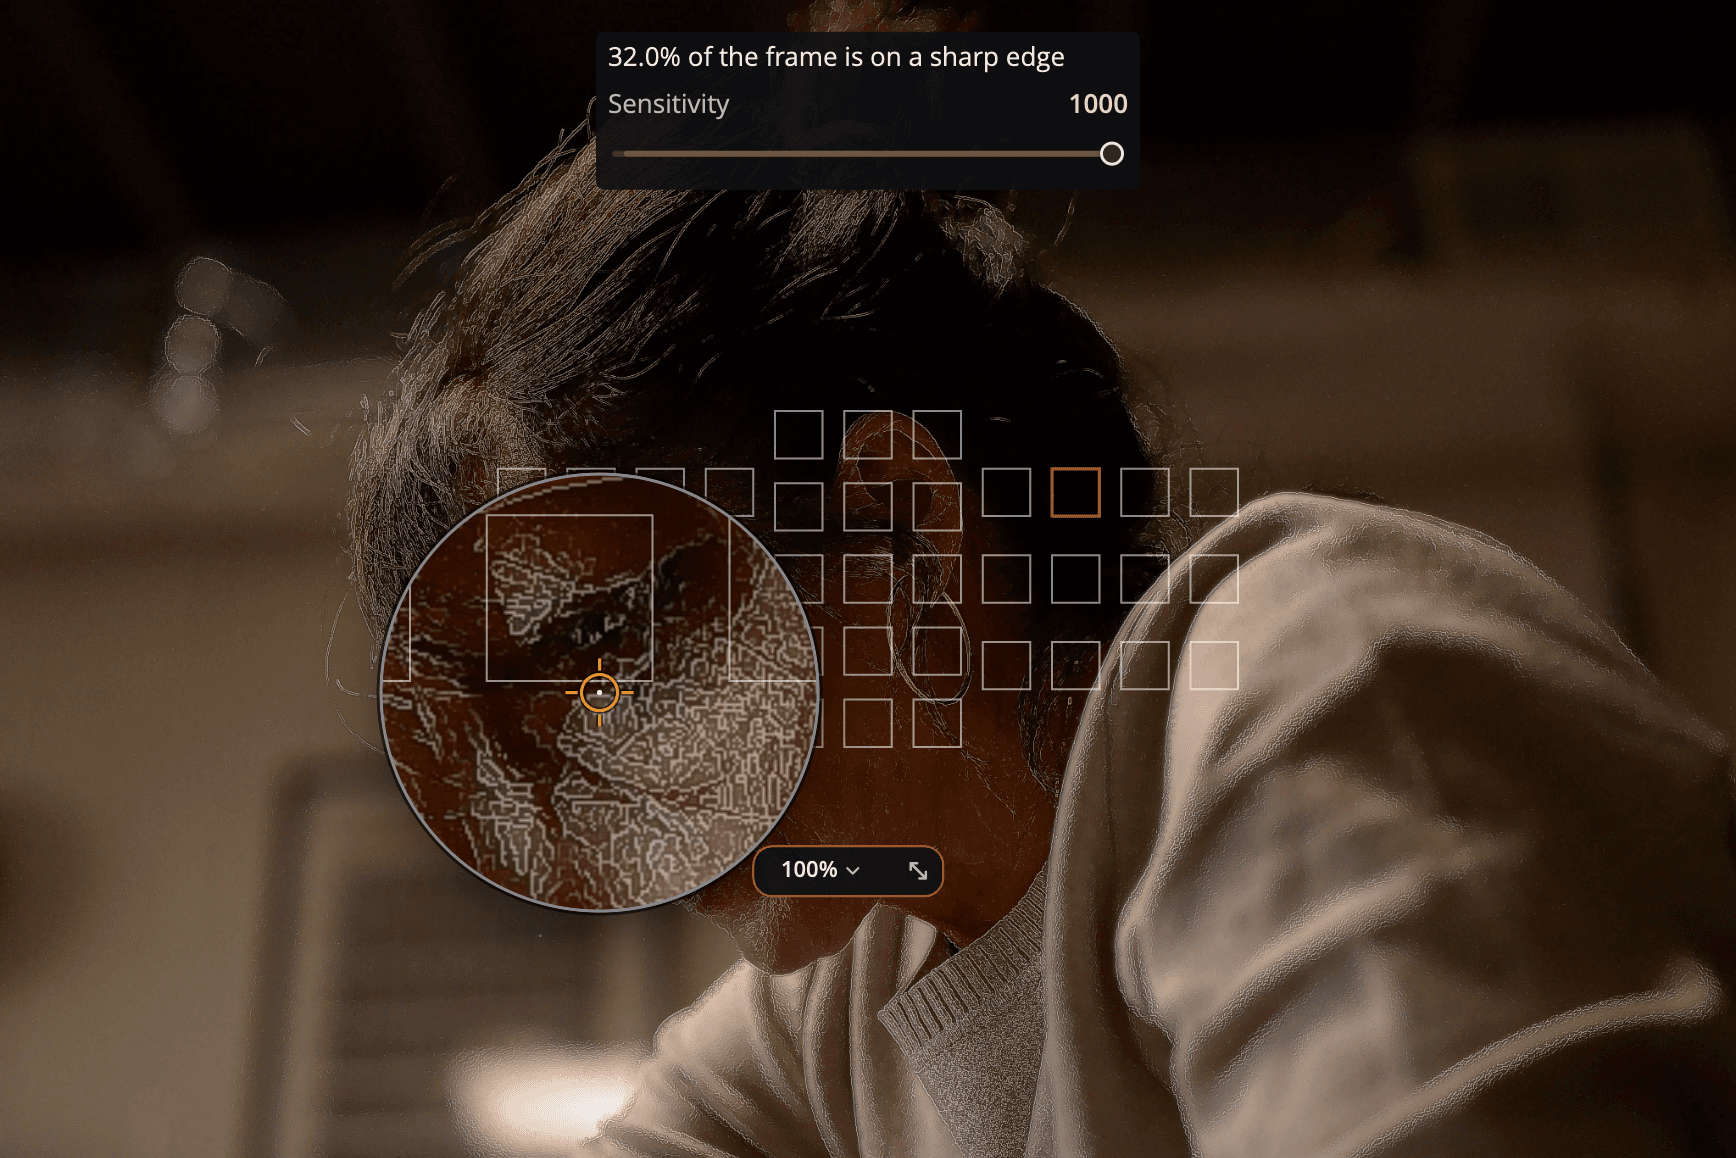
| # | Control | What it does |
|---|---|---|
| 1 | Magnifier | Magnifies the part of the photo under it. Drag it to aim. |
| 2 | Magnification | The Magnifier's zoom. Click it for the magnification and lens settings. |
| 3 | Resize handle | Drag to make the glass bigger or smaller. The magnification stays the same. |
| 4 | AF box | Where the camera focused, with View > Focus Points on. |
| 5 | Peaking | Contours over the sharp edges, with View > Focus Peaking on. |
| 6 | Peaking plate | How much of the frame is sharp, and the Sensitivity slider. |
The Magnifier
The Magnifier is the same magnifier as in Radiant Photo. Press ` (the key left of 1, ^ on a German keyboard), or choose View > Magnifier. On a Mac, the menu shows that key as your keyboard types it. The Magnifier works on:
- Single Photo, over the photo.
- Quick Look with one photo.
- The grid in the Fluid, Grid and Square styles. The glass opens on the photo under the pointer, or on the current photo.
In the List and Columns styles, a Survey and Compare, View > Magnifier is grayed out. A Survey has its own
linked magnifier. See Quick Look and Survey. In Compare, the ` key still puts the Magnifier on the
photo under the pointer. See The Magnifier in Compare.
Keys while the Magnifier is out
| Key | What it does |
|---|---|
| Arrow keys | Change the photo. The Magnifier stays where it is. On the grid it moves to the next photo. |
| ⌥ with an arrow key (Alt on Windows) | Moves the aim one pixel. |
| ⇧⌥ with an arrow key (Shift+Alt on Windows) | Moves the aim ten pixels. |
| ⌥] / ⌥[ (Alt+] / Alt+[ on Windows) | Makes the glass bigger / smaller. |
| ⌥= / ⌥− (Alt+= / Alt+− on Windows) | Steps the magnification up / down. |
| ⏎ | Opens the Magnifier's menu. |
| ⇧E (Shift+E on Windows) | Snap Aim to Eye on the Stage, in Quick Look and in Compare: aims at the nearest eye, then at the next one on each press. See Go eye to eye. |
Esc or ` | Puts the Magnifier away. |
On Windows, Alt with ←, → or ↑ aims the Magnifier while it is out, instead of going back, forward or up a folder.
The Magnifier grows out of the point you aim at, and folds back into it. See Zoom, flights and swipes.
Magnifier settings
| Setting | Range (default) | What it does |
|---|---|---|
| Magnification | 50%, 100%, 200%, 400%, 800% (100%) | 100% shows one photo pixel per screen pixel, so the glass can look smaller than the photo around it. |
| Size | 160 to 400 px (220 px) | The size of the glass. Drag the resize handle. |
| Focus on Cursor | Off | The glass stays put and shows the spot under the pointer. |
| Pixel Grid | On | Draws a grid between the pixels. It shows at 400% and above. |
| Offset Lens | Off | Moves the glass beside the point you aim at, so it never covers it. |
| Color Values | Off | Shows the color values of the pixel you aim at. |
| Hide Magnifier | Puts the Magnifier away. |
Click the magnification readout to change these. Radiant Flow remembers the magnification, the size, Pixel Grid, Offset Lens and Color Values between sessions. Focus on Cursor and the Magnifier itself start off each time you open Radiant Flow.
Focus Points
Choose View > Focus Points (⌥J, Alt+J on Windows) to see where the camera focused. Flow reads the autofocus boxes from the original file and draws them on Single Photo, in Quick Look with one photo, on both Compare frames, inside the Magnifier and inside a Survey's magnifier. At 100% and above, a box also carries a small chip naming what the camera tracked: Face, Eye, Subject or Subject detail.
When the photo's PRISM Photo Score record has found the eyes, a ring on the nearer eye shows whether the camera focused there. See Go eye to eye.
Focus Points is off each time you open Radiant Flow. When a photo has no boxes, Flow says why:
- "No AF data in this photo"
- "This camera's AF grid is not mapped yet"
- "This photo's AF data could not be read"
- "Open the original RAF file to see focus points — this DNG conversion's AF data is unreliable"
Focus Peaking
Choose View > Focus Peaking (⇧J) to draw contours over the edges that are sharp. Peaking shows on Single Photo, in Quick Look with one photo, on both Compare frames, on every Survey frame, inside the Magnifier and inside a Survey's magnifier. The graphics card draws it from the picture on screen, so it keeps up with every zoom and pan. It draws contours, as Radiant Photo does, until you choose another Style on the Focus page.
While peaking is on, a plate on Single Photo says how much of the frame is on a sharp edge, counted once the photo is still. For example: "3.2% of the frame is on a sharp edge". Its Sensitivity slider is the same setting as the one in Settings and on the Focus page. Higher marks more of the frame as sharp.
Focus Peaking is off each time you open Radiant Flow.
Tip
In a Survey, ⇧L turns on peaking inside the linked magnifier only. View > Focus Peaking turns it on there too.
The Focus page
Click Focus on the rail at the window's right edge to open the Focus page beside the photos. It has the same three sections as the Focus pages in Radiant Photo and Radiant Raw, for the selected photo. Click a section's header to fold or unfold it. All three are open the first time.
- Magnifier: the Magnifier switch, which does the same as View > Magnifier, and a square magnified view of the photo. Choose 50, 100 or 200% above it. Click or drag in the small picture beside the zoom to choose the spot. The view starts on the camera's focus point when the photo has one, else on the middle. While peaking is on, the view shows it too.
- Focus Points: Show focus points, the same switch as View > Focus Points (⌥J), and Box color. A line under them counts the photo's focus points, or says why it has none. When the camera's focus box missed the eye Radiant found, the section also says AF missed the eye. See Go eye to eye.
- Focus Peaking: Show focus peaking, the same switch as ⇧J, and the peaking settings:
| Setting | What it does |
|---|---|
| Style | Contours outline the sharp edges. Fill tints the whole sharp area. |
| Channels | Edges, Detail or Both, the same choice ⌥⌘J (Ctrl+Shift+Q) steps through. |
| Sensitivity | Higher marks more of the frame as sharp. The line under it names the camera. |
| Color | The color of the edges. With Detail the row reads Detail color, and with Both there are two rows, Edges color and Detail color. |
| Opacity | How strongly the marks show, from 10 to 100%. |
While peaking is on, the section shows the photo's sharpness score, for example Sharpness 72 of 100, and how much of the frame is on a sharp edge. The score describes the photo, so the settings never change it.
Flow keeps a Sensitivity for each camera, as Radiant Photo and Radiant Raw do, and the three apps share it. The slider shows the selected photo's camera. Every view peaks at that value, also in Compare and Survey. When a section's settings differ from the defaults, its header shows a Reset button. Resetting Focus Peaking doesn't turn peaking off.
Click ⋮ in the page's head to hide sections or put them in another order, as on the Info page. Turn on Solo Mode there to keep only one section open at a time. Flow remembers the order, the folds, Solo Mode, the style, the colors and the opacity. The channels go back to Edges when you quit.
Clipping warnings and peaking channels
Press J, or choose View > Clipping Warnings, to show blown highlights in red and crushed shadows in blue, wherever peaking shows. Press ⌥⌘J (Ctrl+Shift+Q on Windows), or choose Cycle Focus Mask Channels, to step peaking through Edges, Detail, Both and off. See Focus peaking and clipping warnings.
Focus settings
Their options are in Settings > Appearance.
| Setting | Range (default) | What it does |
|---|---|---|
| Focus Points > Box color | Red, Yellow, White, Blue (Red) | The color of the autofocus boxes. |
| Focus Peaking > Sensitivity | 0 to 1000 (550) | Higher marks more of the frame as sharp. It is set for the selected photo's camera, which the line under it names. |
| Focus Peaking > Focus mask color | Red, Yellow, Green, Cyan, Magenta, White (White) | The color of the contours. |
| Focus Peaking > Focus mask opacity | 0 to 100 (40) | How strongly the contours show. |
| Clipping Warnings > Show clipped highlights as stripes | On or off (off) | Draws clipped highlights as stripes, which read without color. |