
Quick Look and Survey
Quick Look shows the photos you selected at full size, over the grid, without leaving the folder. Press Space. With one photo selected it fills the window. With several it lays them out side by side as a Survey.
Open and close Quick Look
- Select one or more photos.
- Press Space, or choose File > Quick Look.
- Press Space or Esc to close. With one photo, a click beside the photo closes it too.
Quick Look is a preview, not a mode. The sidebar and the bottom bar stay on screen, and nothing opens in another app until you press ⏎.
Look at one photo
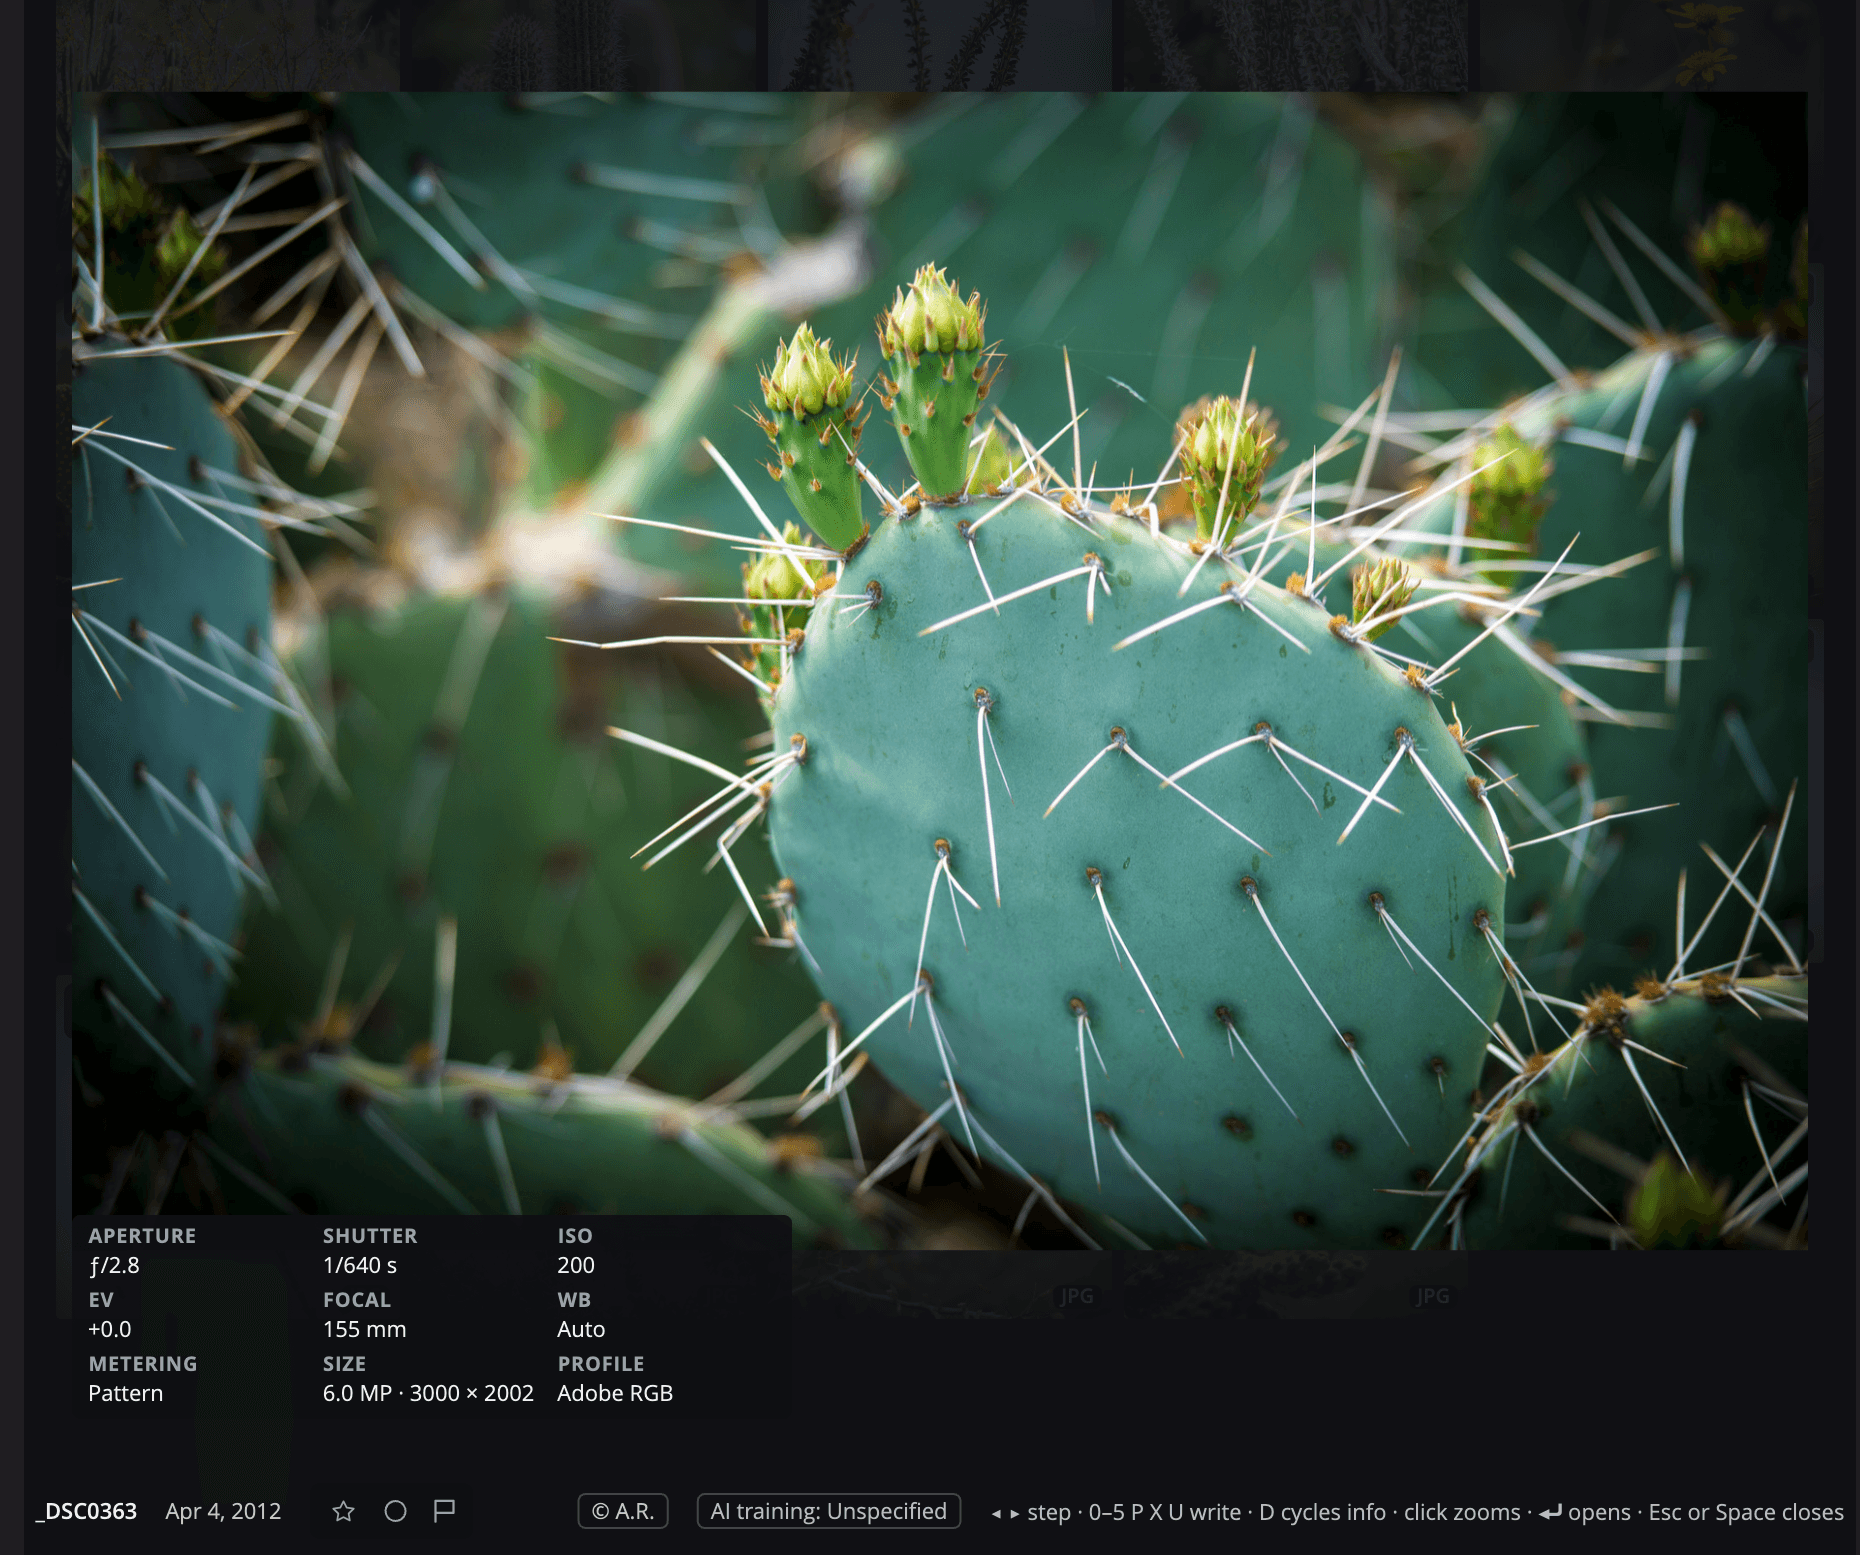
| # | Control | What it does |
|---|---|---|
| 1 | The photo | Click to zoom to 100% at that point. Click again to go back to fit. |
| 2 | Details | The file name, the capture date and the photo's rating, flag and label. |
| 3 | Capture placard | Nine capture facts. Press D to show or hide it. |
| 4 | Rights chips | The copyright notice and the AI training declaration, with Show Rights in Quick Look on. |
| 5 | Key hints | The keys that work here. |
Keys with one photo
| Key | What it does |
|---|---|
| → or ↓ | Next Photo |
| ← or ↑ | Previous Photo |
| D | Cycle Info: more or less information over the photo. |
| 0 to 5, P, X, U, 6 to 9, −, [ and ] | Marks this photo, as in the grid. With one photo selected, ⇧ with a rating, flag or label key also moves to the next photo. |
| Z, ⇧Z, ⌘1, ⌘2, ⌘0, ⌘= and ⌘− | Zoom, as in Single Photo. See Single Photo, Stage and Compare. |
| ⌘→ or ⌘← (Ctrl+→ or Ctrl+← on Windows) | Next or previous photo, at the same zoom and spot. |
\ or ⇧\ | Peeks at the photo before this one, or at the Compare frame. See Peek and Lights Out. |
| ⌥L (Alt+L on Windows) | Lights Out. |
` (the key left of 1) | Shows or hides the Magnifier. See Checking focus. |
| E | Go to Eye: glides to 100% on the first face's eye, then the next face. See Go eye to eye. |
| J | Clipping Warnings. See Focus peaking and clipping warnings. |
| ⏎ | Open in Radiant Photo: opens the photo in the app the Open button uses. |
| G | Switches to Single Photo. |
| K | Opens Compare. |
| Space or Esc | Closes Quick Look. |
You can also zoom with the scroll wheel or a pinch. A zoomed photo uses the whole window. Zoom belongs to one photo: step to the next one and it opens at fit again. To keep the zoom, step with ⌘→ or ⌘← instead. A double-click counts as one click, so it zooms in once. At fit, a two-finger swipe left on a trackpad steps to the next photo, and right to the previous one. See Zoom, flights and swipes.
Cycle Info has three steps, and D moves through them in a circle:
- Details (where Quick Look starts): file name, capture date and marks.
- Details and placard: adds aperture, shutter speed, ISO, exposure compensation, focal length, white balance, metering, size and color profile.
- Nothing: the photo alone.
The step you choose stays as you move between folders. Radiant Flow starts at Details each time you open it.
Photos edited in Radiant Raw
Quick Look with one photo, and each frame of a Survey, show a photo you edited in Radiant Raw with its edits and its Look, as the Stage does. The Radiant Raw mark shows while you see the original instead, for example zoomed in close. See Photos you edited in Radiant Raw.
HDR photos
On a Mac whose screen can show HDR, Quick Look shows an HDR photo in HDR, with its extra brightness. An iPhone HEIC and a JPEG with a gain map are HDR photos. A small mark at the top of the photo reads HDR.
The mark reads HDR · shown as SDR when Quick Look shows the photo's standard picture instead: on Windows, on a screen without HDR, and while clipping warnings, focus peaking or focus points are on the photo. The HDR picture comes up once the photo has finished opening. The frames of a Survey show the standard picture.
Peek and Lights Out
Hold \ (backslash) to see the photo you looked at just before this one, at the same zoom and spot. Hold ⇧\
to see the Compare frame you set with ⇧K. Let go to come back. Tap the key instead and the peek stays until your
next key. Esc ends a peek before it closes Quick Look.
Press ⌥L (Alt+L on Windows), or choose View > Lights Out, to dim everything around the photo. Each press takes one step: dimmed, then out, then lit again. While the lights are out, a click beside the photo brings them back to dimmed instead of closing Quick Look. Lights Out works in a Survey too. See Lights Out.
Survey several photos
With two or more photos selected, Space opens a Survey: the photos side by side on one table. Use it to compare a burst and drop the weaker frames until only the keepers are left.
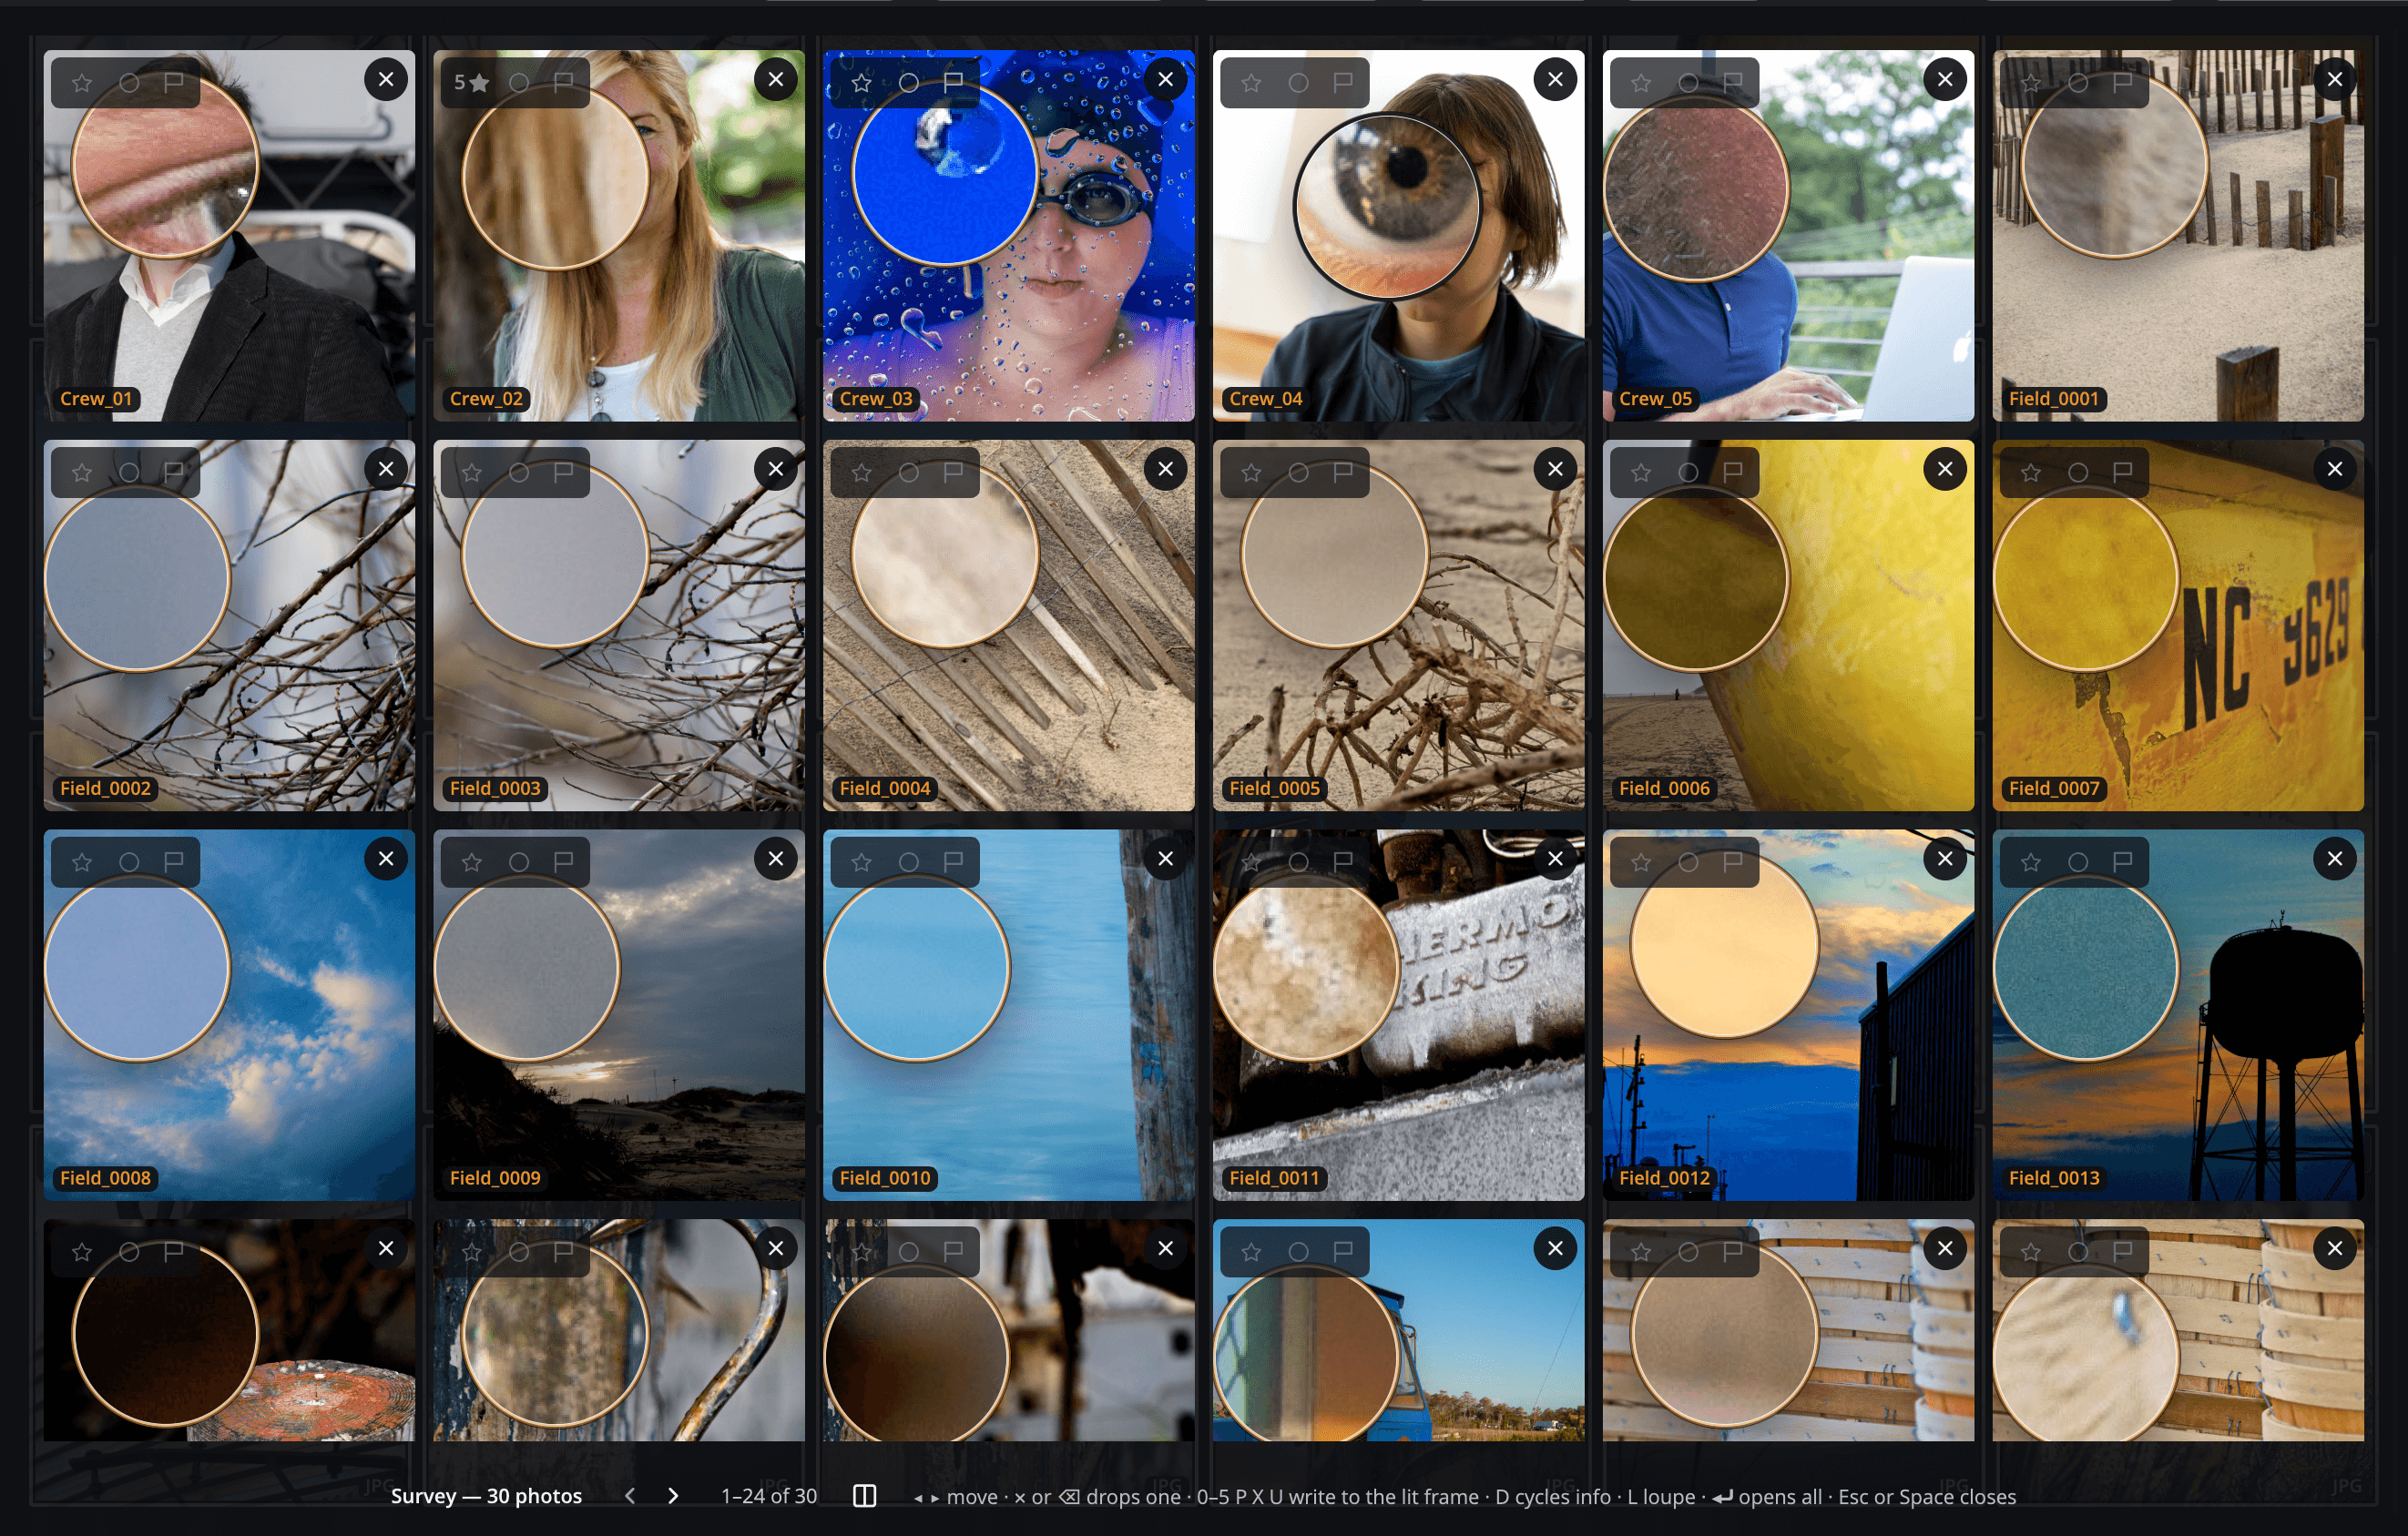
| # | Control | What it does |
|---|---|---|
| 1 | Title | Says how many photos are on the table, for example "Survey — 6 photos". |
| 2 | Lit frame | The frame with the orange ring. The keys act on this frame. |
| 3 | ✕ | Drop from this set: takes that frame off the table. |
| 4 | Linked magnifier | A 100% lens on every frame, all aimed at the same spot. |
| 5 | Unlinked magnifier | A lens you moved with ⌥-drag. Its ring is plain. |
| 6 | Previous frames / Next frames | Pages through more than 24 photos. The range shows where you are, for example "25–48 of 60". |
| 7 | Key hints | The keys that work here. |
Keys in a Survey
| Key | What it does |
|---|---|
| ← → | Light the previous or next frame. |
| ⌫ or ⌦ | Drop from Survey: takes the lit frame off the table. |
| ⇧⌫ (Shift+Backspace on Windows) | Drop Eyes Closed: takes the frames whose main face has its eyes closed off the table. See Survey a burst. |
| 0 to 5, P, X, U, 6 to 9, − | Marks the lit frame only. ⇧ marks it and lights the next frame. |
| ⌘⌥0 (Alt+0 on Windows) | Removes the label from the highlighted frames, or from the lit frame. |
| D | Cycle Info. A Survey frame shows its details or nothing; the placard is for one photo only. |
| L | Magnifier: the linked magnifier. Press L again to fill each frame with its lens, and a third time to turn the lenses off. |
| ⇧L | Focus Peaking inside the magnifier. |
| E | Go to Eye: every lens moves to the eye in its own frame. E again moves them back. |
| J | Clipping Warnings on every frame and inside the lenses. |
| K | Opens Compare, with the lit frame as the frame to beat. |
| ⇧K | Makes the lit frame the Compare frame, and it slides to the first place on the table. ⇧K on it again clears it. |
| R | On a burst's table, Rank Burst by Score: best first, and again back to shooting order. |
| Z, ⌘1, ⌘2, ⌘=, ⌘−, ⌘0 (Ctrl instead of ⌘ on Windows) | With four frames or fewer, zoom every frame together. See Fill the frames and zoom them together. |
| ⌥L (Alt+L on Windows) | Lights Out, as with one photo. |
| ⏎ | Opens the photos still selected, in the app the Open button uses. |
| Space | Closes the Survey. |
| Esc | Brings zoomed frames back to fit, then turns the lenses off, then closes the Survey. |
Click a frame to light it. ⌘-click (Ctrl-click on Windows) and ⇧-click highlight more frames for ⌘⌥0. Each frame also carries its own marks, which you can click.
Dropping a frame also takes it out of your selection, so the photos left on the table are the photos ⏎ opens. Nothing is deleted. More than 1,000 photos ask Open a lot of photos? first.
A dropped frame shrinks away, and the frames left slide over and grow into the room. When you have set a Compare frame with ⇧K, it sits first on the table. See Zoom, flights and swipes.
Note
In a Survey the keys mark only the lit frame. The rows of the Photo menu still act on every photo in the Survey.
A Survey shows up to 1,000 of the selected photos. With more selected, the title says how many it shows, for example "first 1,000 of 4,210 selected".
The linked magnifier
A Survey frame is too small to judge focus, so the Survey has its own magnifier.
- Press L. A lens at 100% appears in the middle of every frame.
- Drag the lens in any frame. Every lens moves to the same spot, for example the left eye in each frame.
- To aim one frame on its own, ⌥-drag (Alt-drag on Windows) inside it. Its ring turns plain.
- To link them all again, drag without ⌥.
Press ⇧L to show focus peaking inside the lenses. The amber ring says a lens is linked. The magnifier and peaking stay as you set them for the next Survey, but are off again the next time you open Radiant Flow. Esc turns the lenses off before it closes a Survey, so close with Space to keep them.
To check the eyes in a burst of portraits, press E: every lens moves to the eye in its own frame, and the lenses turn on. Press E again to move them back. See Go eye to eye. With clipping warnings on (J), the lenses show them too.
The Survey magnifier also shows the camera's focus points when View > Focus Points is on. See Checking focus.
Fill the frames and zoom them together
With the lenses on, press L again. Each lens grows to fill its whole frame, showing that photo at 100% around the spot you aimed at. Press L a third time to turn the lenses off.
- Filling works with eight frames or fewer on the table. With more, the lenses turn off instead and a message says Lenses fill the frames when eight or fewer are on the table. While the lenses fill, the table pages in eights.
- With four frames or fewer on the table, the zoom keys zoom every frame together, each inside its own box: Z (Fit), ⌘1 (100%), ⌘2 (200%), ⌘= and ⌘− (Zoom In and Zoom Out) and ⌘0 (Toggle Zoom (Fit / 100%)). On Windows, use Ctrl instead of ⌘. A trackpad pinch zooms them too. With five frames or more, a message says Zoom works when four or fewer frames are on the table.
- Esc first brings zoomed frames back to fit, then turns the lenses off.
- The key hints end with L again: lenses fill the frames.
Survey a burst
Press ⇧Space (Shift+Space on Windows) on the grid, on the Stage or in Quick Look with one photo to lay that photo's whole burst on the table, best first when the burst's scores allow it. The title then says, for example, Survey — burst of 8, best first, and each scored frame shows its weakest point. In any Survey, ⇧⌫ (Shift+Backspace on Windows) takes the frames with closed eyes off the table. On a burst's table the key hints read ◂ ▸ move · ✕ or ⌫ drops one · ⇧⌫ drops eyes closed · 0–5 P X U write to the lit frame · L lens, again to fill · E eyes · R ranks · ⏎ opens all · Esc or Space closes (Shift+Backspace on Windows). See Survey a burst.
When a Survey opens on photos that aren't scored yet, Flow asks for them to be scored first, and a line above the caption counts them. See Scoring these first.
Show rights in Quick Look
Choose Edit > Rights > Show Rights in Quick Look to add two chips under a single photo. One shows its copyright notice, or No copyright notice. The other shows its AI training declaration, for example "AI training: Prohibited". The chips only read the photo. To change them, see Copyright cards and AI training.
Note
Some files have no picture Flow can read, such as a PSD saved without a preview. Quick Look then says "No preview for" and the file name.