
The Metadata panel
The Metadata panel shows what the camera recorded about the selected photo, and lets you add your own metadata. It docks on the right side of the window, beside the rail. The rail holds the Histogram toggle and two pages: Info, the panel this page describes, and Focus, which holds Magnifier, Focus Points and Focus Peaking. See The Focus page.
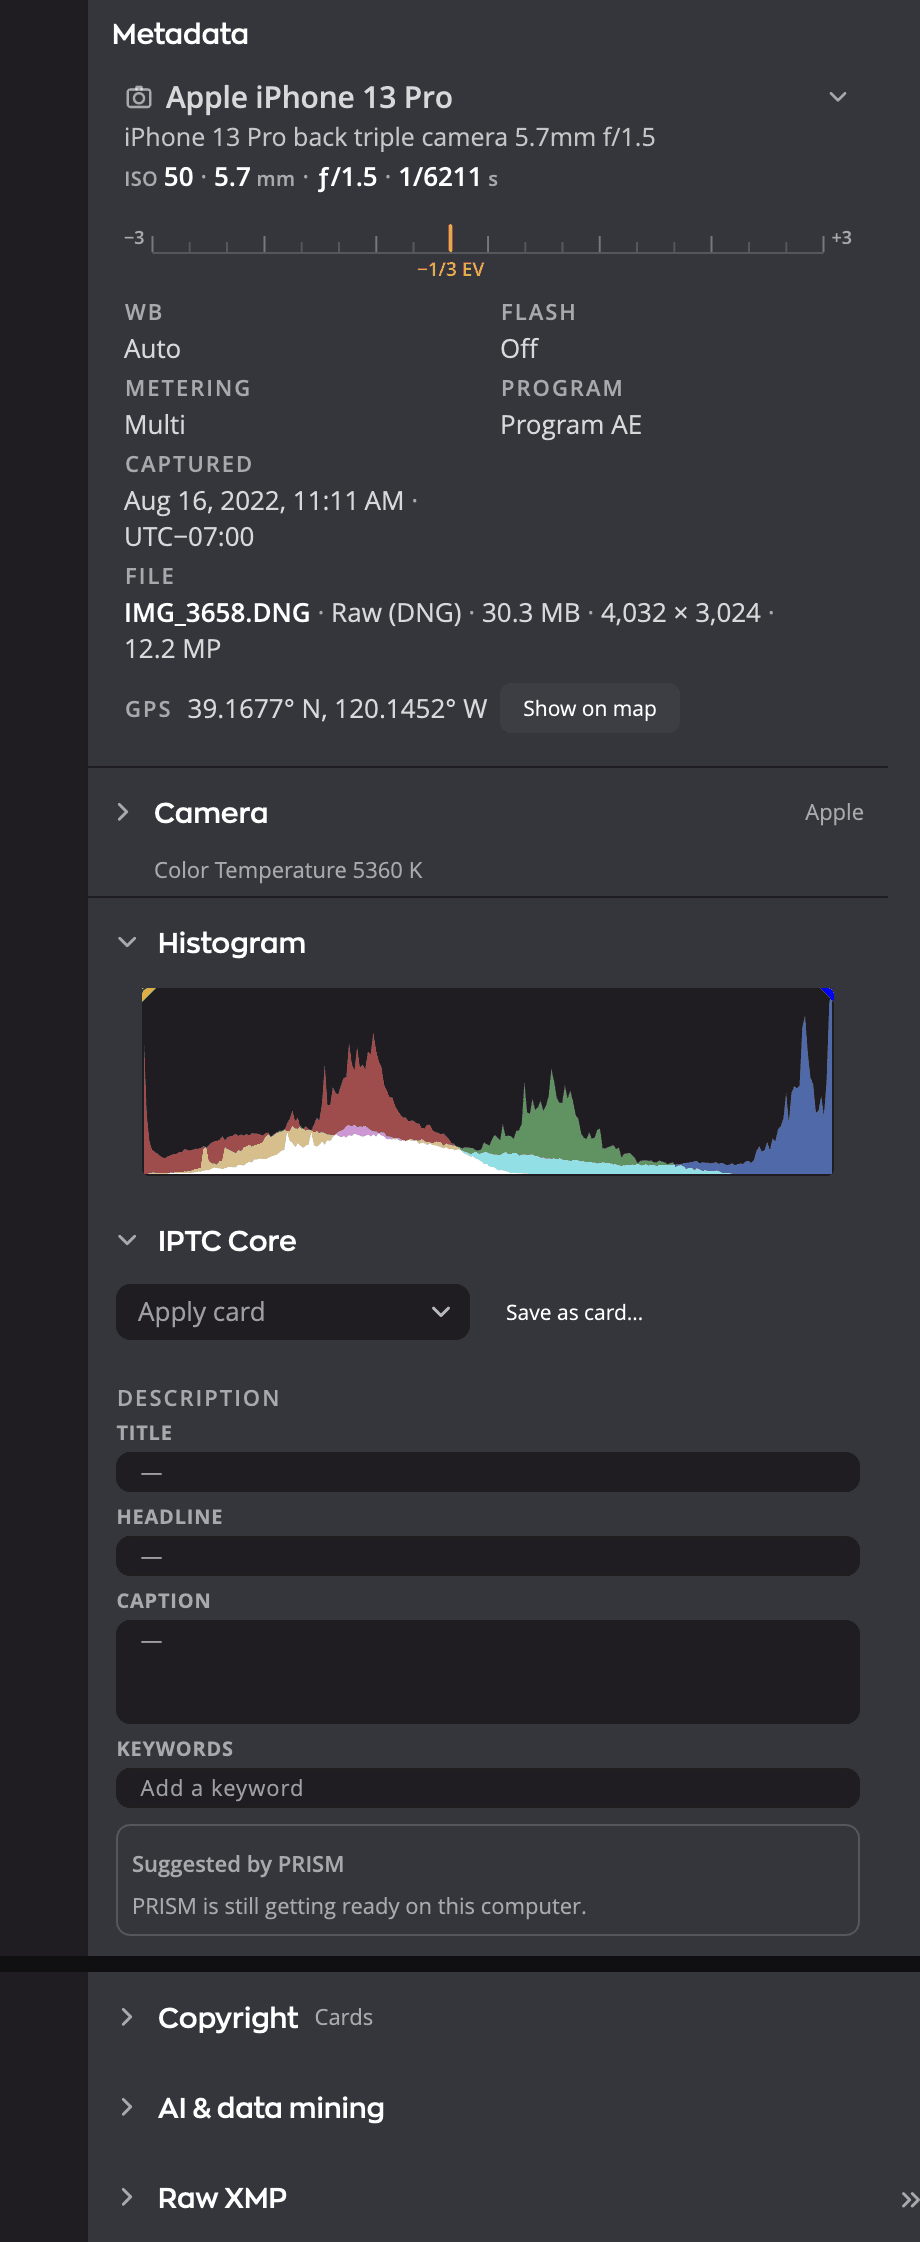
| # | Control | What it does |
|---|---|---|
| 1 | Rail | The Histogram toggle, then the Info and Focus pages. Click a page to open it, and the lit one again to hide the panel. |
| 2 | Divider | Drag to change the panel's width. Double-click to reset it. |
| 3 | Header | Reads Info, with the number of photos when you select more than one. The ⋮ at its right opens Customize sections. |
| 4 | Capture card | The camera, lens and exposure, with more detail when it's open. Click it to open or close it. |
| 5 | Show on map | Opens the place the photo was taken in a map. |
| 6 | Camera | What the camera recorded in its own maker notes, grouped by subject. |
| 7 | Histogram | The photo's tones, with clipping markers and channel chips, docked above the page while the rail's Histogram toggle is on. |
| 8 | IPTC Core | Title, caption, keywords, creator, rights and location fields you can edit. |
| 9 | Suggested by PRISM | Keywords and a caption PRISM suggests for this photo. |
| 10 | Copyright | Your copyright cards, ready to apply. |
| 11 | AI & Data Mining | Whether the photo may be used to train AI. |
| 12 | Raw XMP | The metadata exactly as the file stores it, read-only. |
Open and size the panel
Choose View > Metadata (⌘I, Ctrl+I on Windows), or click Info on the rail. All three do the same thing, and the View menu's check mark shows whether the panel is open. The panel is open the first time you start Flow.
Drag the divider on the panel's left edge to change its width. The panel opens at a quarter of the window. You can drag it out to about a third of the window, or in to a minimum that keeps every field label readable. Double-click the divider to put the panel back to a quarter of the window.
Flow remembers whether the panel is open and how wide it is. View > Hide Panels (⌥⇥, Ctrl+Tab on Windows) puts the panel and the Filter Row away together. See Touring the window.
What the panel shows
- No photo selected: the panel says Select a photo to see its metadata.
- One photo: the panel describes that photo. While Flow reads the file, the card reads Reading…. If the file can't be read, it reads Could not read.
- Several photos: the header shows the count, for example 3 selected. The fields show the first photo you selected. Changes you apply in IPTC Core go to all of them.
Click a section header to fold or unfold the section. Most sections read nothing from the file while they're folded. Fold the ones you don't use to keep the panel quick as you move through a shoot.
Choose and order the sections
You can hide the sections you don't use, and put the others in the order you like.
- Click ⋮ at the right of the panel's header, or choose View > Customize Info Panel…. The Customize sections card opens.
- Untick a section to hide it. Tick it to show it again.
- To move a section, drag it by its grip. You can also press ⌥↑ or ⌥↓ (Alt+↑ or Alt+↓ on Windows).
The card lists only the sections the selected photo can show. In the list, the capture card is called Camera summary. Hiding a section deletes nothing. What it holds is still there when you show it again.
Click Reset to put the sections back in the default order and show them all. A message says Sections reset to the default order. Click Undo on it to get your own order back.
You can also right-click a section's header, or the capture card:
- Hide Camera hides that section.
- Move Up and Move Down move it one place among the sections you can see.
- Open All Sections opens every section you can see. Close All Sections closes them, except one with unsaved changes. Each is grayed out when there is nothing to open or close.
- Customize Info Panel… opens the card.
Flow keeps a section on screen in two cases. Its checkbox and its Hide command are grayed out, and they say why:
- It's the last one showing. One section always stays: Last section shown.
- It has unsaved changes. For example, Save or revert IPTC Core first. Click Save or Revert, then hide it.
Flow remembers your choices. The order is the same for every folder, library and catalog you browse. Settings > Metadata has a switch for the Camera section too. See Settings.
Saved layouts: Cull and Caption
The panel keeps two saved layouts. Each one has its own order and its own hidden sections.
- Cull is for picking photos. It starts with the capture card and Camera on top, with every section shown. If you set your own order before, Cull keeps it. Flow shows Cull until you switch.
- Caption is for writing captions, keywords and copyright. It starts with IPTC Core, then the Job's suggested tags while a Job is open, Copyright, AI & Data Mining and the capture card. Sync History follows for a photo in a catalog. Camera and Raw XMP are hidden. See Suggested tags.
To switch, choose View > Switch to Caption Layout (⌥⌘I, Ctrl+Shift+L on Windows). It's the row under Customize Info Panel…. While Caption shows, the row reads Switch to Cull Layout, and the same keys switch back. So the row always names the layout that isn't showing. If the panel is closed, Flow opens it first.
You can also right-click the panel's header: its menu lists Cull Layout and Caption Layout, with a check mark by the one that shows.
Switching never changes your order:
- Each layout keeps its own changes. Hiding or moving a section in one doesn't touch the other.
- The Customize sections card, a section header's menu and the Camera switch in Settings all change the layout that's showing.
- Switching doesn't open or close sections. Each section stays open or closed as you left it.
- A section with unsaved changes stays on screen when you switch. The layout you switch to keeps showing it until you hide it.
- Reset works on the layout that's showing. Cull goes back to the default order with every section shown. Caption goes back to the order above. Undo on the message brings back your own order.
Flow remembers which layout is showing, and the order and hidden sections of each.
Solo Mode
Solo Mode is the first row of the Customize sections card. It's on at first: Opening a section closes the others. For example, with Camera open, open IPTC Core and Camera closes. This keeps the panel short.
- Solo Mode works on every section that opens and closes. The capture card and the Histogram stay as they are.
- Turning it on keeps the topmost open section open and closes the others. Turning it off opens and closes nothing.
- A section that holds typing you haven't saved is never closed by Solo Mode.
- Right-click the panel's header to turn it on or off there. The menu's Solo Mode row has a check mark while it's on.
- Open All Sections turns Solo Mode off first, so the sections stay open. Turn it on again on the card or in the header's menu. Close All Sections leaves Solo Mode as it is.
Flow remembers whether Solo Mode is on.
The capture card
The capture card answers "what took this, and how". It is the first section unless you move it. Its first three lines name the camera body, the lens and the exposure: ISO, focal length, aperture and shutter speed. A scale shows any exposure compensation.
Click those three lines to switch between the full card and a compact one. The full card adds a grid of six facts and four more lines:
| Item | What it shows |
|---|---|
| WB, Flash, Metering | White balance, whether the flash fired, and the metering mode. |
| Program, Focus, Drive | The exposure program, the focus mode and the drive mode. |
| Captured | The capture date and time, with the time zone the camera recorded. |
| File | The file name, format, size in MB and resolution in megapixels. |
| GPS | Where the photo was taken, with Show on map. |
| Look, Radiant Photo version | On a photo Radiant Photo sent back to Lightroom Classic or Capture One: the Look it applied and the version of Radiant Photo that made it. |
A fact the file doesn't carry is left out. Flow remembers which form of the card you chose.
Look and Radiant Photo version appear at the end of the card, below the capture details, only on a file Radiant Photo sent back to Lightroom Classic or Capture One, from the editor, Quick Look or a batch. You can read them but not change them. If Radiant Photo applied no Look, Look shows a dash.
Show on map appears only when the photo carries a GPS position. On a Mac it opens the Maps app. On Windows it opens Google Maps in your web browser.
If the photo's color profile can't be used, a line under the card reads Color profile unreadable, shown as sRGB.
Tip
Quick Look shows a different summary: nine capture facts in a fixed three-by-three block over the photo. See Quick Look and Survey.
Camera
The Camera section sits directly under the capture card. It shows what the camera wrote in its own maker notes, such as focus details, picture settings, lens data, firmware and shutter count. Its header names the camera's maker, and a one-line summary under it shows the main facts even while the section is folded.
- Open, the section groups the fields under Focus, Image, Lens, Body and Other. It leaves out what the capture card already shows.
- Click Show all fields to see every field the camera wrote, in a table you can select and copy. Click Show curated fields to go back.
- Drag the grip at the bottom of the section to make it taller or shorter. Flow remembers the height.
If the file has none, the section says No camera notes in this file. If Flow can't decode the camera's notes, it says Camera notes not recognized.
The section isn't shown for Apple Photos, which doesn't hand over the original file.
More fields with ExifTool
ExifTool is a free tool that knows each camera's private format. When it's installed on your computer, Flow also reads the selected photo with it and adds the fields its own reader doesn't decode:
- Flow's own fields show first and don't change. ExifTool's join them a moment later.
- A camera whose notes Flow doesn't recognize shows the fields ExifTool reads, instead of Camera notes not recognized.
- Show all fields also lists the other fields ExifTool reads in the file.
Flow only reads photos with ExifTool. It never writes to them with it. If ExifTool can't read a photo, the section shows what Flow read on its own.
Without a working ExifTool, No camera notes in this file. and Camera notes not recognized. add a line: More fields may be available with ExifTool. Click Install… beside it. On a Mac with Homebrew, Flow installs ExifTool in one step. On a Mac without it, Flow shows the command to type and a download link. On Windows, it offers the ExifTool installer to download. Settings > Sidecars > Camera MakerNotes shows whether Flow found it. See Settings.
Histogram
Turn on the Histogram toggle at the top of the rail to see the tones of the selected photo. Its clipping markers light up when shadows or highlights clip.
While Single Photo shows the photo, Flow counts the tones from the preview on screen. In the other views, and until that preview is ready, it counts them from the photo's thumbnail, so the histogram is quick even on large raw files.
On a Mac, an HDR photo is counted from its HDR picture instead. An HDR photo is a HEIC or JPEG with a gain map, or a PQ or HLG photo.
The histogram of an HDR photo has two parts, with a line between them at normal white. The left part is the standard range. To the right of the line, a gold area shows the light brighter than normal white.
A dashed line marks each whole stop (+1, +2) in the gold area, and the area ends near the photo's brightest point. An HDR photo with nothing brighter than normal white keeps the ordinary histogram. On Windows, every HDR photo keeps the ordinary histogram.
While the panel is open, the histogram is docked at its top on both pages, and the sections scroll under it. With the panel closed, it floats over Single Photo in the top-right corner; drag it to another corner or by its edge to resize it. Turn the toggle off and Flow stops counting. Flow remembers the toggle, the page and the floating card's place.
Channels, LOG and PRO
Under the plot, the channel chips R, G, B and L show or hide red, green, blue and luminance. R, G and B are on to begin with. The last chip that is on stays on. The LOG pill (Logarithmic histogram scale) lifts small counts in the shadows and highlights so you can see them.
Point at the plot to see which tone range you are on, from Blacks to Whites. Flow doesn't edit photos, so dragging on the plot changes nothing.
Click PRO (Pro histogram) in the header for more:
- The title becomes a menu. Choose Waveform, Parade or Vectorscope instead of the Histogram.
- A line under the chips shows the photo's exposure. While the pointer is on the photo in Single Photo, in the Magnifier or on a Survey frame, it shows the red, green and blue values of the pixel under the pointer instead.
- A stats line shows the Mean brightness and how much of the photo is clipped in the shadows and in the highlights.
- Clip at sets the levels that count as clipped: 0 is pure black and 255 is pure white. The stats line and the clipping warnings (J) both use these levels. See Focus peaking and clipping warnings.
Flow remembers PRO, the chips, LOG, the scope you chose and the Clip at levels.
Scopes on Photo and the Scopes window
For larger scopes, View > Scopes has the same two tools as Radiant Photo and Radiant Raw. They measure the photo as it is. Flow doesn't edit photos, so there is no edit to measure.
| Command | Mac | Windows | What it does |
|---|---|---|---|
| Show Scopes on Photo | ⌃⌘G | Not set | Draws a scope on the photo. |
| Show Scopes Window | ⌃⌘W | Ctrl+Shift+U | Opens the Scopes window. |
| Link with Photo | Marks the pixel under the pointer on every scope. On by default. | ||
| Pin as Reference | Keeps the selected photo's scopes behind the next photo's, so you can match one photo to another. | ||
| Clear Reference | Removes the reference. Quitting Flow removes it too. |
While a scope is showing, its row reads Hide Scopes on Photo or Hide Scopes Window. Pin as Reference is grayed out with no photo selected, and says Select a photo first. Clear Reference is grayed out with nothing pinned, and says No reference is pinned. On Windows, Show Scopes on Photo has no key of its own, because Ctrl+Shift+G is Ungroup in Flow. You can give it one in Settings > Keyboard Shortcuts.
Scopes on Photo shows in Single Photo, on each Compare frame and on each Survey frame that is large enough.
- Choose Band, Full frame or Corner, then set its Opacity and Band height.
- The band and the full frame show the Waveform or the Parade. Choose the Histogram or the Vectorscope in the scope's menu, and it moves to a corner card.
- In the scope's settings, Position puts the band Over the photo or Below the photo. Below the photo works in Single Photo only. On a Compare or Survey frame the band stays over the photo.
- Flow always measures the whole photo, even when you zoom in.
The Scopes window floats over the photos in every view and follows the selected photo. Choose a Layout: One scope, Two, side by side, Two, stacked, One plus two or Two by two. Then pick a scope for each pane. Drag the window's header to move it, and double-click the header to fill the photo area. Drag the grip in its corner to resize it.
In Single Photo and in the Scopes window, the scopes count the same pixels as the histogram. On a Compare or Survey frame, each scope counts that frame's own preview. Flow remembers whether Scopes on Photo and the Scopes window are showing, where they are, their settings and Link with Photo.
IPTC Core
IPTC Core holds the fields you can edit, in four groups: Description, Creator & contact, Rights and Location taken. Type in a field, then click Save to write it, or Revert to throw away your changes. With several photos selected, the button reads Apply to and the number of photos.
The GPS row ends Location taken. For one photo, a line under its coordinates shows the altitude and the direction the camera faced when the photo carries them, and Altitude and direction… sets or clears them. See Altitude and direction.
Press ⌘K (Ctrl+K on Windows) to put the cursor in the Keywords box, and ⌘→ or ⌘← (Ctrl+Right Arrow or Ctrl+Left Arrow) to move to the next or previous photo with the cursor still in the field you're typing in.
With several photos selected, a plus mark on a keyword means only some of them carry it. Click the mark to add it to all of them. See Edit several photos at once.
For every field, multi-photo editing and where Flow writes the metadata, see Editing metadata.
Suggested by PRISM
Under Keywords, a card offers up to eight keywords PRISM suggests for the photo, and one caption while the Caption field is empty.
- Click a suggested keyword to add it to Keywords.
- To add every suggestion at once, click Add all.
- To take the suggested caption, click Use.
Nothing is written until you click Save. Folded, the IPTC Core header shows how many keywords PRISM suggests, for example 5 suggested.
The card needs PRISM Photo Score turned on, and works on one photo at a time. With several photos selected it reads Select one photo to see suggestions. To hide the card for a photo, click Hide suggestions for this photo.
Note
In some languages the suggestions are in English for now. The card says so when they are.
Sync History
For a photo in a Lightroom Classic catalog, Sync History lists each change Flow sent to Lightroom Classic and what became of it. See Sync History. On a Mac, it does the same for a photo in a Capture One catalog or Session. See Capture One catalogs and Sessions.
Copyright
Copyright lists your copyright cards. A card holds your creator and rights fields, ready to apply to the selected photos in one click. The section is open to begin with. See Copyright cards and AI training.
AI & Data Mining
AI & Data Mining holds two fields: AI training, which states whether the photo may be used to train AI, and Other constraints. See Copyright cards and AI training.
Raw XMP
Raw XMP shows the photo's XMP metadata exactly as the file stores it: Read-only — shown exactly as stored. You can select and copy the text, for example to send to support. The section is folded until you open it.
Raw XMP isn't shown for Apple Photos, where reading it would mean exporting the photo first.
Apple Photos
For a photo in Apple Photos, the panel shows only the fields Photos reports, because Photos doesn't hand over the original file. The panel says so under the capture card. The IPTC fields are read-only there. See Browsing your Apple Photos library.