
The Picks Strip
The Picks Strip lists your picks in a row under the grid, so you can see what you have kept while you go on culling. It shows the picks among the photos the grid shows, in the grid's order. To turn it on, choose View > Picks Strip or press ⌃⌘D (Ctrl+Shift+D on Windows).
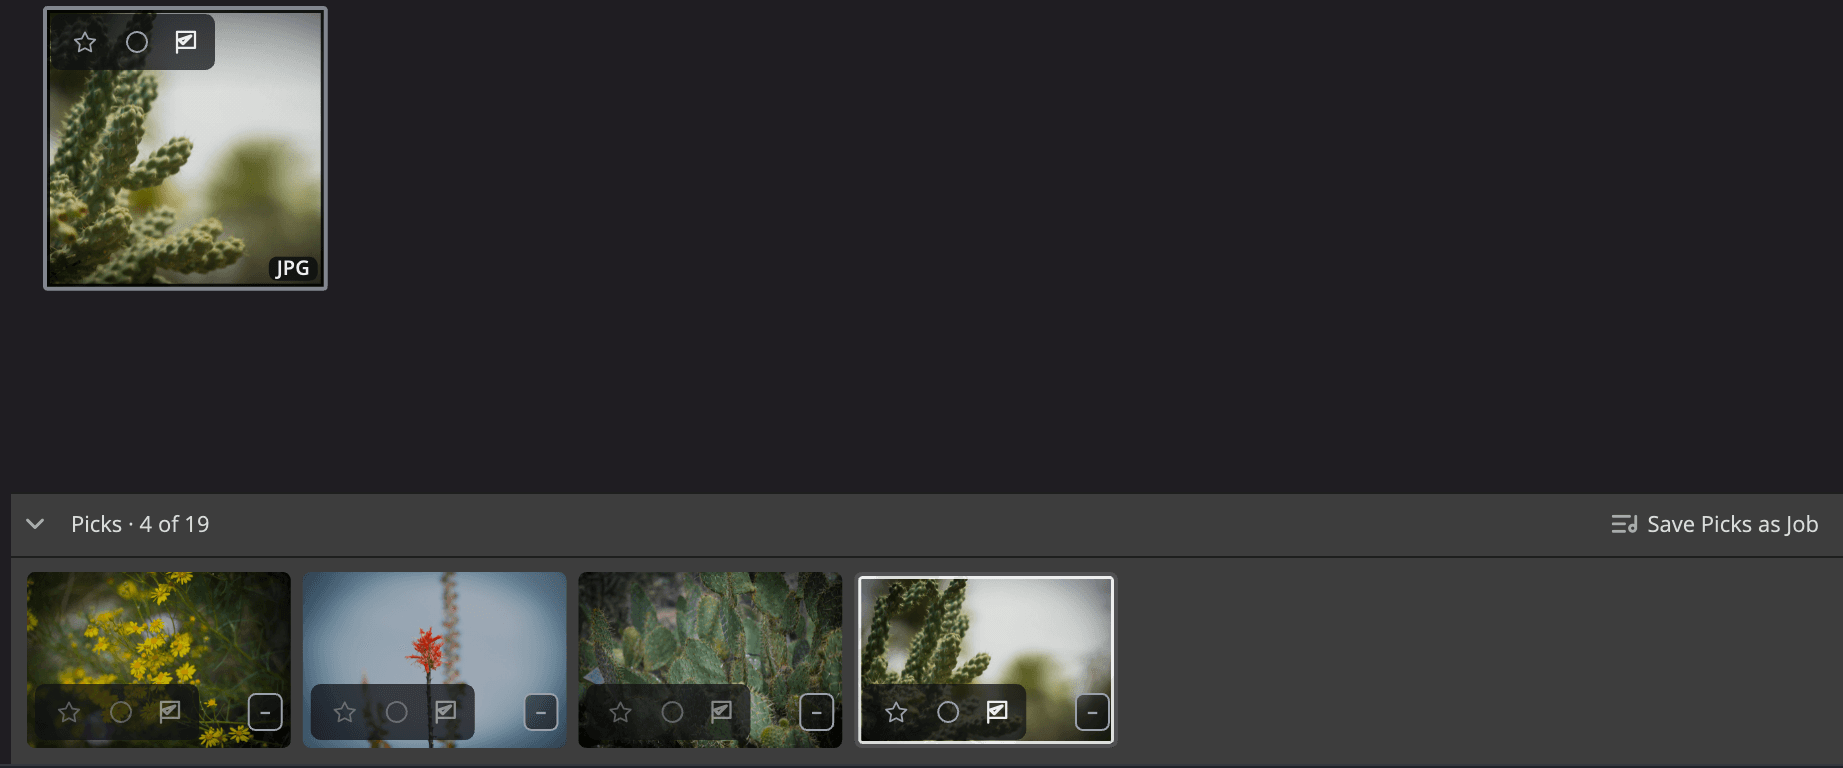
| # | Control | What it does |
|---|---|---|
| 1 | Fold arrow | Folds the strip down to a thin rail. |
| 2 | Receipt | Counts your picks against the photos in the grid, for example Picks · 12 of 340. |
| 3 | Save Picks as Job | Saves every pick in the strip as a new Job. |
| 4 | Frames | One frame per pick. Click one to select it. |
| 5 | Selected frame | The photo selected in the grid is highlighted here too. |
Turn it on
Choose View > Picks Strip, or press ⌃⌘D (Ctrl+Shift+D on Windows). Do the same again to turn it off.
The strip is off until you turn it on, and Flow remembers your choice. It sits at the bottom of the grid, above the bottom bar, and the grid gets shorter to make room. Nothing else moves.
The strip changes only when you tell it to. A new pick, a filter or an empty folder never opens, closes or resizes it.
What it lists
The strip lists the photos you flagged Pick (press P), from the folder and filters the grid shows, in the grid's order. When you pick or unpick a photo, the strip catches up a moment later.
The receipt says what you are looking at:
| Receipt | Meaning |
|---|---|
| Picks · N of M | N picks among the M photos in the grid. |
| No picks yet | Nothing in the grid is flagged Pick. |
| Your filters hide the picks | Your filters leave out picked photos, for example a flag filter set to Rejected. |
The strip shows up to 5,000 picks. The receipt still counts all of them.
Work in the strip
The strip and the grid share one selection. Click a frame and the same photo is selected in the grid.
| Action | What it does |
|---|---|
| Click | Selects that pick. |
| ⌘-click (Ctrl-click on Windows) | Adds the pick to the selection, or takes it out. |
| ⇧-click | Selects the picks between the highlighted one and this one, and no photos in between. |
| ← → | Moves to the previous or next pick. |
| Home / End | Goes to the first or last pick. |
| ⌘A (Ctrl+A on Windows) | Selects every pick in the strip. |
| Right-click (⌃-click on a Mac) | Opens the right-click menu for the selection. A pick outside the selection becomes the selection. |
| Return (Enter on Windows) | Opens the selection in the app the Open button names. |
The usual marking keys work in the strip too: stars, P, X and U, color labels, and Space for Quick Look. Unpick a photo with U and it leaves the strip.
Fold the strip
Click the fold arrow to fold the strip down to a thin rail. Click the rail to open the strip again, scrolled to where you left it.
Hide Panels and Filmstrip hides the strip along with the other panels. Press it again and the strip comes back as it was.
Drag picks out
Drag frames from the strip to another app to copy them there, the way you drag photos from the grid.
To drag every pick at once, fold the strip, then drag the rail. Flow drags up to 1,000 photos at a time and tells you when it leaves some out, for example Dragging the first 1,000 of 1,250 picks.
Save your picks as a Job
Click Save Picks as Job in the strip's header, or choose Photo > Save Picks as Job. Name the Job and click Create. Flow adds every pick in the strip to it, not only the selected ones.
The button is dimmed when the strip has no picks. See Jobs.
Where it isn't offered
View > Picks Strip is gray, and says why, in these places:
- In Single Photo (the Stage style) and in Compare, which have their own filmstrip: This view has its own filmstrip.
- In Apple Photos: Photos in Apple Photos can't be picked here.
- In Aperture libraries and Lightroom Classic catalogs: This catalog can't show a separate list of picks.