
Batch Rename and Organize
Batch Rename gives two or more photos new names from a pattern. Organize files them into a folder structure, such as one folder per year and month. Both work in one panel under the grid, and the grid itself shows every new name before anything changes.
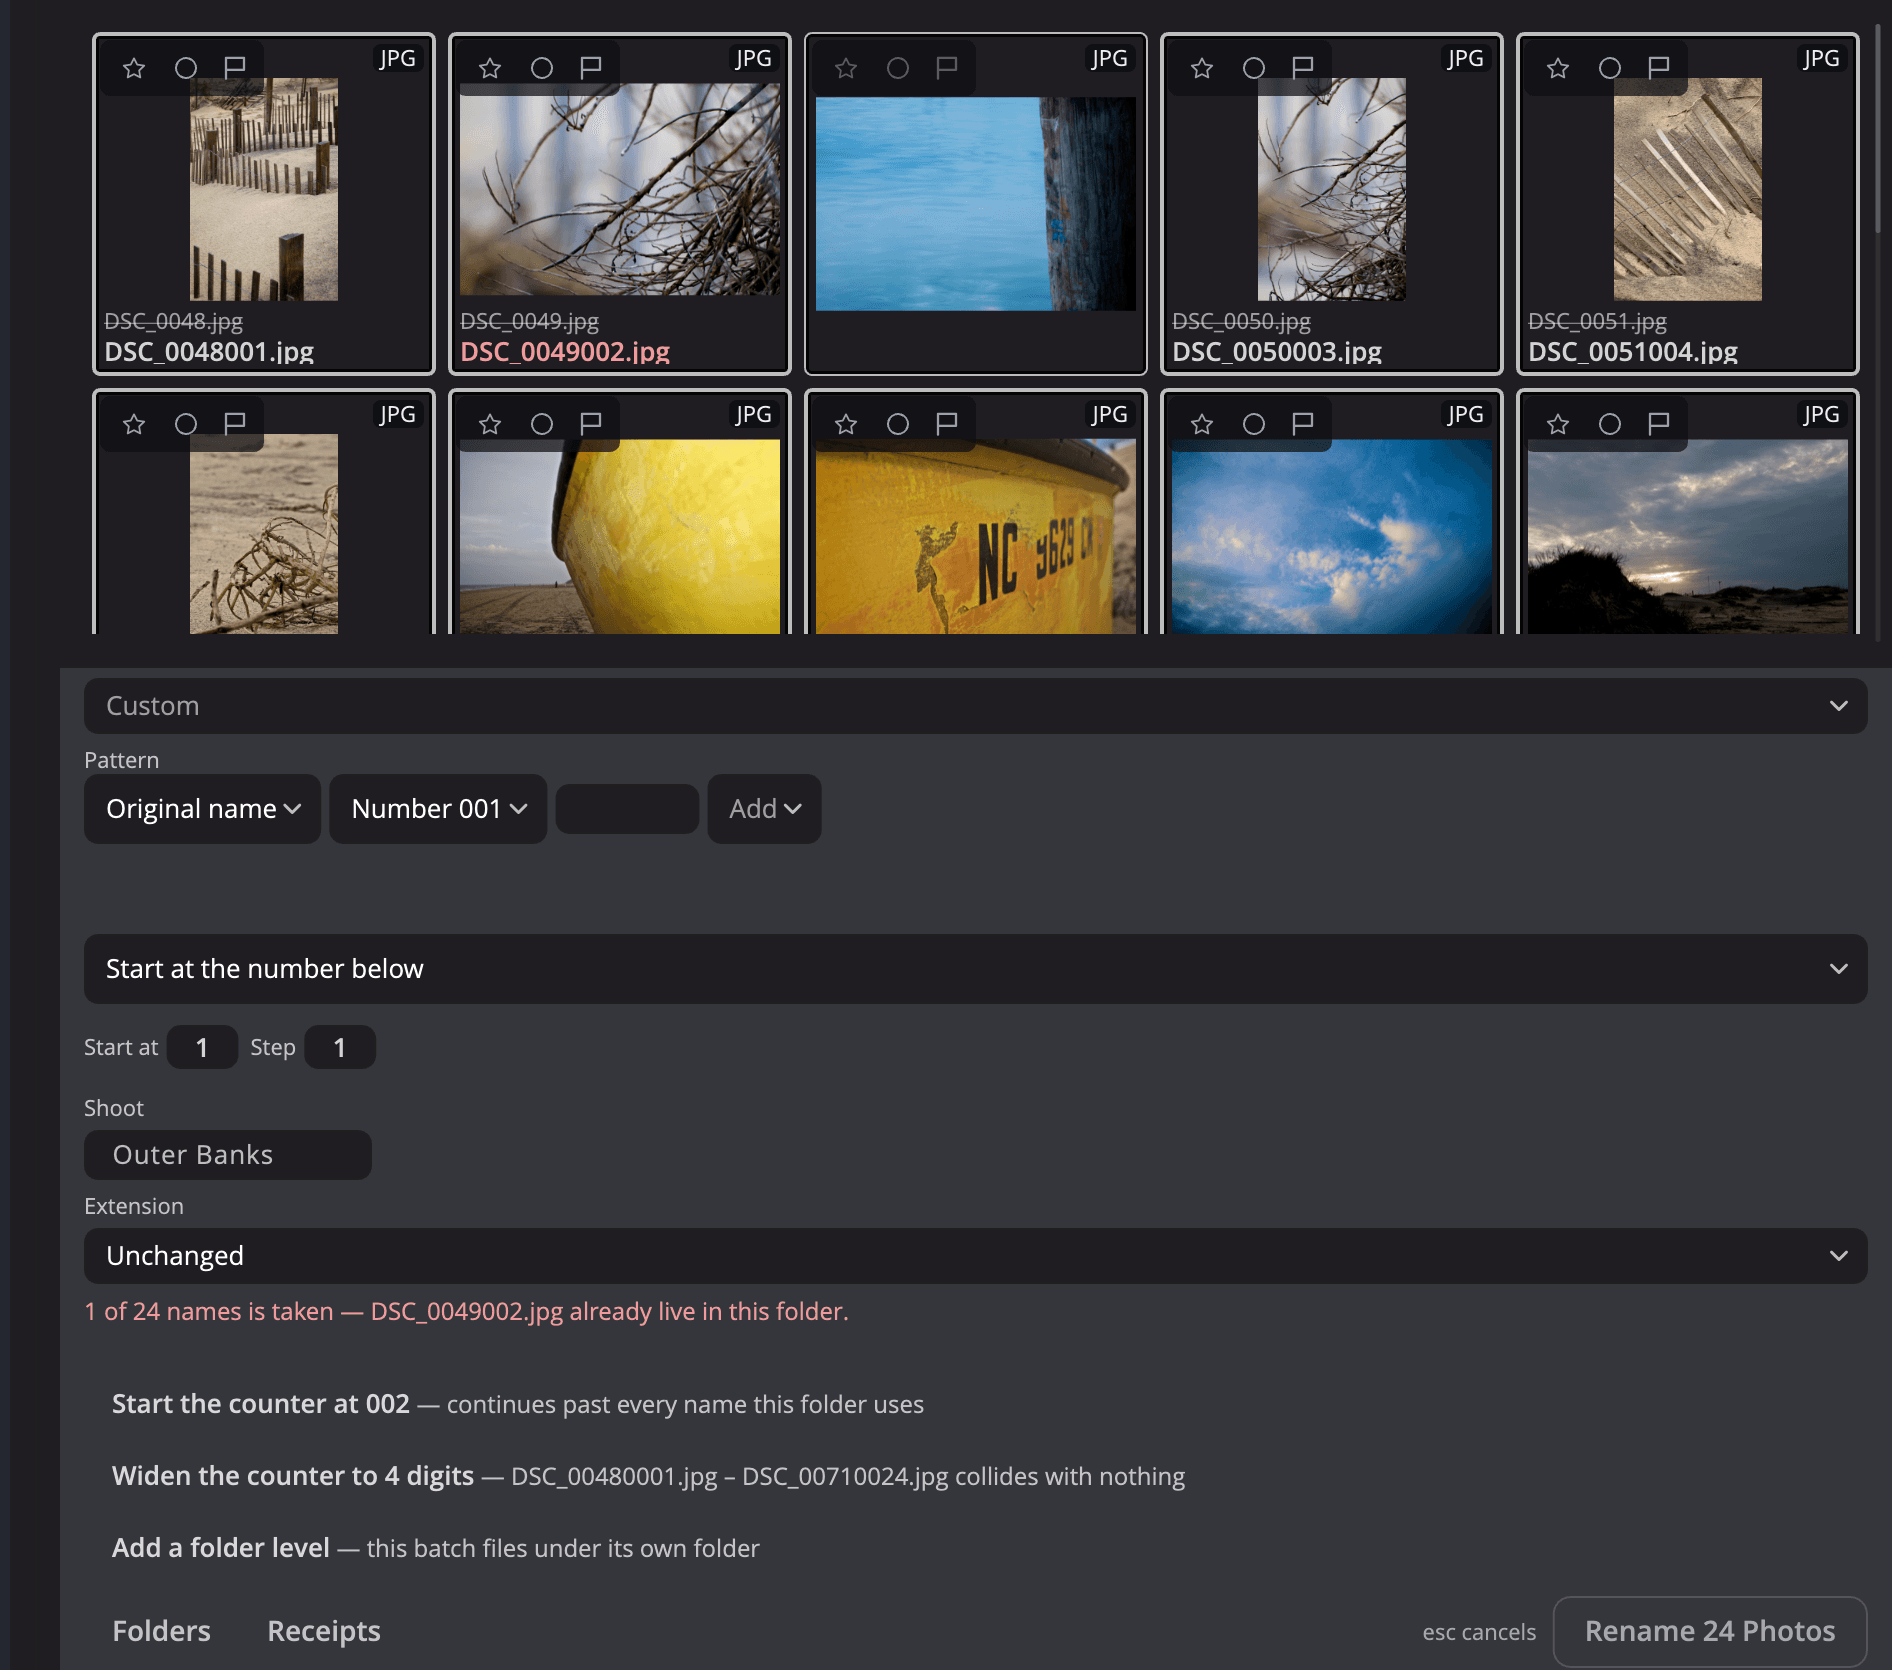
Rename a batch of photos
- Select two or more photos.
- Choose Photo > Batch Rename… or press F2.
- The rename panel opens under the grid. Every caption now shows the photo's current name struck through, with the new name under it.
- Choose a template, or build the name from pills in the Pattern row.
- Read the plan line, then click Rename 24 Photos.
To close the panel without renaming anything, press Esc.
The panel doesn't lock the window. You can scroll, sort and change the selection while it's open, and the plan follows the selection. If fewer than two photos stay selected, the panel closes.
The first time, the pattern is Original name, so a rename changes nothing until you edit it. After that, the panel opens with the pattern, template and extension setting you used last.
| # | Control | What it does |
|---|---|---|
| 1 | Template | Fills in a saved pattern. Reads Custom when the pattern matches no template. |
| 2 | Pattern | The pills that make up each new name. Click a pill to change it. |
| 3 | Numbering | Start at and Step for the counter, and where it starts. |
| 4 | Shoot | The name the Shoot pill prints. It starts as the folder's name. |
| 5 | Extension | Unchanged, lowercase or UPPERCASE. |
| 6 | Plan line | How many photos, the first and last new name, and any conflict. |
| 7 | Fixes | One-click fixes when new names collide with names already in use. |
| 8 | Folders | Shows or hides Organize, the folder part of the panel. |
| 9 | Receipts | Opens the list of past batches, each with a way back. |
| 10 | Rename 24 Photos | Renames the photos. Gray while a conflict remains. |
Build a pattern
Each part of the new name is a pill. Click a pill to open its editor, with a Token column and a Form column. Every choice applies at once, and the captions in the grid update as you go. The editor also has Move left, Move right and Remove.
Click Add to add a pill. The field at the end of the row takes text: type a separator or a word there. You can
also type or paste a whole pattern, such as Iceland_{date}_{n:4}, and it turns into pills.
| Token | Typed as | What it prints |
|---|---|---|
| Original name | {name} | The file's current name, without its extension |
| Number | {n} | A counter. Forms: No padding, or 2 to 6 digits (default 3) |
| Total | {total} | How many photos are in the batch, the same in every name. Total, padded ({total:n}) adds zeros to match the Number pill's width |
| Frame | {frame} | The camera's frame number: the digits at the end of the original name |
| Capture date | {date} | The date as 20260408. Forms: {yyyy}, {yy}, {mm}, {month}, {dd} |
| Capture time | {time} | The time as 143207. Forms: {hh}, {min}, {ss}, {hh12}, {ampm} |
| Camera | {camera} | The camera model. Camera, short ({camera:short}) leaves out the maker |
| Shoot | {shoot} | The text in the Shoot field |
| Job | {job} | The name of the Job you're browsing |
| Job date, Job ref | {jobdate}, {jobref} | That Job's date and reference |
| Text | Fixed text you type |
Minutes print as {min}, because {mm} is the month.
A batch never changes a file's type. Flow always keeps the original extension, and Extension changes only its case. When a part has nothing to print, such as Camera on a photo with no camera name, that part and its separator drop out. The plan line says how many photos that affects.
Number the photos
The counter runs in grid order, so sort the grid first if the order matters.
- Start at sets the first number (default 1).
- Step sets how much each number adds (default 1).
- Start at the number below uses Start at as it is.
- Continue after the last number here reads the folder and carries on after its highest number. The panel says where it starts: "This folder ends at 0284, so the first file becomes 0285."
Check the plan and fix conflicts
The plan line sums up the batch before you commit, for example: "284 photos → 20260408_Iceland_0001.CR3 – 20260408_Iceland_0284.CR3 · no conflicts · originals kept in metadata."
Flow never overwrites a file. The line turns red, and the button grays, when:
- a new name is already used in the folder;
- the pattern gives two photos the same name;
- the pattern would separate a Raw+JPEG pair from its settings.
Names are compared without regard to case. Colliding names show in red in the grid. Under the plan line, Flow offers fixes, best first. Examples are Start the counter at 0285, Widen the counter to 5 digits and Add a folder level. Click one to apply it.
"Originals kept in metadata" means Flow writes each photo's old file name into its .xmp sidecar. If a sidecar
already records an original name, from an import or an earlier batch, that first name stays.
Organize photos into folders
Organize moves photos into a folder structure that it builds from their dates and names.
- Select two or more photos.
- Choose Photo > Organize… or press ⇧F2. In the rename panel, you can also click Folders.
- Check Destination, the folder the structure grows in. It starts as the folder that holds the photos.
- Set the levels under Structure. The first time, they're year, then month.
- Read the tree, then click Rename and File 24 Photos.
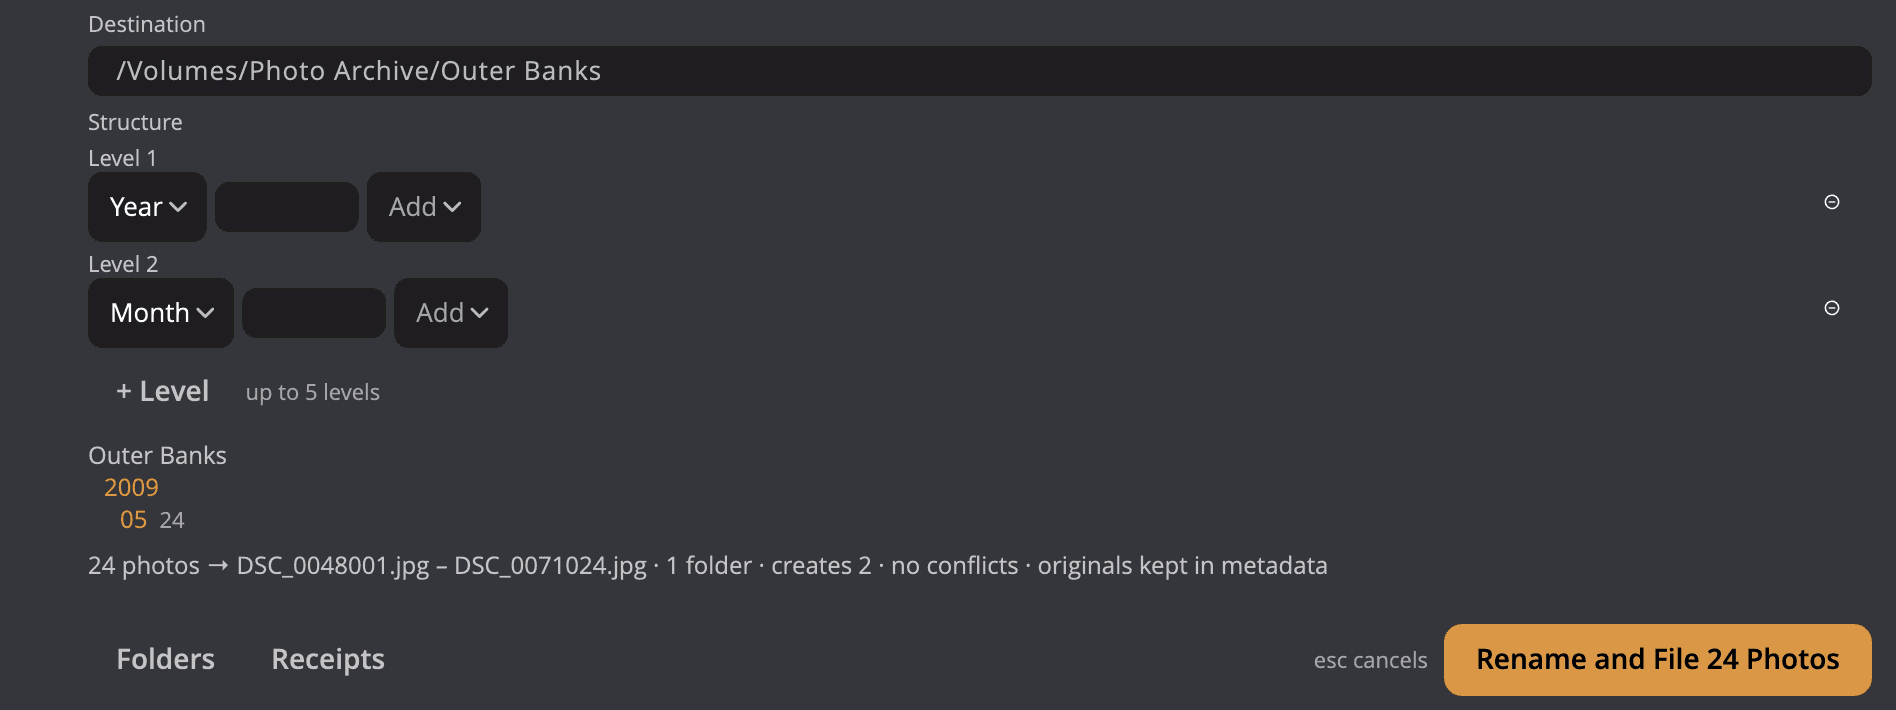
| # | Control | What it does |
|---|---|---|
| 1 | Destination | The folder the structure is built inside. Type a path to change it. |
| 2 | Level 1, Level 2 | One folder level each, built from the same pills as a name. |
| 3 | Remove level | Deletes that level. |
| 4 | + Level | Adds a level, up to 5 levels. |
| 5 | Folder tree | Every folder the pass lands in, with photo counts. New folders are highlighted. |
| 6 | Rename and File 24 Photos | Renames and moves the photos in one pass. |
In a folder level, Capture date prints with dashes, such as 2026-04-08. A Number pill can't be a folder
level, because every photo would get its own folder. Photos with no capture date file one level up, and the panel
says how many.
An Original folders level ({folders}) keeps the folders each photo sits in under the folder you're browsing. With
Include Subfolders on, a photo in Wedding/Reception/Speeches files into Reception/Speeches inside the destination. The
level mixes with others, as in {yyyy}/{folders}.
The level never rebuilds a camera's DCIM folder or the folders inside it. For a photo straight in the folder you're
browsing, or when you browse a Job, it prints nothing and drops out.
The name pattern still applies. To file photos without renaming them, choose the Keep name template.
Templates
Click Template to reuse a pattern in one step.
- Date – Shoot – Counter prints the date, the shoot and a 4-digit counter:
20260408_Iceland_0001. - Keep name keeps each photo's current name.
- Name (1 of 10) prints the shoot, then each photo's number and the total in parentheses:
Iceland (1 of 24). Flow writes the word between the numbers in the app's language. It's set when you pick the pattern, so names you already made keep their word if you change the language later. - Under Structures, Camera files by date makes a year folder with one folder per day inside it.
- Shoots by month makes year, month and shoot folders.
- Shoot with video apart makes a folder for the shoot. Inside it, the photos and the videos go into two folders of their own.
- Keep the source's folders keeps the folders the photos sit in under the folder you're browsing. See Organize photos into folders.
To save your own, choose Save name pattern…. With Folders showing, you can also choose Save structure… or Save both…. Name the template and click Save. Your templates appear under Saved.
When you change a saved template's pattern, its row reads "Studio · modified". The menu then offers Update “Studio” to save the change, Rename “Studio”… and Delete “Studio”. The templates that come with Flow can't be changed.
A template keeps the pattern, the structure and the extension setting. It doesn't keep the destination, the counter start or the shoot name, because those belong to each shoot.
Undo a batch
Right after a batch, the message ("Renamed 284 photos") has an Undo button. Edit > Undo (⌘Z, or Ctrl+Z on Windows) works too, among your last eight changes.
For an older batch, use the receipts:
- Choose Photo > Rename Receipts…, or click Receipts in the rename panel.
- Find the batch. Each receipt shows when it ran and what it did, such as "Organized 24 photos".
- Click Revert.
A revert puts the old names back, and after Organize it moves the photos back to their folders. Receipts are kept on this computer, with no limit, and survive a relaunch. A revert writes its own receipt, so you can revert a revert.
If some photos are already back, the button reads Revert 12. When all of them are, the receipt reads Reverted. A name that something else has taken since is refused, never overwritten.
Stop a long batch
A large batch shows a progress strip, "Renaming photos", with a Stop button. Photos already renamed keep their new names. The message says how far it got: "Stopped after renaming 120 of 284 photos."
When Batch Rename isn't available
- With one photo selected, F2 renames that photo in place. See Working with files.
- Batch Rename and Organize need two or more photos. A closed stack counts as all the photos in it.
- They're off in your Apple Photos library, on a memory card, and in Lightroom Classic catalogs and Aperture libraries.
- In a folder, they ask first when a Lightroom Classic catalog in the sidebar uses some of the photos. See Photos a Lightroom Classic catalog uses.