
Jobs
A Job is a saved list of photos that you gather from any number of folders and drives, like a playlist. The photos stay where they are: a Job only remembers where each one lives. Your Jobs are in the Jobs section of the sidebar.
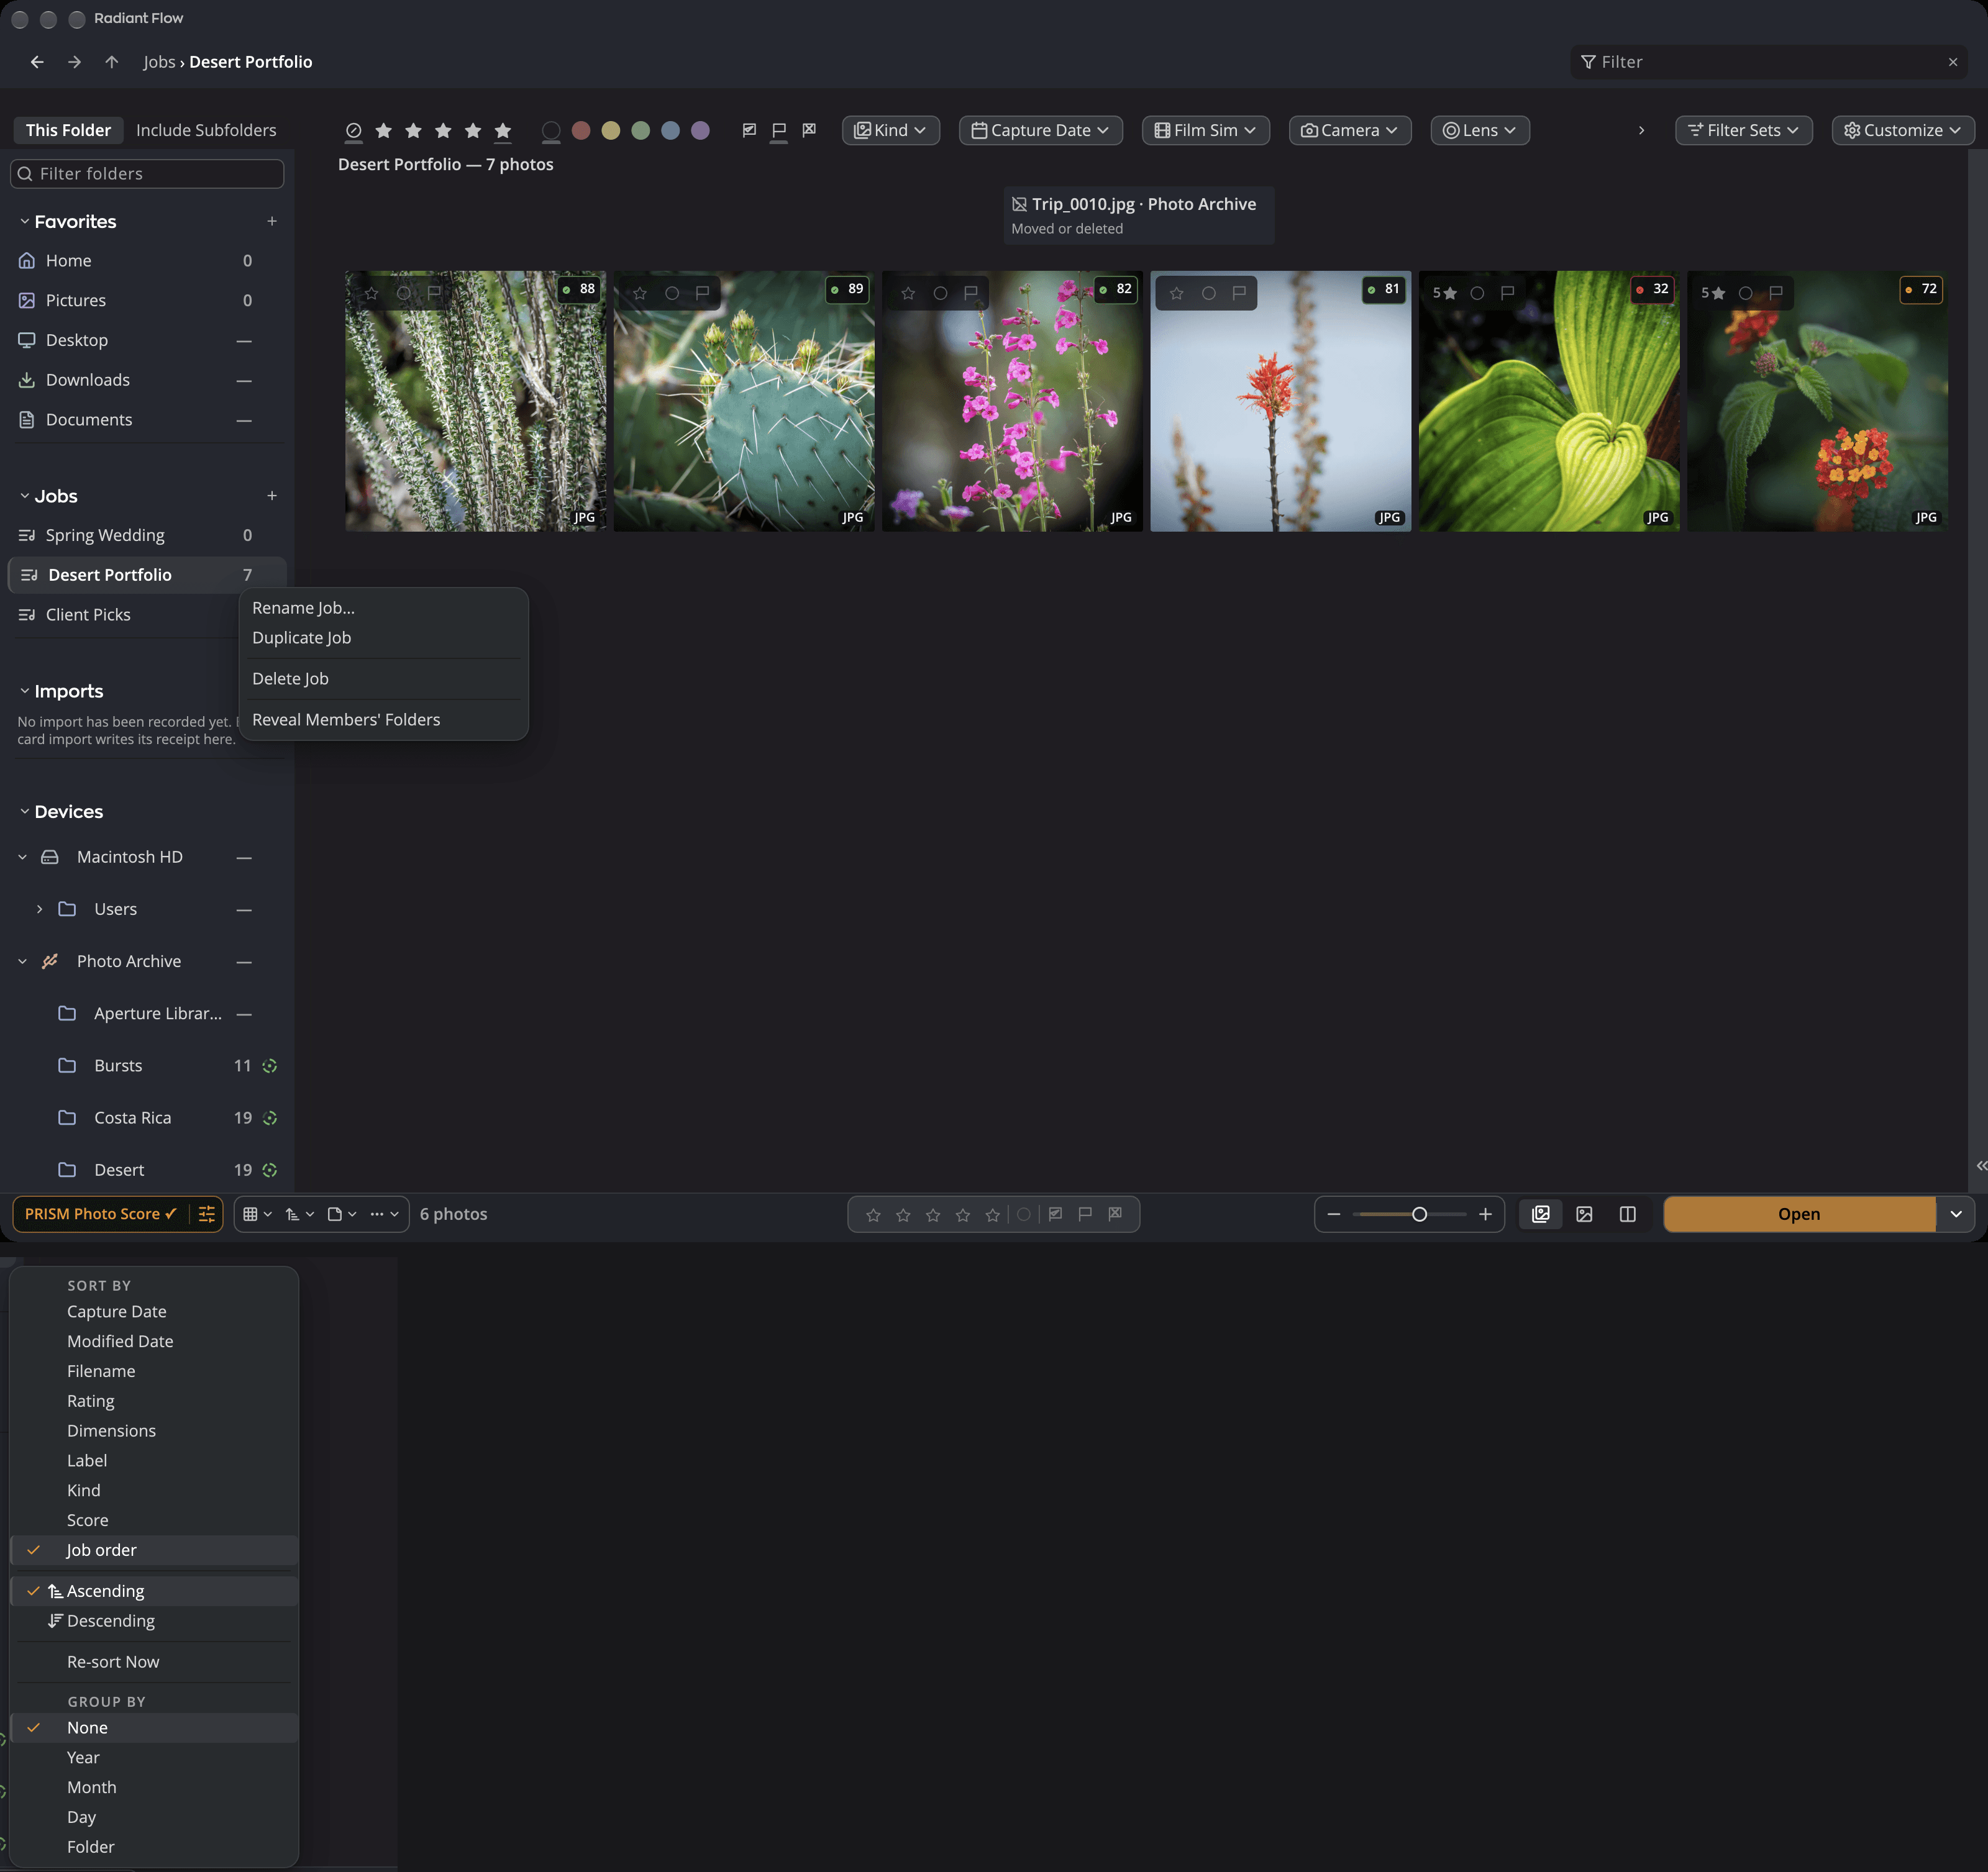
| # | Control | What it does |
|---|---|---|
| 1 | Jobs section | Lists your Jobs with the number of photos in each. Click a Job to open it. |
| 2 | + | Opens New Job… and Import Job…. |
| 3 | ⋯ menu | Everything you can do with the Job: send it, export it, give it a card, and rename, duplicate or delete it. |
| 4 | Title band | Names the open Job and counts its photos, and any that are offline. |
| 5 | Placeholder | Stands in for a photo that isn't where the Job expects it, and says why. |
| 6 | Job order | The Job's own order: the order you added the photos in, or dragged them into. |
Make a Job
- Select the photos you want to start with, or select nothing for an empty Job.
- Choose File > New Job… or press ⇧⌘J (Ctrl+Shift+J on Windows). You can also click + on the Jobs header and choose New Job…, or choose Photo > Add to Job > New Job….
- Type a Name. If you leave it as it is, the Job is called Untitled Job.
- Type a Reference and a Date if you want them. Type the date as YYYY-MM-DD.
- With photos selected, leave Include the N selected photos selected to put them in the Job.
- Click Create.
The reference and date are optional. Batch Rename can put them in file names, with the Job, Job ref and Job date pills. See Batch Rename and Organize.
To show or hide the Jobs section of the sidebar, choose View > Jobs or press ⌘J (Ctrl+J on Windows).
Flow also makes Jobs for you when you rescue an Aperture library with Rebuild the album and project tree on: one for each Aperture project and each album. They come after your own Jobs, under From Aperture, in two groups, Projects and Albums. The From Aperture row counts the photos in these Jobs, and each group counts its Jobs. Click a group's row to fold it or open it again. These Jobs work like any other. See Aperture libraries.
Add photos to a Job
Select photos in any folder, then do one of these:
- Choose Photo > Add to Job, then the Job.
- Drag the photos onto the Job in the sidebar. The Job's row shows Add to Job while you hover.
A message says how many photos went in, for example "Added 12 photos to “Wedding”." Nothing is moved or copied.
- New photos go at the end of the Job.
- A photo that is already in the Job isn't added again. If nothing is new, the message says Nothing new to add to the Job.
- A Job holds up to 100,000 photos.
Photos in Apple Photos, Aperture libraries, Lightroom Classic catalogs and the sidebar's Capture One section can't go in a Job. Flow gathers a Job only from folders on your disks.
Tip
The Picks Strip's Save Picks as Job makes a Job of every pick in one step. See The Picks Strip.
Work in a Job
Click a Job in the sidebar to open it. The grid shows its photos, and everything works as it does in a folder: marks, filters, Quick Look, Batch Rename and Open.
- The sort starts at Job order, the order you added the photos in, unless the window was sorted by another field. View > Sort by offers the other fields too, with Job order at the end of the list. Choosing Capture Date in a Job sorts by Job order.
- In Job order, drag photos to a new place in the grid to change the Job's order. A bar shows where they will land. Press Esc to cancel the drag. This doesn't work while Group By is on. No file moves.
- Group By > Folder groups the photos by the folder each one lives in.
- Columns needs a single folder, so it isn't available in a Job. Click Show as Grid to switch.
When you come back to a Job, Flow puts back the photo you were on, your filters and your grid style.
Remove photos from a Job
- Open the Job and select the photos.
- Choose Photo > Remove from Job, or Remove from Job in the Job's ⋯ menu.
The photos leave the list at once. Flow doesn't ask first, because no file is moved or deleted.
The Job's ⋯ menu
Hold the pointer over a Job in the sidebar and click its ⋯ button. The rows, from the top:
| Command | What it does |
|---|---|
| Open | Opens the Job, as a click on its row does. |
| Select All Members | Opens the Job and selects every photo in it that Flow can find. Placeholders stay unselected. |
| Send Job to | Sends the Job's photos to another app or to a folder. See Send a Job. |
| Send changes to | Sends only the photos that changed since the last send to a place. It appears after the first send. |
| Receipts… | Lists every send of the Job, and the last time the Job card was applied. |
| Export Job… | Saves the Job as a file. See Export a Job. |
| Rename Job… | Changes the name, the reference or the date. |
| Edit Job Card… | Opens the Job card. See The Job card. |
| Apply Job Card… | Opens the sheet that writes the Job card into the Job's photos. |
| Releases and Documents… | Opens the Job's releases and other documents. |
| Suggested Tags… | Offers keywords for groups of the Job's photos. See Suggested tags. |
| Duplicate Job | Makes a copy of the list, named with "copy" at the end. |
| Delete Job | Deletes the list, and the copies of releases and documents Flow keeps for the Job. Your photos stay where they are. |
| Reveal Members' Folders | Opens the folders the Job's photos live in, in the Finder or File Explorer. |
| Remove from Job | Takes the selected photos out of the Job. Only while the Job is open and photos are selected. |
Delete Job doesn't ask first, and Undo doesn't bring the Job or its copied documents back. No photo is touched.
Reveal Members' Folders opens up to eight folders at a time. If the Job spans more, a message says how many were left out.
Send a Job
Send Job to lists the places Flow can reach: Lightroom Classic when Flow lists one of your catalogs, Capture One, Radiant Raw when it is installed and licensed, Radiant Photo, Mylio, a Delivery Folder, and the app you chose under Open In. A place Flow can't reach isn't listed. If Mylio or that app isn't installed, its sheet says so. While a Job is open, File > Send Job to has the same rows.
Each place opens the Send sheet:
- Under Send, choose All members or Picks. With the Job open and photos selected, Selection is there too.
- Read Before sending. It lists photos that are offline or missing, and Raws with no sidecar. Answer each row, for example with Skip or Write now.
- Click the Send button. It counts the photos that will go.
Nothing is written before you click Send, except a sidecar you ask for with Write now. Afterward, the Job's row in the sidebar shows where it went, how many photos went and when.
Receipts… lists every send of the Job, newest first: where it went, what was sent and skipped, and when. The newest receipt for each place has Send changes…, which opens the same sheet for only the photos that changed since.
Receipts… also shows the last time the Job's card was applied, by Apply Job Card… or by an import's Apply the Job's card, for example Job card applied to 7 photos · Oct 30, 2026. After Edit > Undo, it ends with · undone. It is not a send, so it has no Send changes….
For Lightroom Classic, the sheet says what goes with the photos: Sends ratings, flags, color labels, keywords, the Job card's fields, caption and GPS location. The GPS location is the Job card's, when the card includes one. It goes only to photos that have no location in Lightroom Classic. A send never replaces or clears a location. It also skips a photo whose location is private in Lightroom Classic. And it never writes a location that falls inside a Saved Location marked Private.
Send to Radiant Photo
Send Job to > Radiant Photo… opens the Send sheet with two choices:
| Choice | What happens |
|---|---|
| Open now | The default. The photos open in Radiant Photo, as they do with Open. |
| Process with… | Radiant Photo saves a finished copy of every photo, with a Look, a Recipe or its Workflow, in a folder you choose. You don't open the photos one by one. |
To process the Job's photos:
- Under Send, choose which photos go, as for any send.
- Click Process with….
- Under Look or Workflow, choose what Radiant Photo applies. The menu lists Radiant Photo's own Looks, Recipes and Workflow. Flow picks the first Look for you.
- Check the Output folder. It starts as a folder named after the Job, inside Deliveries in your Pictures folder. To use another folder, open the menu and choose Choose Folder….
- Choose a Format: JPEG, TIFF or PNG. For JPEG, set the Quality, from 1 to 100. It starts at 91.
- Click the Send button.
What each choice does to the photos:
- A Look. Each photo keeps the edits it has in Radiant Photo, with the Look on top.
- A Recipe. Every photo gets the Recipe, in place of any edits it has.
- The Workflow. Radiant Photo finds each photo's scene and applies the Workflow's Recipe for it. The menu shows only the Workflow that is chosen in Radiant Photo. To use another one, choose it in Radiant Photo first.
The files are named after the originals, ending in -Radiant. A TIFF is saved at 16 bits per channel. If a file with the same name is already in the folder, Radiant Photo keeps both.
Flow doesn't process anything itself. Send hands Radiant Photo one job, then opens Radiant Photo or brings it to the front. The sheet says Radiant Photo lists the job under Share ▸ Jobs and starts it there. By default, Radiant Photo starts the job as soon as it arrives, after any job already running there. If Start jobs from Radiant Flow on arrival is off in Radiant Photo's settings, the job waits for its Start button. Share ▸ Jobs is in Radiant Photo's editor: if Radiant Photo opens on its Home screen, open a photo to watch the job. The Job's row in the sidebar then reads, for example, Queued in Radiant Photo · 400 of 412 · today 14:02: Flow handed the job to Radiant Photo. The row doesn't say when the job is finished. See Jobs from Radiant Flow in the Radiant Photo manual.
These rows keep the Send button unavailable until you act on them:
| Row | What to do |
|---|---|
| Radiant Photo has not listed its Looks yet. Open Radiant Photo once. | Radiant Photo tells Flow its Looks, Recipes and Workflow while it runs. Open it once, then click Process with… again. |
| “Wedding Warm” is no longer in Radiant Photo. | Radiant Photo no longer offers what you chose: it was removed, or another Workflow was chosen there. Choose another one. |
If the job can't be written, Flow says The job could not be handed to Radiant Photo. Try again. The sheet stays open, so you can click Send again. If Radiant Photo can't be started, Flow says why. The job still waits, and Radiant Photo lists it the next time it opens.
Send changes… on a Process with… receipt opens the sheet on Process with…, with the same output folder. The receipt doesn't remember the Look, Recipe or Workflow, so choose it again.
Export a Job
Export Job… saves the Job as a file, for example to take it to another computer. The file holds references, never
photos: where each photo is, the Job card and the receipts. When the Job card has releases or documents,
select Include the releases and documents to put them in the file too. The file is named after the Job and ends
in .radiant-job.json.
To bring a Job file in, click + on the Jobs header and choose Import Job….
The Job card
A Job card holds the details you want in every photo of the Job: the creator and rights, the event and place, keywords, and templates for the title and caption. Edit Job Card… opens it. Under Start from, begin with one of your saved cards or with no card.
Saving keeps the card with the Job. Nothing is written to any photo until you apply it:
- Choose Apply Job Card… in the ⋯ menu, or click Save and Apply… in the card.
- Under Apply to, choose all the Job's photos, its picks, or the photos you selected.
- Check what the sheet Writes and what it Skipped, for example photos that are offline.
- Click the Apply button. It counts the photos.
If the Job has no card yet, Apply Job Card… opens the card first.
An import can also write the Job's card to the photos it brings in; see Importing from a memory card.
Releases and documents
Releases and Documents… shows the model and property releases and other documents that belong to the Job. Click Add… to attach one to the Job card. Flow keeps a copy in its own Jobs folder and remembers where the original is.
Coverage counts the Job's photos with people in them that carry a model release. PRISM Photo Score finds the people. Link a release… ties photos to a release. As with the rest of the card, nothing is written to a photo until you choose Apply Job Card….
Suggested tags
Suggested Tags… sorts the Job's photos by what PRISM Photo Score saw in them, under Genre, People and Scene. For example, a row can hold every Portrait or every Outdoor photo. Each row shows how many photos it holds and a few samples, and can show them in the grid for you to check first.
- Accept writes the row's word as a keyword to its photos. The row's Undo takes it back off.
- Reject hides the row and writes nothing.
Nothing is written until you click Accept. If PRISM Photo Score hasn't looked at the Job's photos yet, the pane says so and offers Score now.
When a photo isn't there
A Job remembers where each photo was when you added it. If a photo isn't there when you open the Job, a placeholder stands in for it and says why:
| Placeholder | Meaning |
|---|---|
| Offline | The drive the photo is on isn't connected. |
| Waiting for this device | The drive hasn't answered yet, for example because it is waking up. |
| No access to this folder | Flow isn't allowed to read the folder the photo is in. |
| Moved or deleted | The drive is there, but the photo isn't. |
Connect the drive and the photo comes back. Flow checks again when you open the Job, choose File > Rescan (⌘R, Ctrl+R on Windows), connect a drive or come back to the window.
A photo that was moved or renamed doesn't follow along, even when Flow moved it. Select its placeholder and choose Remove from Job, then add the photo again from its new place. Flow never removes a photo from a Job on its own.
The sidebar counts every photo in the Job, offline ones included. The title band adds how many are offline, for example "Wedding — 240 photos · 3 offline". If the Job has a reference or a date, the title band shows them after the name.