
Touring the window
Radiant Flow works in one window. The sidebar lists your places, the middle shows the photos, and the panels around them carry the tools you cull with.
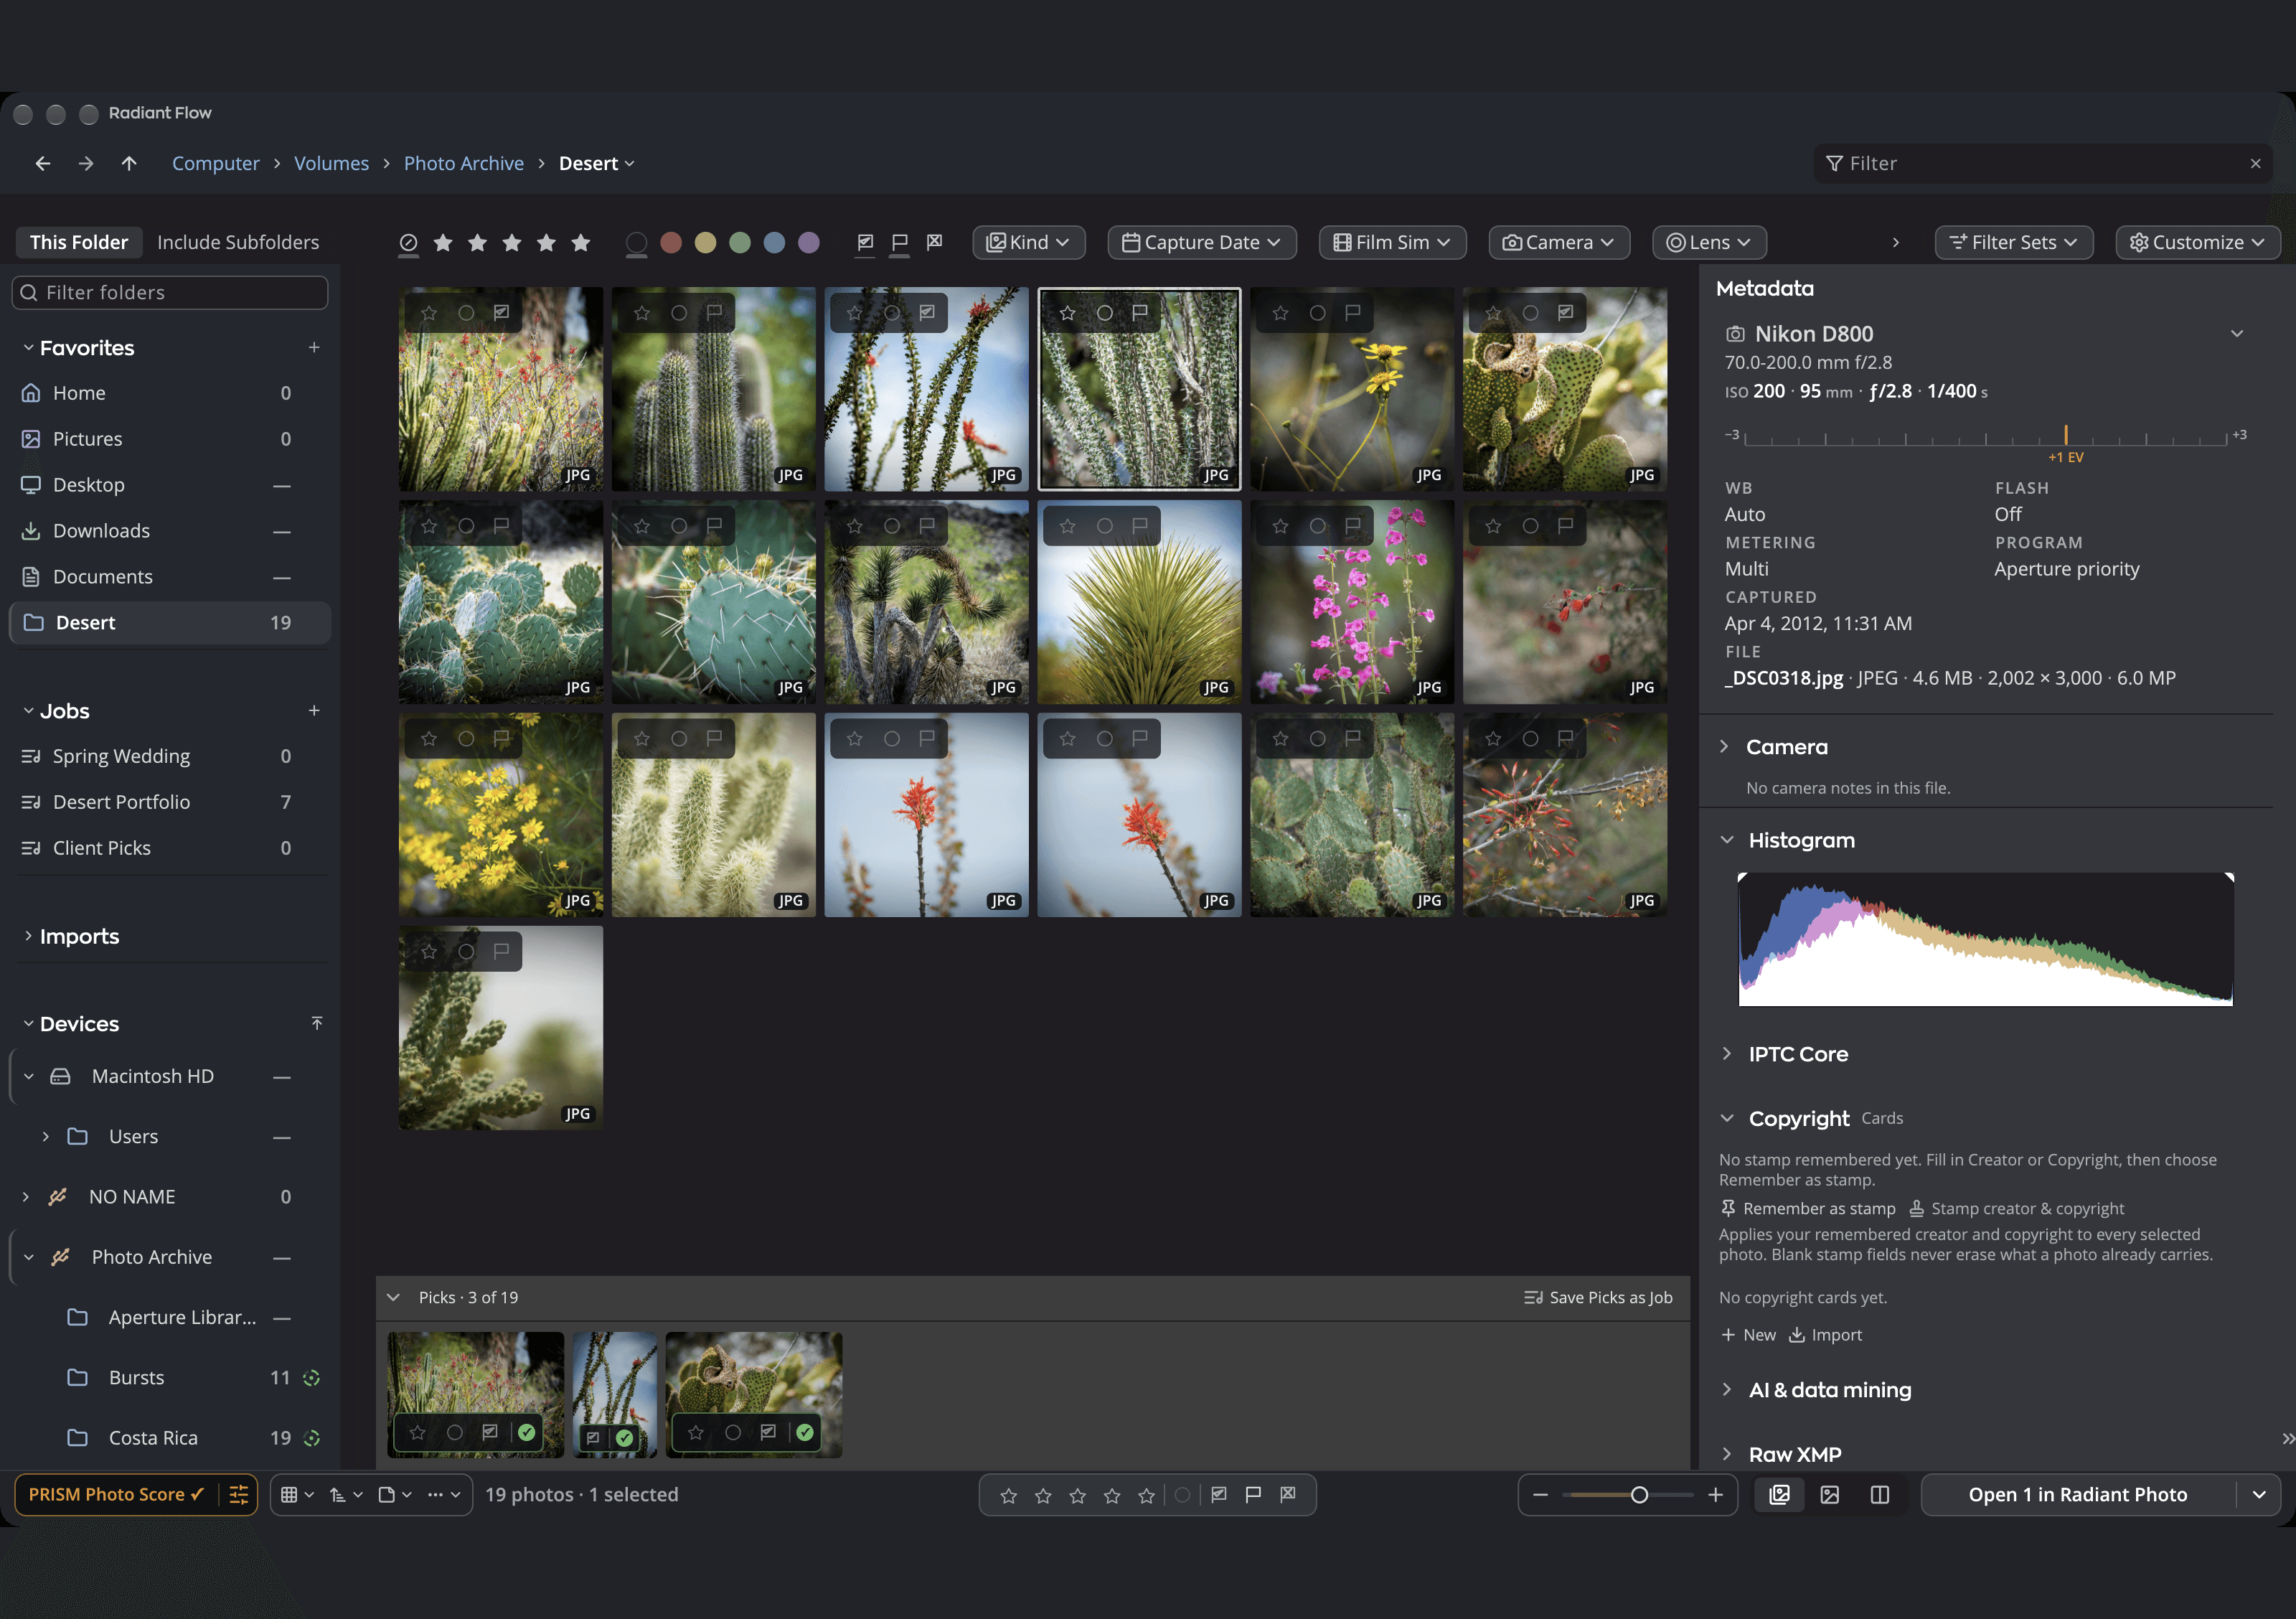
| # | Control | What it does |
|---|---|---|
| 1 | Back and Forward | Retrace the places you've visited. The up arrow beside them is Enclosing Folder. |
| 2 | Breadcrumbs | Where you are. Click a folder name to go there. |
| 3 | Filter box | Type to narrow the photos. Active filters show as chips inside the box. |
| 4 | Sidebar | Your Favorites, drives, cards and libraries. See The sidebar. |
| 5 | Filter Row | Filter by rating, flag, label, file type, date, camera and more. |
| 6 | Photo area | The photos, in the grid style you choose. Drag the scrubber at its right edge to jump through a big folder. |
| 7 | Metadata panel | The selected photo's capture details and editable metadata, beside the rail at the window's right edge. The rail's Histogram toggle docks the histogram above it. |
| 8 | Picks Strip | The photos you've picked, in a band under the grid. |
| 9 | Bottom bar | Score, view and sort controls, the photo count, the rating pill, zoom and Open. |
| 10 | Scan mark | Turns while Flow reads a folder. Point at it to see how many photos it has found. |
The menus
On a Mac, the menu bar reads Radiant Flow, File, Edit, View, Go, Photo, Window and Help. On Windows the menus are inside the window, under its title bar: File, Edit, View, Go, Photo, Window (only when Radiant Raw is installed) and Help. Settings… (Ctrl+,) and Personalize Radiant Flow… are at the end of the Edit menu there.
The Grid Style, Sort by and Annotations pop-ups on the bottom bar show the same rows as their View submenus, in the same order. Pick from whichever is closer.
The top rail
The row across the top of the window tells you where you are and how you got there.
- Back and Forward move through the places you've visited, like a web browser. Hold the pointer over one to see where it goes, for example Back to 2024. Press and hold, or right-click, to list the whole history on that side.
- Enclosing Folder (the up arrow) goes to the folder that holds this one, for example Up to Shoots.
- Click a folder name in the breadcrumbs to go there. Click the › between two names to list the folders beside the next one, and jump to a sibling shoot in one click. The last name opens a list of the folders inside it.
- The Filter box searches the photos you're looking at. Choose Edit > Filter (⌘F, Ctrl+F on Windows) to type in it from the keyboard.
| Command | Mac | Windows |
|---|---|---|
| Go > Back | ⌘[ | Alt+← |
| Go > Forward | ⌘] | Alt+→ |
| Go > Enclosing Folder | ⌘↑ | Alt+↑ or Backspace |
On a Mac the title strip above the rail names the app, Radiant Flow. On Windows the window's own title bar does that.
Note
In a narrow window, the arrows move into a More Controls menu (⋯) at the left of the rail. Long breadcrumb trails fold their middle folders into a ··· button that lists them.
Hide and show panels
Each panel has its own switch in the View menu, and two commands put several away at once. A second press brings back exactly what was showing before.
| Command | Mac | Windows | What it does |
|---|---|---|---|
| View > Metadata | ⌘I | Ctrl+I | Shows or hides the Metadata panel. Clicking the lit page on the rail at the window's right edge does the same. |
| View > Filter Row | ⇧⌘F | Ctrl+Shift+F | Shows or hides the Filter Row. |
| View > Picks Strip | ⌃⌘D | Ctrl+Shift+D | Shows or hides the Picks Strip. |
| View > Hide Panels | ⌥⇥ | Ctrl+Tab | Hides the Metadata panel and the Filter Row together. |
| View > Hide Panels and Filmstrip | ⇧⌥⇥ | Ctrl+Shift+Tab | Hides the Metadata panel, the Filter Row, the Picks Strip and the Stage filmstrip together. |
| View > Scopes > Show Scopes on Photo | ⌃⌘G | Not set | Draws a scope on the photo in Single Photo, Compare and Survey. |
| View > Scopes > Show Scopes Window | ⌃⌘W | Ctrl+Shift+U | Opens the Scopes window over the photos. It follows the selected photo. |
A check mark beside each row shows what is on screen. The two Scopes rows have none: they read Hide while their scopes show. Flow remembers whether the Metadata panel, the Picks Strip and the scopes were showing the next time you open it. See Scopes on Photo and the Scopes window.
The sidebar always stays on screen. Drag the divider beside it to make it narrower, down to a minimum width. See The sidebar.
Note
View > Picks Strip is gray in the Stage and in Compare, which have a filmstrip of their own. It's also gray in Apple Photos and in catalogs that can't list picks. Hold the pointer over the row to see why.
The bottom bar
The bar along the bottom of the window has three parts:
- On the left, the PRISM Photo Score pill, four view pop-ups and the photo count, for example 12,481 photos · 340 selected.
- In the middle, the pill that sets stars, color labels and flags on the selected photos.
- On the right, the scan mark, the zoom slider, the Magnifier button, the Grid · Single · Compare switch and the Open button.
The scan mark appears only while Flow reads a folder, and nothing else moves when it does. See The bottom bar for every control.
The Window menu
On a Mac, the Window menu holds the system's own commands for the window, and Pair with Radiant Raw when Radiant Raw is installed:
| Command | Key | What it does |
|---|---|---|
| Minimize | ⌘M | Puts the window in the Dock. |
| Zoom | Makes the window fill the screen, or returns it to its last size. | |
| Pair with Radiant Raw | Places Flow and Radiant Raw side by side. See Pair Flow with Radiant Raw. | |
| Bring All to Front | Brings Flow's windows in front of other apps' windows. |
At the end of the View menu, Enter Full Screen (⌃⌘F) gives the window the whole screen. In full screen the row reads Exit Full Screen. Choose it, or press ⌃⌘F again, to leave.
On Windows, the Window menu is there only when Radiant Raw is installed, and holds just Pair with Radiant Raw. View > Full Screen (F11) enters or leaves full screen. Use the buttons in the title bar to minimize or maximize the window.