
Single Photo, Stage and Compare
Single Photo shows one photo at a time, as large as the window allows, with a filmstrip of the folder underneath. Compare puts two photos side by side so you can choose the better one.
Open Single Photo
Single Photo is the Stage grid style. Any of these opens it:
- Press G, or choose View > Single Photo. Press G again to go back to the grid style you came from.
- Choose View > Grid Style > Stage (⌘⌥6, Ctrl+Shift+F6 on Windows).
- Click Single in the Grid · Single · Compare switch at the right of the bottom bar.
- Double-click a photo in the Fluid, Grid or Square style. This is the default in Settings > General > Double-click.
Press Esc to go back to the grid style you came from. Your selection stays as it was. If a peek, the face row or Lights Out is on, Esc puts those away first, one step at a time. See Peek at another photo and Lights Out.
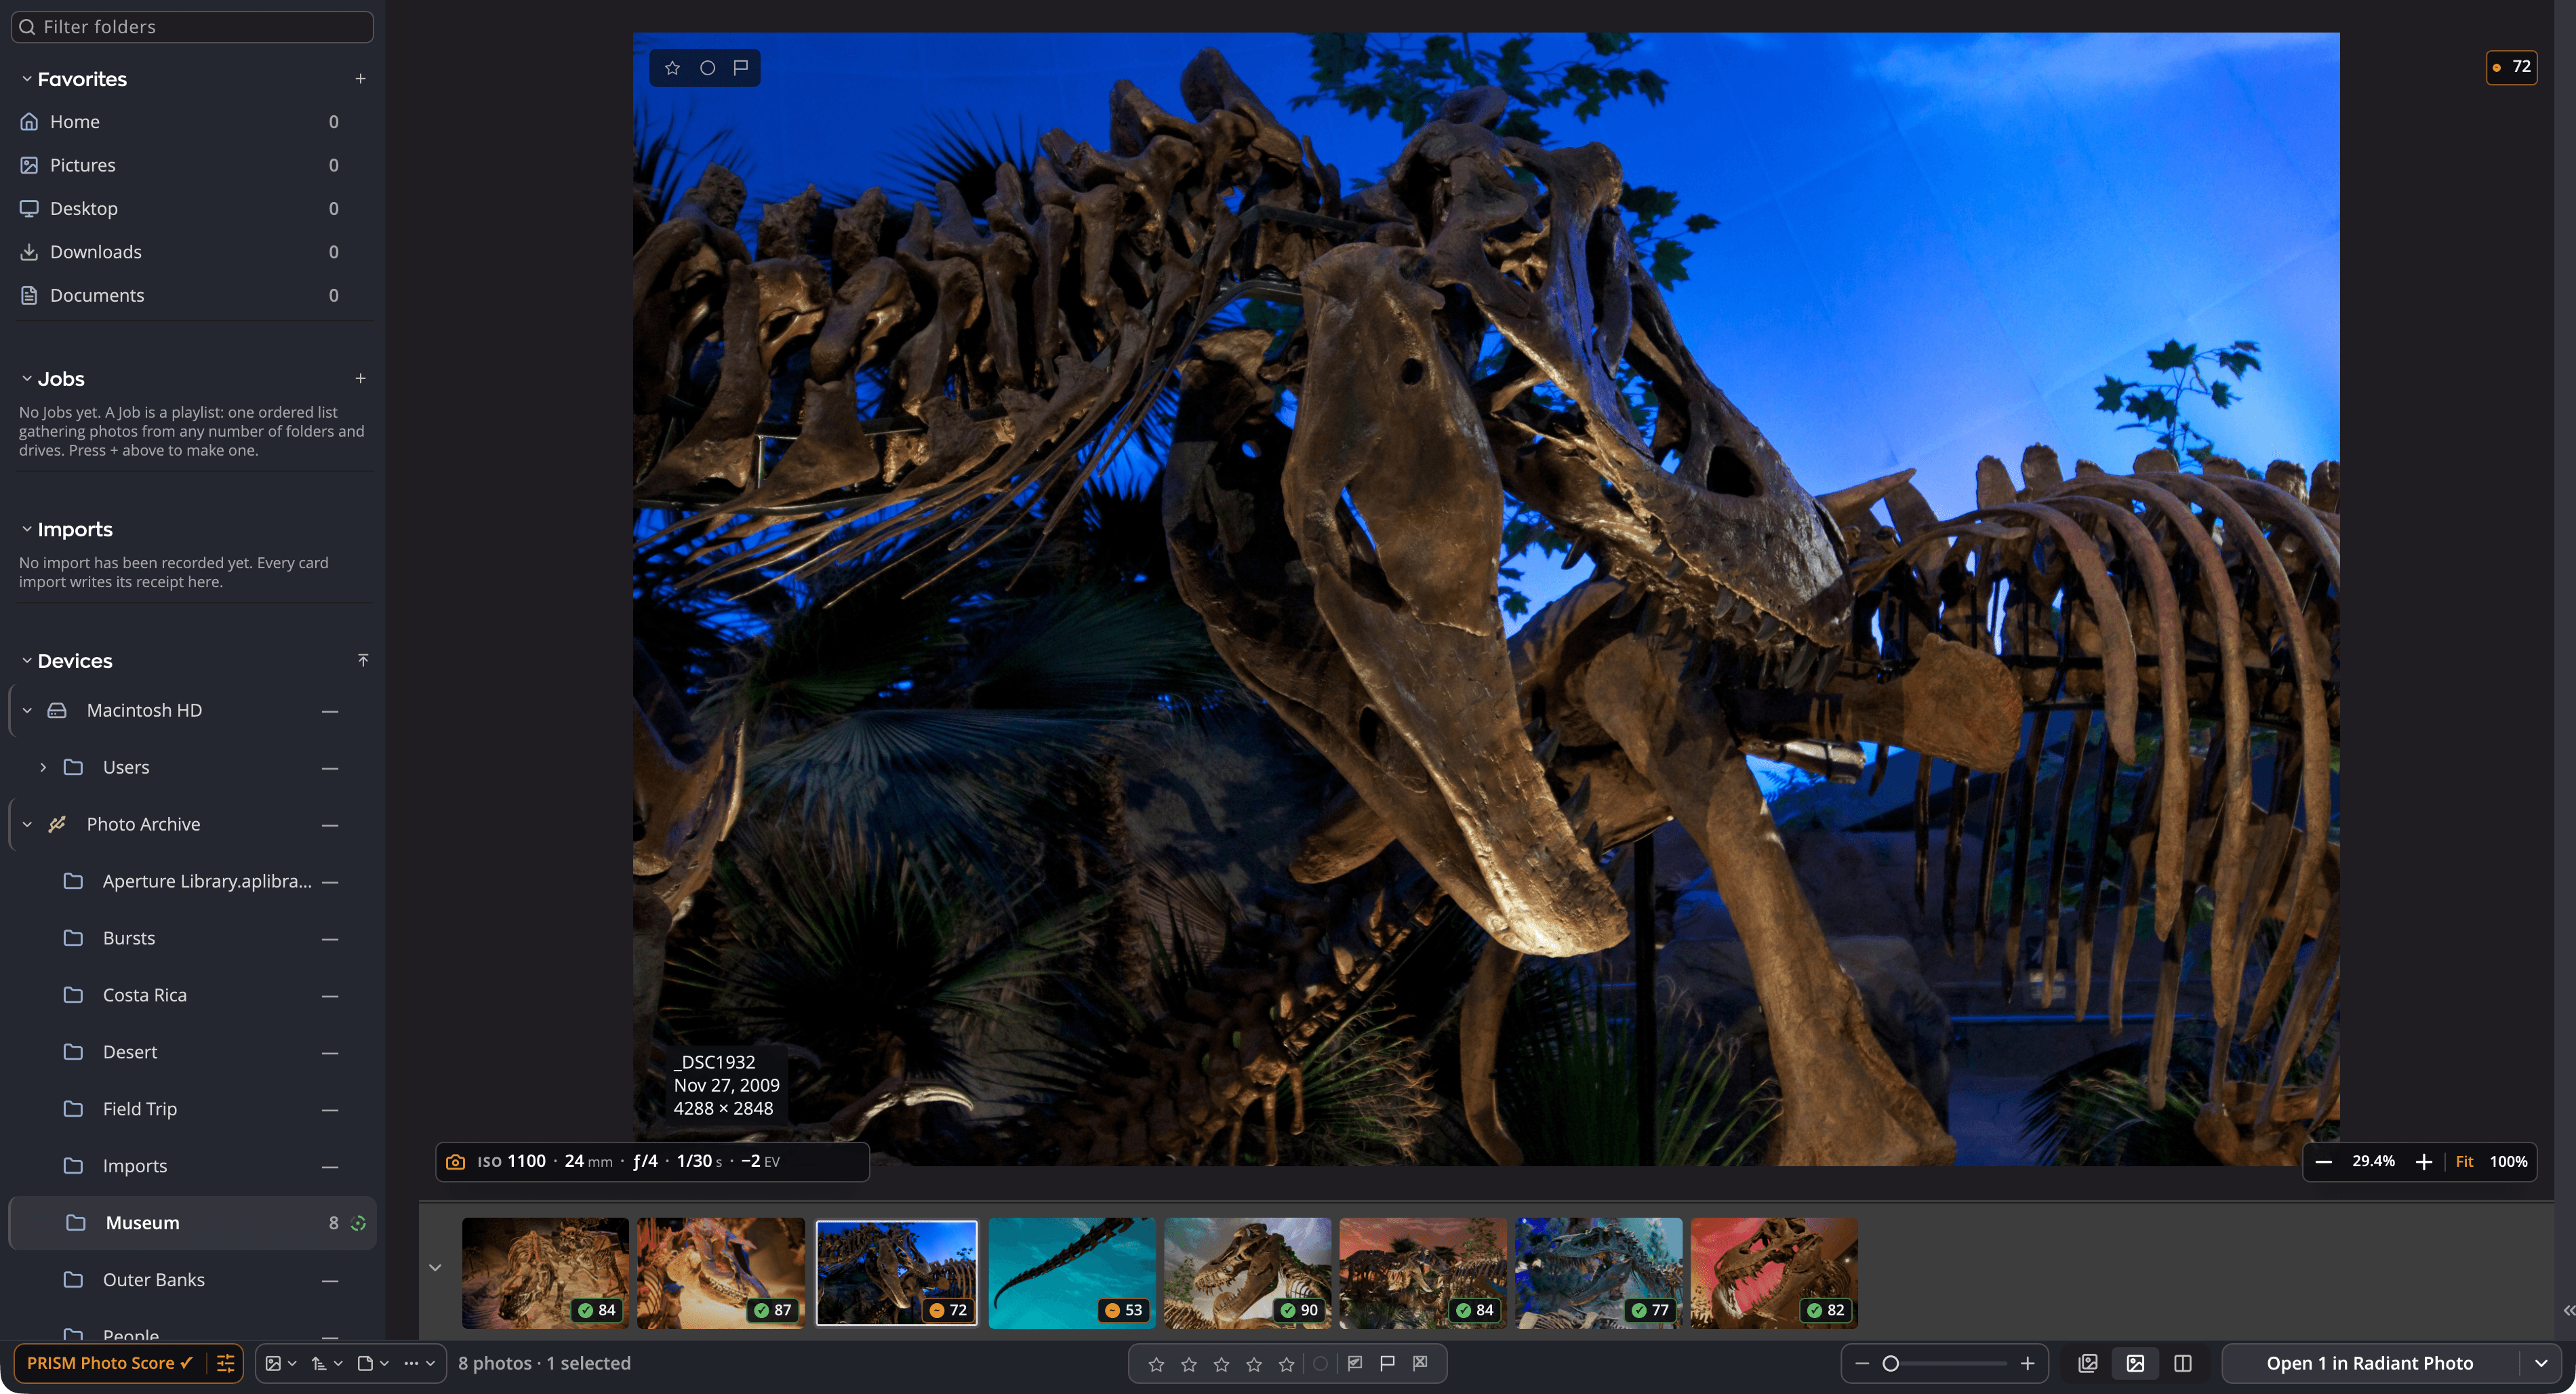
| # | Control | What it does |
|---|---|---|
| 1 | The photo | Double-click to switch between Fit and 100% at that point. Drag to move around a zoomed photo. |
| 2 | Marks pill | The photo's rating, label and flag. Click one to change it. |
| 3 | PRISM Photo Score card | The photo's score, when PRISM Photo Score is on. |
| 4 | Camera pill | ISO, focal length, aperture, shutter speed and exposure compensation. Click to fold it. |
| 5 | Zoom pill | − and + step the zoom, 100% shows the photo's own pixels, Fit fits it to the window. |
| 6 | Filmstrip | The photos in the folder. Click one to show it. The arrow at its left end folds it away. |
| 7 | Grid · Single · Compare | Switches between the grid, Single Photo and Compare. |
What shows over the photo follows View > Annotations. See Grid styles and thumbnails. For Fujifilm photos, the camera pill also names the film simulation.
Along the bottom of the photo, the camera pill, the Info Box and the photo's keywords also follow the BOTTOM list of Single Image in Settings > Layout. A ticked row shows its line, and the order of the rows sets which of the Info Box and the keywords sits on top. See Settings.
Move through the photos
| Key | What it does |
|---|---|
| → or ↓ | Next photo. Inside a ranked burst, the next frame by rank. |
| ← or ↑ | Previous photo. Inside a ranked burst, the previous frame by rank. |
| Home / End | First / last photo. |
| ⌘→ / ⌘← (Ctrl+→ / Ctrl+← on Windows) | Next / previous photo, at the same zoom and spot. |
| ⌥⌘→ / ⌥⌘← (Ctrl+Shift+→ / Ctrl+Shift+← on Windows), period and comma | Next / previous burst, and the frames inside one. In a ranked burst, period and comma go by rank. See Cull a burst. |
| B | Last Marked Photo. See Culling a shoot. |
| Two-finger swipe left / right at Fit | Next / previous photo, on a Mac trackpad or a Windows precision touchpad. See Zoom, flights and swipes. |
| ⇧ with an arrow, Home or End | Extends the selection. |
| ⇧⌘Space (Ctrl+Shift+Space on Windows) | Stage Filmstrip: shows or hides the filmstrip. |
| ⏎ | Opens the selected photos in the app the Open button uses. |
| Esc or G | Goes back to the grid style you came from. |
The marking keys work as they do in the grid. See Culling a shoot. In the filmstrip, ⌘-click (Ctrl-click on Windows) and ⇧-click build a selection, and a right-click opens the photo menu.
Note
On Windows, an optional input-language hot key can use Ctrl+Shift+Space. When it is turned on, Windows takes the key first. Choose another key for Stage Filmstrip in Settings > Keyboard Shortcuts.
Zoom
Each photo opens at fit. Press Space to switch between Fit and 100% at the pointer. In Single Photo, Space zooms rather than opening Quick Look. Scroll or pinch to zoom, and drag to move around. 100% means one pixel of the photo for each point on the screen, the same as in Radiant Photo. Zoom goes up to 1600%.
The zoom glides rather than jumping. When the zoomed photo covers the camera and zoom pills, they move down to the bottom edge. Past Fit, a small navigator map above the zoom pill shows where you are. See Zoom, flights and swipes and The navigator map and the pills that step aside.
To keep the zoom as you step, press ⌘→ or ⌘← (Ctrl+→ or Ctrl+← on Windows). The next photo opens at the same zoom and spot. The rows are Go > Next Photo, Keep Zoom and Previous Photo, Keep Zoom. They work on the Stage and in Quick Look with one photo.
These rows are in the View menu while one photo fills the view, in Single Photo and in Quick Look:
| Command | Key | What it does |
|---|---|---|
| Fit | Z | Fits the whole photo in the window. |
| Fill | ⇧Z | Fills the window with the photo, cropping the edges from view. |
| 100% | ⌘1 (Ctrl+1 on Windows) | One photo pixel per screen point. |
| 200% | ⌘2 (Ctrl+2 on Windows) | Twice that. |
| Toggle Zoom (Fit / 100%) | ⌘0 (Ctrl+0 on Windows) | Switches between Fit and 100%. |
| Zoom In | ⌘= (Ctrl+= on Windows) | One zoom step in. |
| Zoom Out | ⌘− (Ctrl+− on Windows) | One zoom step out, down to fit. |
Note
These keys mean something else in the grid. There, ⌘1 to ⌘9 jump to the sidebar's sections and ⌘= and ⌘− change the thumbnail size. On Windows, Ctrl+1 and Ctrl+2 filter by rating and Ctrl+0 is Clear all filters.
To check focus more closely, see Checking focus.
Photos you edited in Radiant Raw
The Stage shows a photo you edited in Radiant Raw with its edits, its Color Grading Look included. The Look can be one that comes with Radiant Raw, one of your own My Looks, a Look from a store pack, or the Look of a Raw Composite pass. While Flow develops the photo, you may see the camera's picture for a moment first.
The Radiant Raw mark beside the marks pill tells you which picture you see:
- No mark. You see the photo with its edits.
- The mark. You see the original. Hold the pointer over the mark and it says Edited in Raw. Flow shows the original until it can draw the edit.
Flow shows the original, with the mark, in these cases:
- You zoom in close, for example to 100% on a large photo. The Stage then shows the file's own pixels. Zoom back out and the edits come back.
- Prefer embedded previews (faster) is chosen in Settings. Flow then develops nothing. See Preview quality.
- The Look is from a store pack that isn't installed, or that Radiant Photo or Radiant Raw on this computer has no license for.
- The Look is one of your own that was made on another computer.
Compare always shows the original. The mark follows View > Annotations.
Faces and eyes
- Press F, or choose View > Show Faces, to swap the filmstrip for a row of every face in the photo. Each face's ring says whether its eyes are open or closed. Press F again, or Esc, to bring the filmstrip back. See The face row.
- Press E, or choose View > Go to Eye, to glide to 100% on the first face's nearer eye. E again goes to the next face. In Compare, E puts both photos at 100% with their eyes lined up. See Go eye to eye.
Compare two photos
Compare shows two photos side by side, each fitted to its own half. The left one is the photo to beat. You walk the other photos through the right half until one wins.
- Select the photos you want to compare. With one photo selected, Compare walks through the whole folder.
- Press K, choose View > Compare A ↔ B, or click Compare in the bottom bar. With nothing selected, Compare is grayed out and says "Select a photo to compare".
- Press → and ← to bring the next candidate into the right half.
- When a candidate wins, press ↑ to make it the photo to beat.
- Mark the photos as you go. The marking keys write to the right half. Hold ⇧ with a marking key to mark the candidate and bring up the next one.
- Press K, Esc or Space to leave. While Compare is open the menu row reads Exit Compare.
From a Survey, K opens Compare with the lit frame as the photo to beat. See Quick Look and Survey.
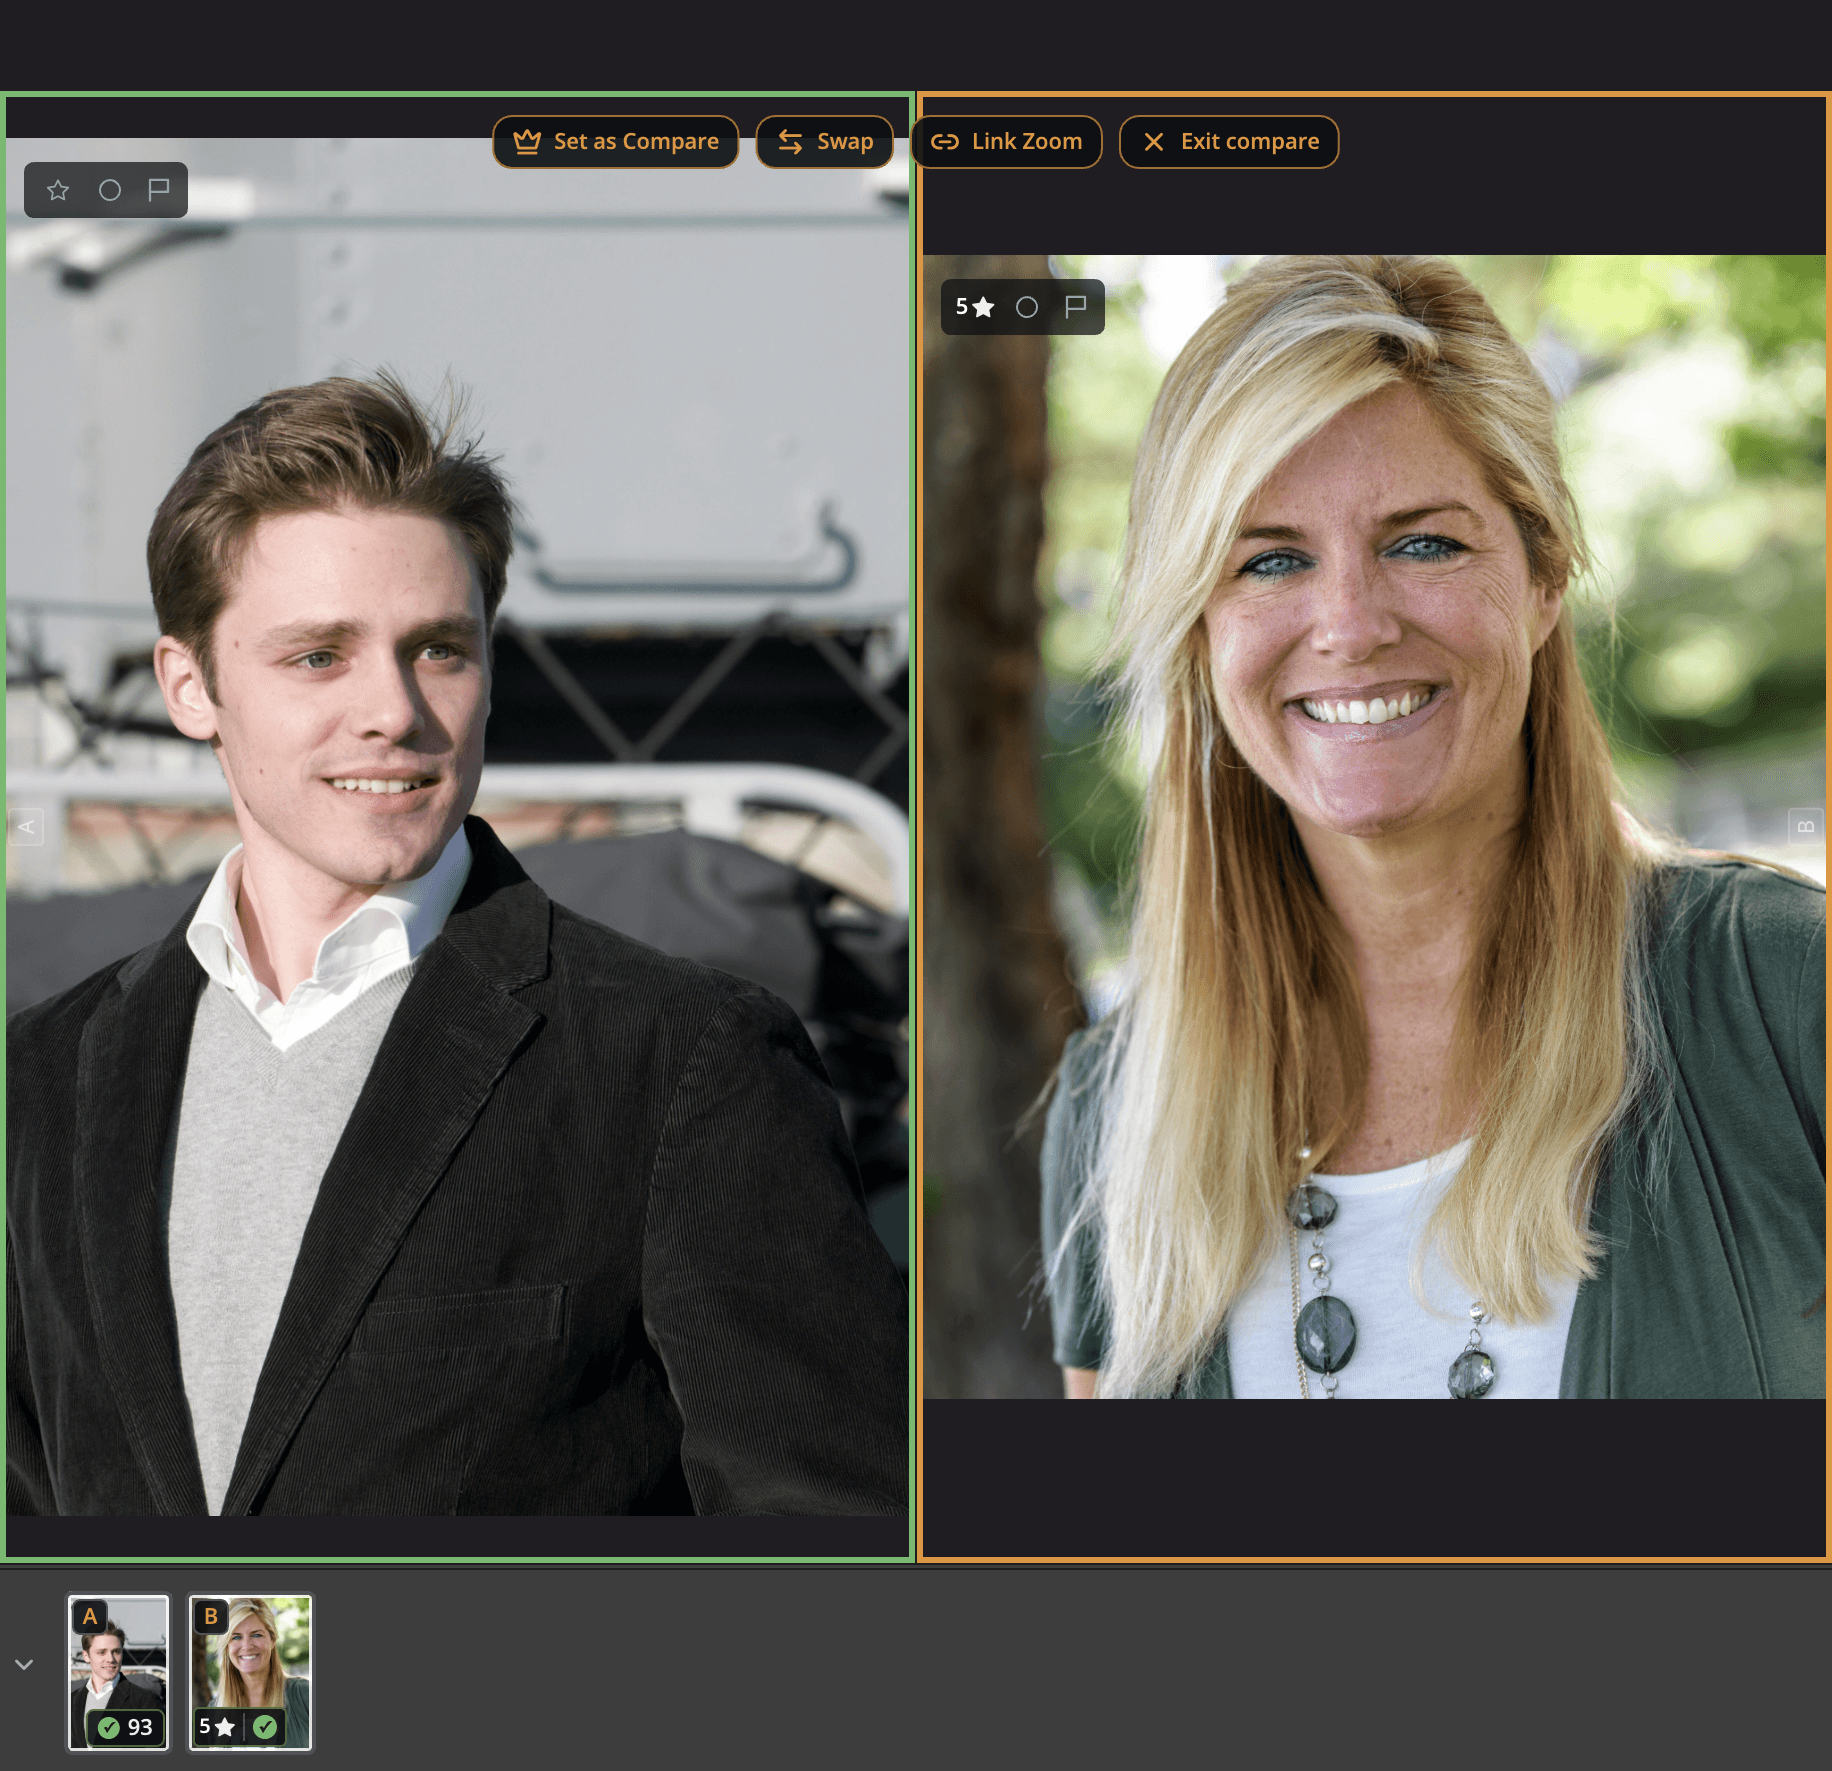
| # | Control | What it does |
|---|---|---|
| 1 | A: Compare frame | The photo to beat. It stays put while you step. |
| 2 | B: Primary frame | The candidate. The arrows change it, and the marking keys write to it. |
| 3 | Marks pill | Each pane's own rating, label and flag. A click changes that pane's photo. |
| 4 | Set as Compare | Makes the Primary frame the photo to beat, then steps on (↑). |
| 5 | Swap | Swaps the two frames (↓). |
| 6 | Link Zoom | On by default: zooming or moving one pane does the same to the other. |
| 7 | Exit compare | Leaves Compare (Esc). |
| 8 | Strip | The photos being compared. The photo to beat has its own ring. Click a frame to make it the Primary frame. |
Click a pane to switch it between Fit and 100% at that point. ⌘= and ⌘− (Ctrl+= and Ctrl+− on Windows) zoom both photos. 100%, 200% and Toggle Zoom (Fit / 100%) are in the View menu in Compare too, with the same keys as in Single Photo. ⏎ opens the photos in the app the Open button uses: the two on screen when you started from one photo, otherwise your whole selection.
Zoomed in, one navigator map at the lower right shows the Primary frame's photo. ↑ slides the Primary frame's photo into the Compare frame's place, and in Side by Side ↓ crosses the two over. See Zoom, flights and swipes.
Bursts in Compare
Select one photo in a scored burst and press K: the burst's best frame opens as the photo to beat, and the runner-up beside it, with Rank lit. → and ← then walk the rest of the burst from best to worst. At the top of the two frames, Compare by numbers puts the two frames' numbers side by side. See Compare by numbers and the suggested pair and Rank a burst by score.
Choose how Compare shows the two photos
The dial at the start of the strip above the photos picks one of five views. You can also choose View > Compare Look while Compare is open, or press the view's key.
| View | Key | What you see |
|---|---|---|
| Blink | ⌥1 (Alt+1 on Windows) | One photo at a time, the Primary frame. Hold \ to see the Compare frame in its place. |
| Side by Side | ⌥2 (Alt+2) | The two photos next to each other. |
| Wipe | ⌥3 (Alt+3) | One picture split by a line: the Compare frame on the left, the Primary frame on the right. Drag the line to move it, or press Tab until a ring shows round its grip and use the arrow keys. Shift moves it in bigger steps. |
| Ghost | ⌥4 (Alt+4) | The Primary frame at half strength over the Compare frame. |
| Difference | No key | What changed between the two photos shows bright. What stayed the same is dark. |
Compare starts in Side by Side. After that it opens in the view you used last, until you quit Flow. Choose the view on screen again to turn it: Side by Side stacks the photos top and bottom, and Wipe's line runs across the photo. Choose it once more to turn it back.
In Blink, Wipe, Ghost and Difference, Link Zoom is grayed out. Both photos always zoom together there.
On Windows, Alt+1 to Alt+4 pick a view only while Compare is open. Everywhere else they jump to the sidebar sections. Difference has no key of its own. You can give it one in Settings > Keyboard Shortcuts.
Flip and alternate the two photos
- Flip. Hold
\(backslash) to see the other photo in the same place, and let go to come back. Tap\instead and the flip stays until you tap it again. View > Flip Frames does the same. In Side by Side the two photos trade places, and in Wipe they trade sides. - Alternate. Press ⇧
\or choose View > Alternate Frames to switch between the two photos twice a second. Press any key or click to stop. With Reduce Motion on, it doesn't start, and a hint says to hold\instead.
A flip never changes which photo is which. The arrows still change the Primary frame, and the marking keys still write to it.
In Compare, Esc first stops Alternate Frames, then puts the Magnifier away, then takes back a flip you tapped, then closes Compare.
The Magnifier in Compare
Press ` (the key left of 1) in Compare to put the Magnifier on the photo under the pointer. Move the pointer to the other
photo and the Magnifier follows. In Side by Side, the other photo shows a thin ring at the same spot.
To move the Magnifier to that spot on the other photo, press ⇧` or choose View > Move Magnifier to Other Frame.
This works in Side by Side, where both photos are on screen. Press ` or Esc to put the Magnifier away. The
Magnifier's own keys are in Checking focus.
Line up the photos with match points
When two photos are framed differently, match points line them up. Hold ⌥ (Alt on Windows) and click the same spot in each photo, for example the near eye. After the first click, a ring marks the spot and a hint says to click the other photo. After the second, a message says Frames matched on this point. From then on, the two spots stay together whenever both photos zoom and pan together.
With the Magnifier on a photo, press M or choose View > Set Match Point at Magnifier to set a point where the Magnifier aims. To remove the points, ⌥-click a ring, or choose View > Clear Match Points. Flow forgets them when you close Compare.
For two portraits, press E instead: it puts both photos at 100% on their eyes, and with Link Zoom on it sets the two eyes as the match points. See Go eye to eye.
Peek at another photo
On the Stage, and in Quick Look with one photo, \ shows the photo you looked at just before this one, at the
same zoom and spot. ⇧\ shows the Compare frame the same way. Hold the key to peek and let go to come back.
Tap it and the peek stays until your next key, which ends it and then does its usual job.
A tag in the corner names the photo on screen. A peek changes nothing: your selection, the marks pill and the filmstrip stay with your own photo. When there is nothing to peek at, a hint says why. The rows are View > Peek at Previous Photo and Peek at Compare Frame.
To set the Compare frame, press ⇧K on a photo or choose View > Set as Compare Frame. Press ⇧K on it again to clear it. K then opens Compare with that photo as the photo to beat. Flow forgets it when you open another folder.
Lights Out
Lights Out dims everything around the photo, so nothing distracts you. It works on the Stage, in Quick Look and Survey, and in Compare. Choose View > Lights Out or press ⌥L (Alt+L on Windows). Each press takes one step:
- The panels and bars dim. You can still use them.
- Only the photo shows, on a dark background, and the pointer hides.
- The lights come back on.
Click while the lights are out to go back to dimmed. On the Stage, Esc brings the lights back one step per press; in Quick Look, Survey and Compare, Esc closes them first. When you go back to the grid, the lights come on at once. Flow doesn't keep Lights Out after you quit.
On the Stage, Esc does one thing at a time: it ends a peek, then closes the face row, then puts the Magnifier away, then brings the lights back, and then leaves Single Photo.