
Grid styles and thumbnails
A grid style decides how Flow lays out the photos, from a justified wall to one photo at a time. Choose one from View > Grid Style or from the first pop-up on the bottom bar.
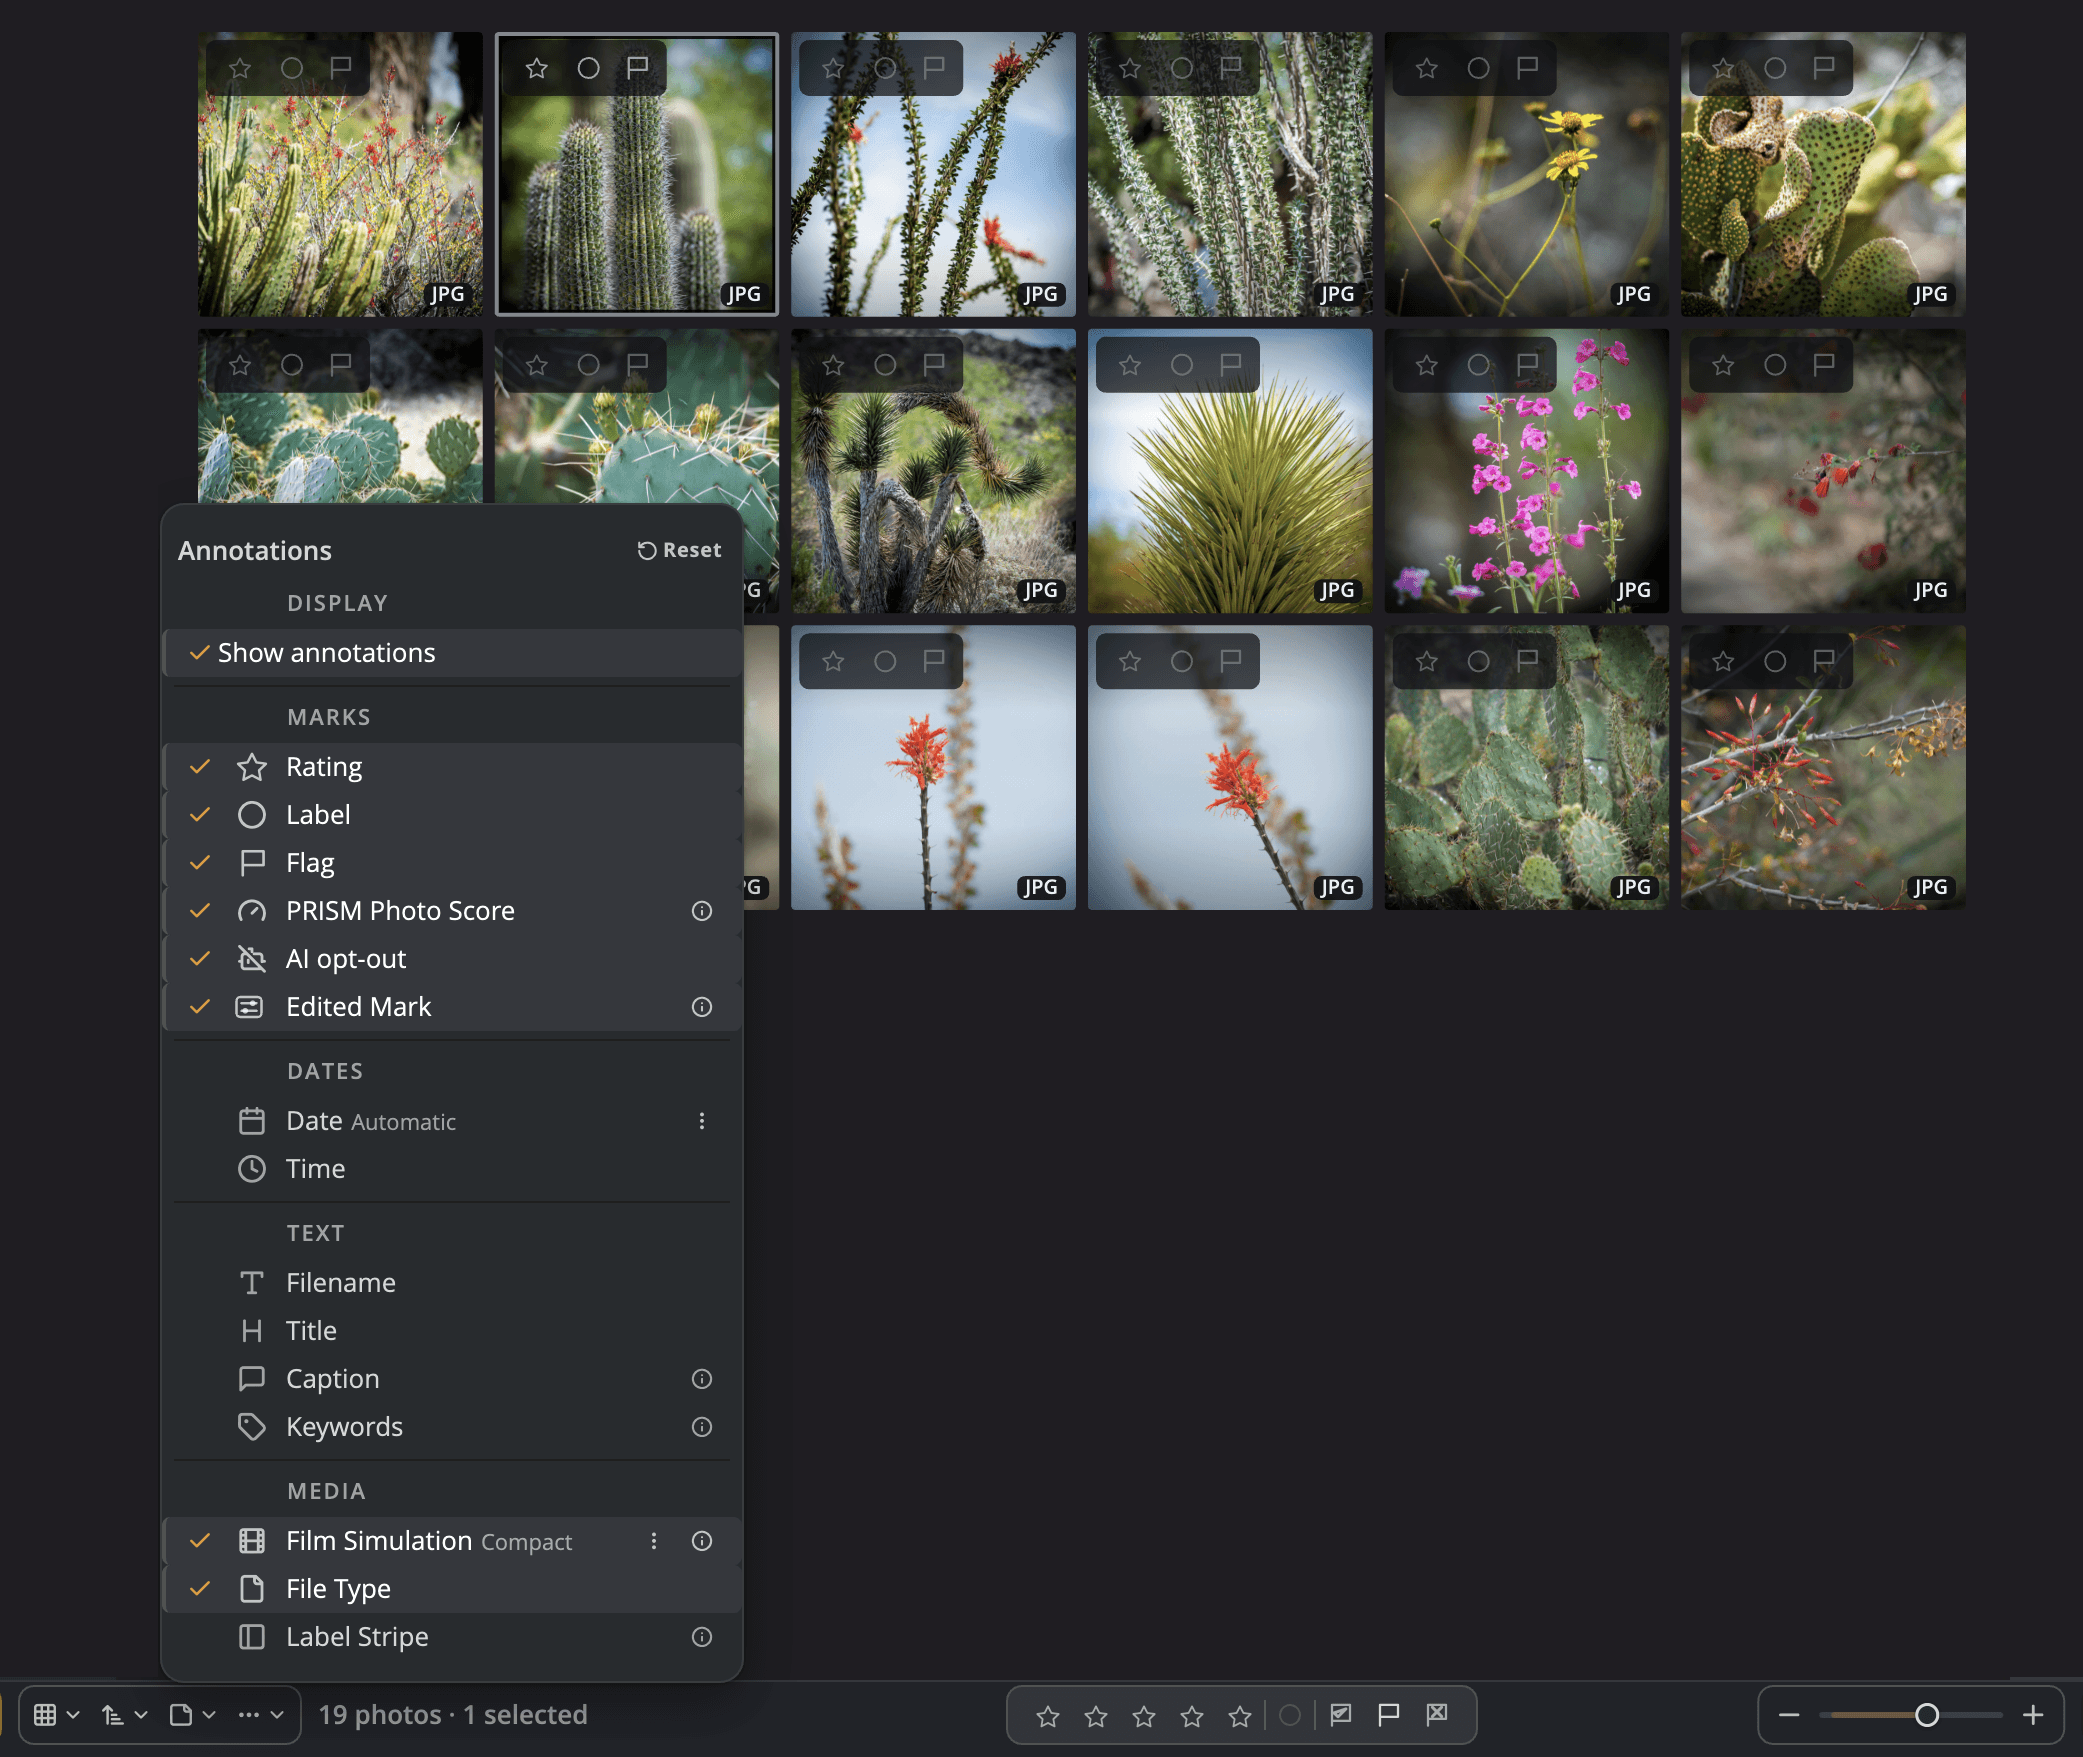
| # | Control | What it does |
|---|---|---|
| 1 | Grid Style pop-up | Chooses one of the six styles. Its icon shows the style you're in. |
| 2 | Annotations pop-up | Chooses what each photo shows: stars, flags, labels, file type and more. |
| 3 | Show annotations | Turns every annotation off or back on, keeping your choices. |
| 4 | Annotations on a tile | The marks and details you've chosen, drawn on the photo. |
| 5 | Zoom slider | Drag right for larger thumbnails, left for more of them. Click − or + to step. |
Choose a grid style
| Style | Mac | Windows | Best for |
|---|---|---|---|
| Fluid | ⌘⌥1 | Ctrl+Shift+F1 | Justified rows with every photo at its own shape, edge to edge. A new install opens in Fluid. |
| Grid | ⌘⌥2 | Ctrl+Shift+F2 | Even square cells, each photo cropped to fill its cell. The densest read for culling. |
| Square | ⌘⌥3 | Ctrl+Shift+F3 | A contact sheet: each photo whole in its square, with its file type above it and its marks below. |
| List | ⌘⌥4 | Ctrl+Shift+F4 | A table with a row per photo and the columns you choose. |
| Columns | ⌘⌥5 | Ctrl+Shift+F5 | Cascading folder panes, as in Finder's Column view. Browse and cull in one view. |
| Stage | ⌘⌥6 | Ctrl+Shift+F6 | One photo filling the window, with a filmstrip below. |
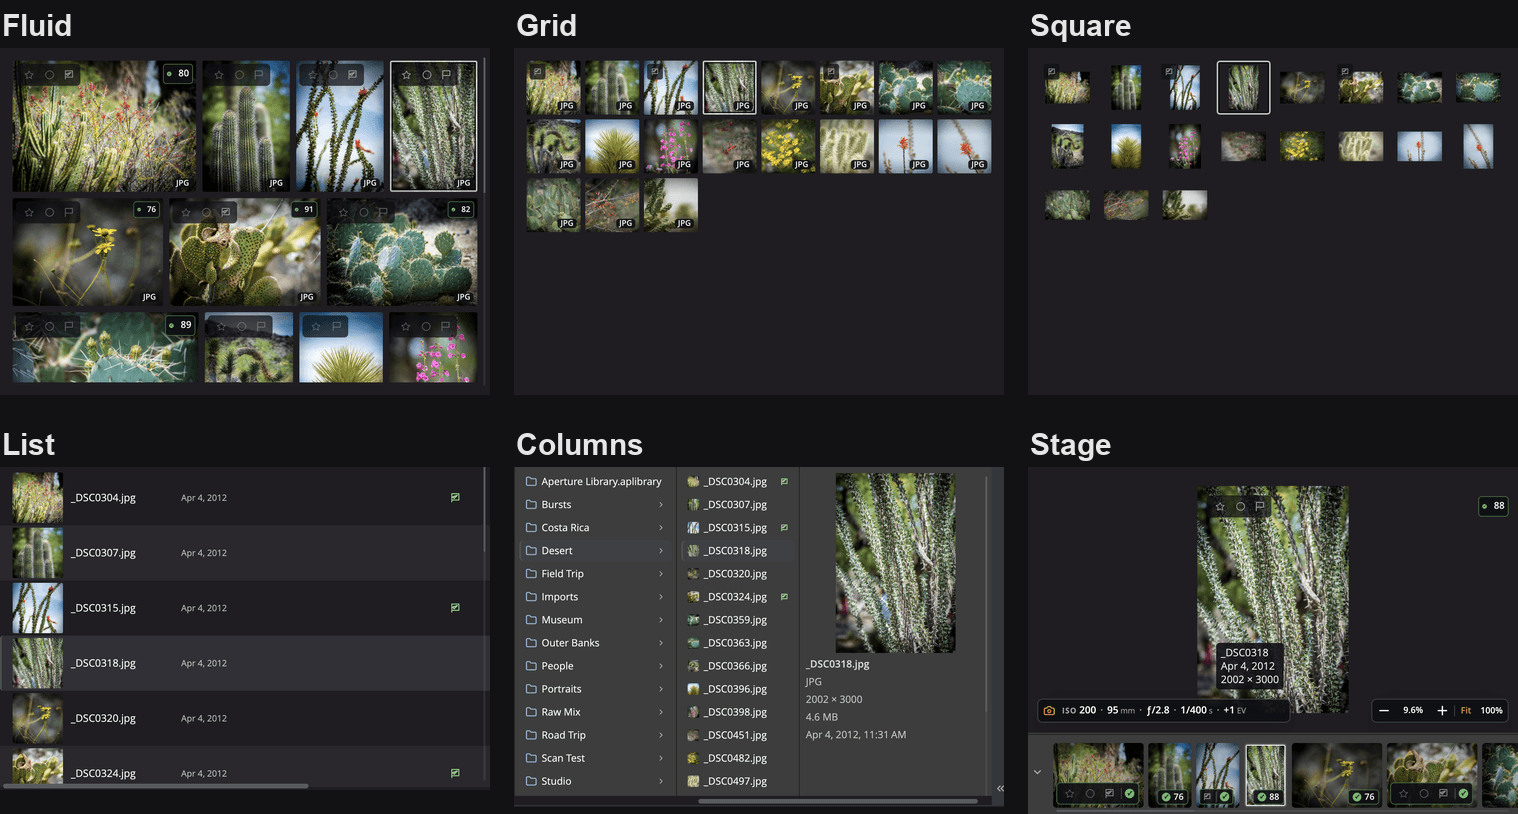
Flow remembers the style you choose. Selection, ratings and keys work the same way in every style.
To step through the styles with one key, choose View > Cycle Layout or press ⌥⇧⌘P (Ctrl+Shift+T on Windows). Each press goes to the next style in the order of the table, then back to Fluid. A style the photos can't show is skipped, such as Columns in Apple Photos.
- Square also tints each cell with its color label, so a labeled shoot reads as color at a glance.
- Columns lists folders and photos by name and offers no other sort. Each row shows its rating, label and flag at the right edge.
- Columns needs a folder on a disk. It's gray in Apple Photos, in Aperture libraries and in Lightroom Classic catalogs; hold the pointer over the row to see why.
- Stage is the same view as View > Single Photo (press G). In the Stage, View > Grid Style > Tile style sets the filmstrip's tiles to Fluid (by aspect ratio) or Square. See Single Photo, Stage and Compare.
Change the thumbnail size
The zoom slider on the bottom bar sets the size. The keyboard does the same:
| Command | Mac | Windows |
|---|---|---|
| View > Larger Thumbnails | ⌘= | Ctrl+= |
| View > Smaller Thumbnails | ⌘− | Ctrl+− |
In Grid and Square, the slider runs from 12 photos across at its smallest to 2 across at its largest. In Fluid it sets the height of the rows. Flow remembers the size.
The slider changes meaning with the style:
- In List, it sets the row size: Compact, Small, Medium (the default), Large or X-Large.
- In the Stage, it zooms the photo, and ⌘= and ⌘− zoom in and out. The View menu names them Zoom In and Zoom Out there.
Choose what shows on each photo
View > Annotations chooses what Flow draws on each photo: marks, file facts and badges. The Annotations pop-up on the bottom bar holds the same rows, grouped under captions, with a Reset button.
- Choose View > Annotations, or click Annotations on the bottom bar.
- Select the annotations you want, and clear the ones you don't.
- To hide them all for a moment, clear Show annotations.
The rows list only what the current style can draw. Fluid, Grid and Square share one set. The Stage has a set of its own, so its pop-up is titled Single Photo Annotations.
That pop-up also has Camera HUD, Info Box and Keywords Plate, the lines along the bottom of the photo. They are ticked when Single Photo shows them, as set in the BOTTOM list of Single Image in Settings > Layout. Turning one on here ticks it in that list too. See Settings.
These annotations are on to begin with: Rating, Label, Flag, PRISM Photo Score, File Type, Film Simulation, AI opt-out and Edited Mark. The others start off, including Filename, Title, Caption, Keywords, Date, Time, Dimensions, File Size, Camera, Lens, Exposure and Label Stripe. GPS is offered on the Stage only, and is on there to begin with.
PRISM Photo Score shows each photo's score as a badge. See PRISM Photo Score.
Note
AI opt-out draws only on a photo that is opted out of AI training. Edited Mark draws only on a photo edited in Radiant Photo, Radiant Raw, Lightroom Classic or Capture One. On a photo edited in Radiant Raw, it goes away while Flow shows the photo with its edits. See Photos you edited in Radiant Raw.
In List and Columns, View > Annotations is gray: a table shows its fields as columns, so you choose them with Show Details instead.
Choose the columns in List and Columns
View > Show Details works in List and Columns. In the other styles it's gray.
- In List, it lists every column, in two groups:
- Marks: Rating, Label, Flag and Kind.
- Text: Capture Date, Size, Dimensions, Description, Film Sim, Folder, Time, Modified Date, Megapixels, Orientation, Aspect Ratio, Path, PRISM Photo Score, Title, Keywords, Camera · Lens · Exposure, Copyright, Color Profile and GPS.
- In Columns, it lists the three marks each row can show: Rating, Label and Flag.
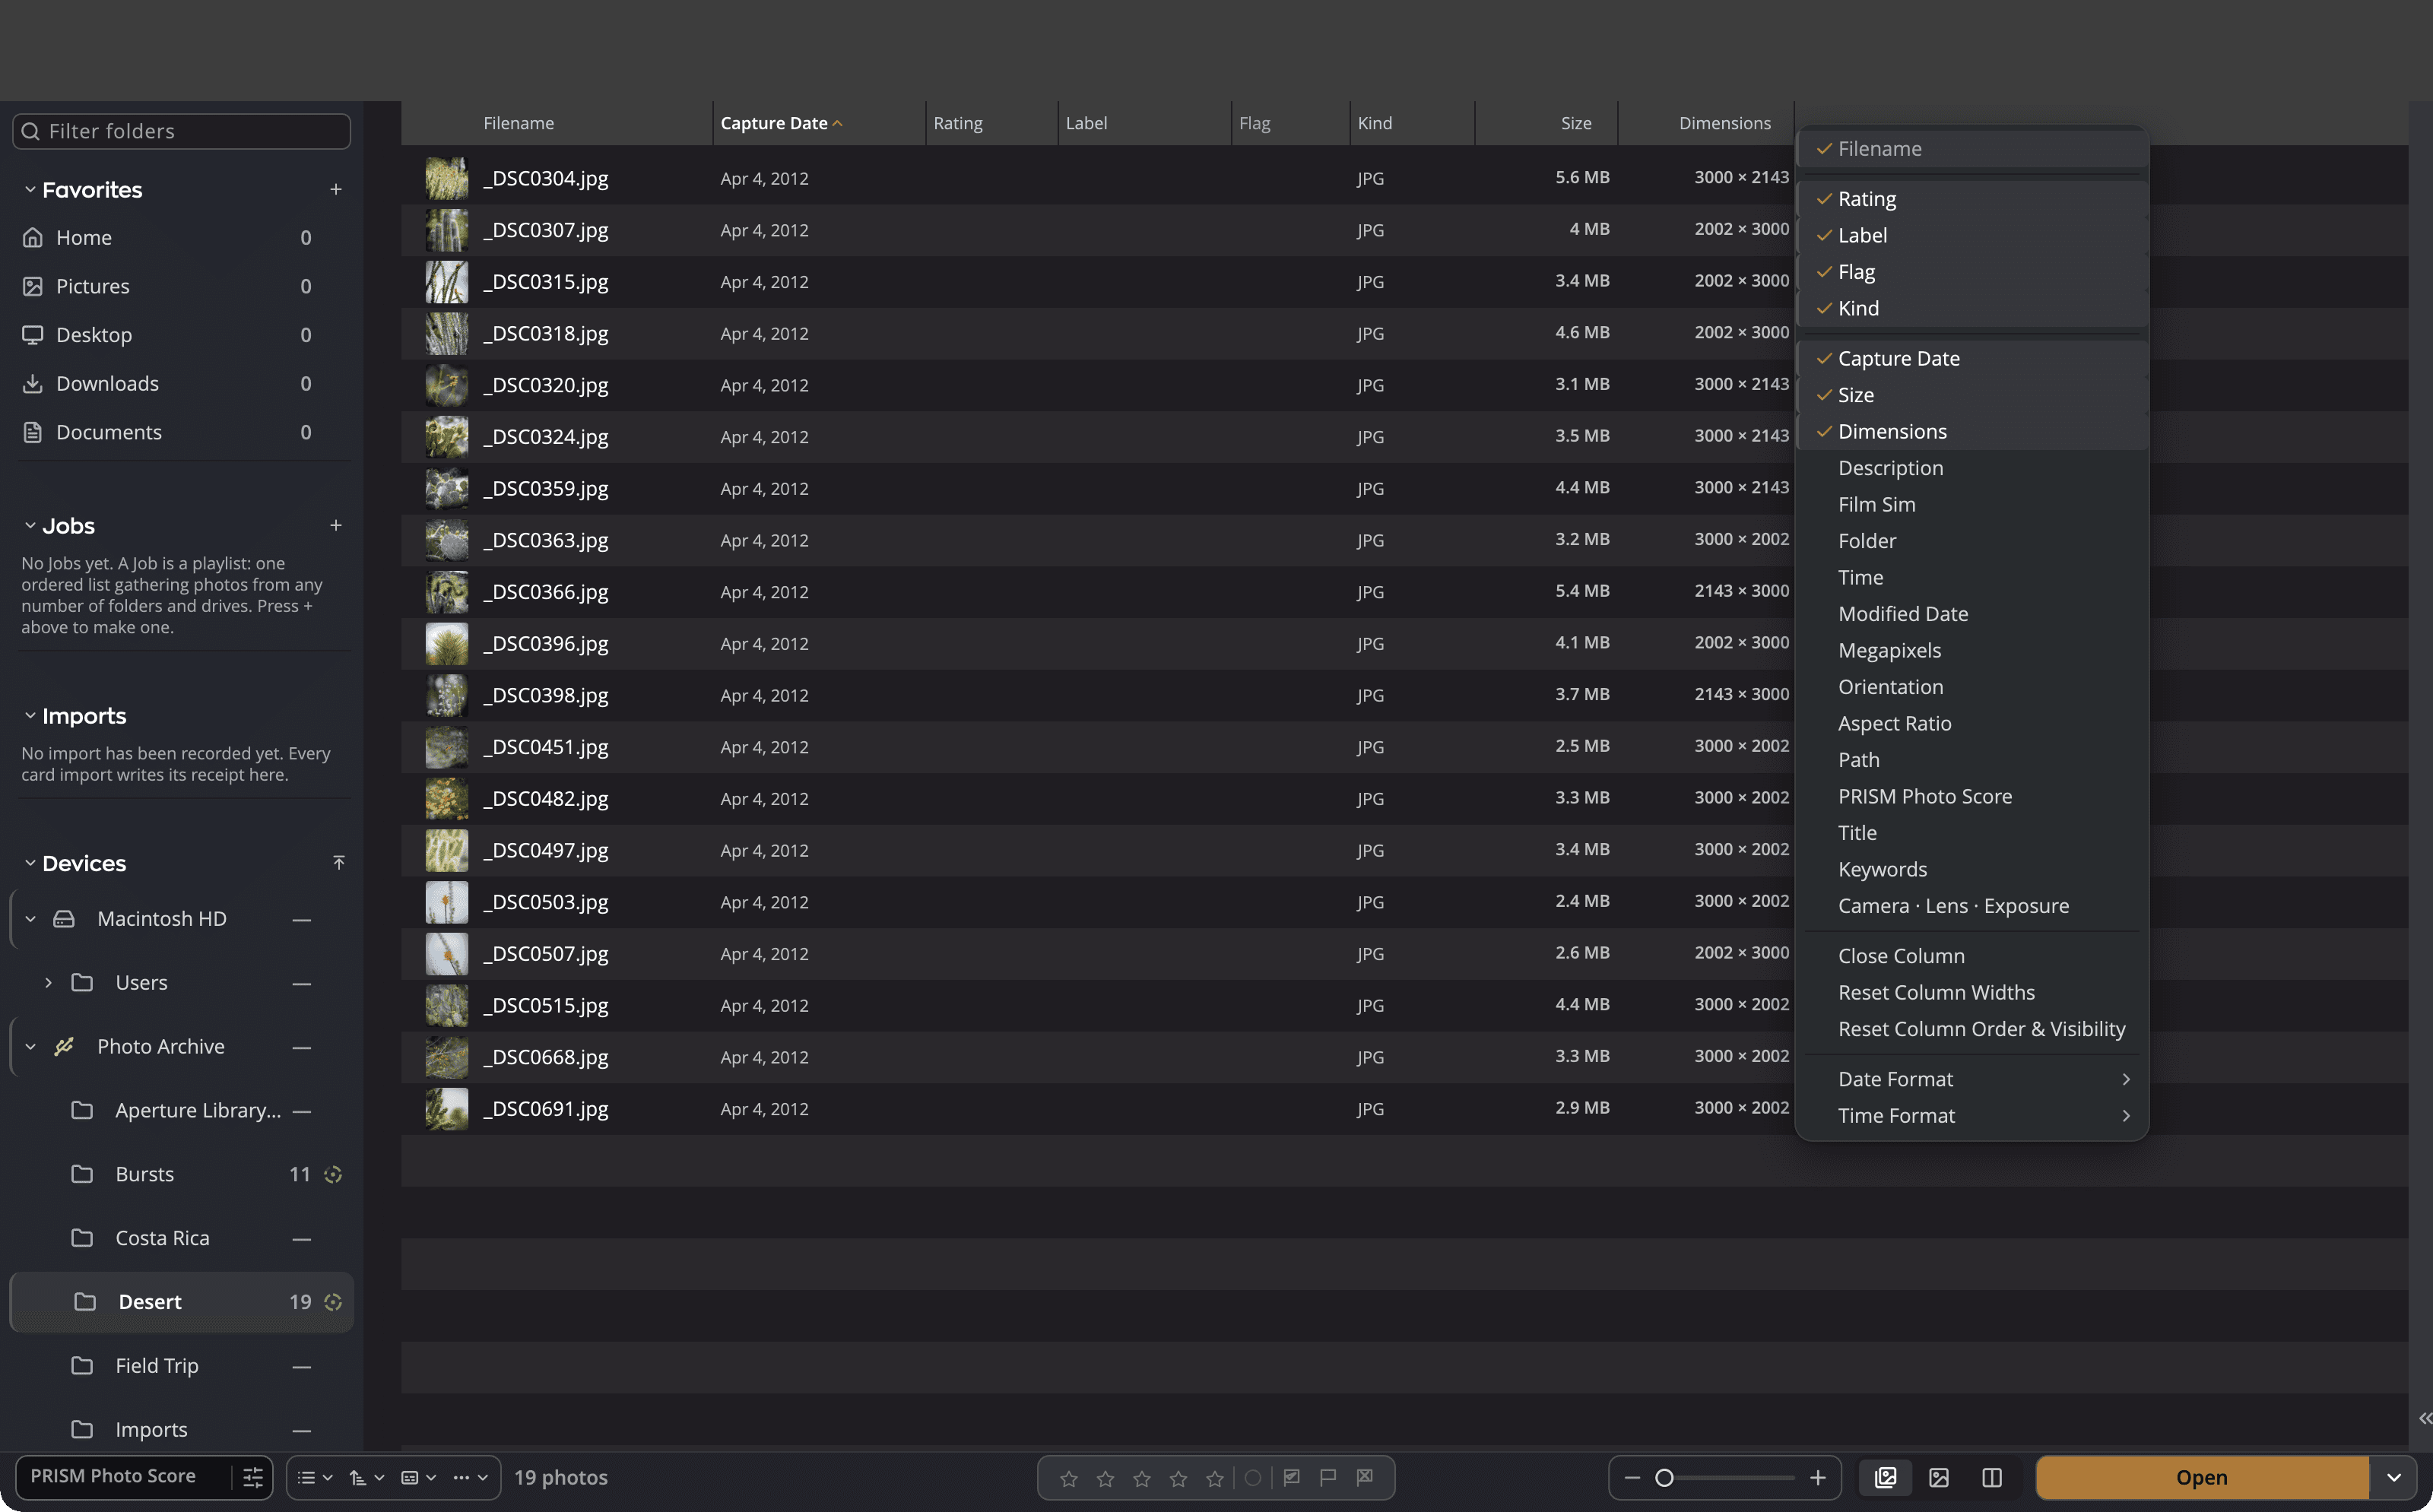
| # | Control | What it does |
|---|---|---|
| 1 | Column header | Click to sort by that column, if it can sort. |
| 2 | Column divider | Drag to set the width. Double-click to fit the column to what its rows show. |
| 3 | Column rows | Right-click any header to turn columns on and off. Name is Always shown. |
| 4 | Close Column | Removes the column you right-clicked. |
| 5 | Show Details pop-up | Applies, saves and manages column presets. |
| 6 | Row-size slider | Sets the row size, from Compact to X-Large. |
Arrange the List
- Right-click any column header to turn columns on and off. A column you turn on this way appears next to that header.
- Close Column isn't offered on the name.
- Reset Column Widths puts every column back to its standard width and leaves the order alone.
- Reset Column Order & Visibility puts back the standard columns in the standard order and leaves your widths alone.
- Drag a column header to move the column. Name always stays first.
The Show Details pop-up on the bottom bar holds column presets: ready-made sets of columns. Flow comes with Essentials, Culling, Delivery, Metadata and Everything. Arrange the columns your way, then choose Save Column Preset… to keep the arrangement, or Manage Column Presets… to rename, duplicate or delete presets.
Copyright shows the photo's copyright line. Color Profile shows the color profile the file names, such as sRGB or Display P3, and a dash when it names none. Delivery includes Color Profile, and Metadata includes Copyright. You can't sort by these two columns.
GPS shows where the photo was taken: latitude first, then longitude, in decimal degrees to six places, for example 48.858370, 2.294481. A photo with no location shows a dash. You can't sort by GPS. Everything includes it. When you save or edit a column preset, GPS is under Basics in the list of columns to add.
Size the panes in Columns
Flow remembers the width of each pane.
- Drag a divider to set that pane's width. ⌥-drag (Alt-drag on Windows) sets every pane at once.
- Double-click a divider to fit the pane to the longest name in it. ⌥-double-click (Alt-double-click on Windows) fits every pane to its own longest name.
- Right-click a divider for Right Size This Column, Right Size All Columns Individually and Right Size All Columns Equally.
View > Resize Columns to Fit File Names keeps every pane as wide as its names need, as folders open. It's off by default.
A pane is never narrower than 160 px or wider than 420 px at the Default interface size. The last pane has no divider: it takes whatever room is left.
Choose how folders look
View > Folder Style sets how Flow draws folders in the grid. Choose Soft (the default), Deep, Flat or Minimal. The choice applies to every folder in the window.
Arrange annotations with a layout preset
Settings > Layout decides where each annotation sits on a photo, while Annotations decides which ones show. Pick a built-in layout: Standard, Triage, Clean, Client, Technical or Travel day. Standard is the layout Flow ships with.
To keep your own arrangement, choose Save as preset…. To start over, choose Reset this view. See Settings.