
Filtering
Filters narrow the grid to the photos you want to see, for example everything rated 3 stars and up, or only the picks. They never change or move a photo. The filter row sits under the toolbar, and every filter you turn on appears as a chip in the Filter box at the top right.
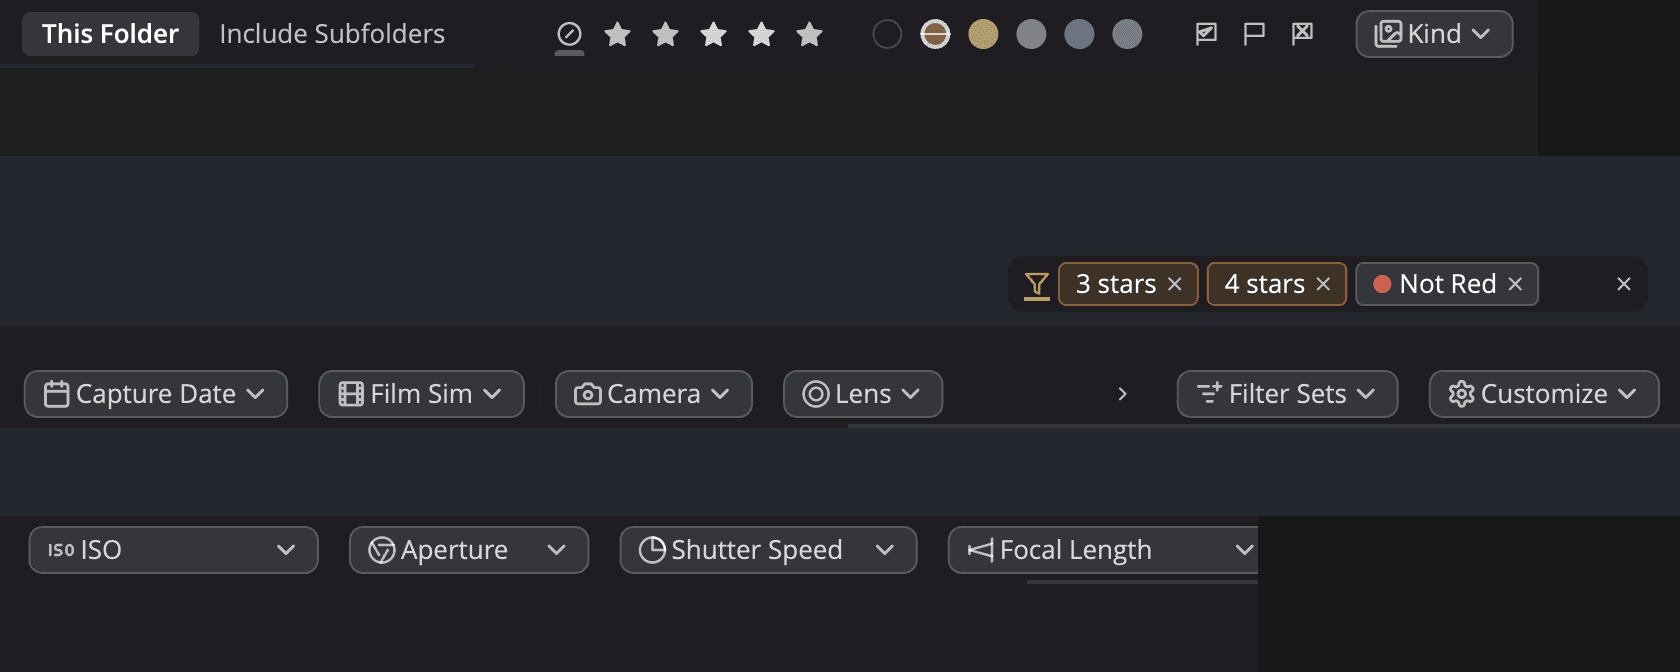
| # | Control | What it does |
|---|---|---|
| 1 | This Folder · Include Subfolders | Shows this folder alone, or this folder and every folder inside it. |
| 2 | Rating | Unrated and 1 to 5 stars. |
| 3 | Label | No Label and the five colors. |
| 4 | Flag | Picked, Unflagged and Rejected. |
| 5 | Kind | File format, and edited or not. |
| 6 | Capture Date | A date range, with a timeline of your photos. |
| 7 | Film Sim, Camera, Lens | Menus of the values in the photos you are looking at. |
| 8 | ISO, Aperture, Shutter Speed, Focal Length | A range you set with two handles. |
| 9 | Filter Sets | Saves and applies named sets of filters. |
| 10 | Gear | Customize: chooses which filters show in the row, and their order. |
| 11 | Chips | One chip for each value you turned on. Click a chip's ✕ to remove that value. |
| 12 | ✕ | Clear all filters: removes every filter and the search text. |
Choose View > Filter Row (⇧⌘F, Ctrl+Shift+F on Windows) to show or hide the filter row.
Turn filters on and off
- Click a value in the filter row, for example 3 stars or the red label. The grid narrows at once.
- Click more values in the same filter to see more photos. With 3 and 4 stars lit you see photos with 3 or 4 stars.
- Turn on a second filter, for example Picked, to narrow further. You then see photos that are 3 or 4 stars and picked.
- To remove one value, click it again or click the ✕ on its chip. To remove everything, click the ✕ in the Filter box or press ⌃0 (Ctrl+0 on Windows).
The buttons never show what you chose. Your choices show as chips in the Filter box, and as a ✓ in each menu.
Ways to click a value
| Gesture | What it does |
|---|---|
| ⇧-click a star | Shows that rating and up, for example 3, 4 and 5 stars. |
| ⌥-click (Alt-click on Windows) | Excludes the value: you see every photo except those. The chip reads Not and the value, for example "Not Red". |
| ⌘-click (on a Mac) | Shows only this value, and turns off the others in the same filter. |
⌥-click more values in the same filter to exclude those too. The marks and the rows of the value menus, such as Kind, Film Sim and Camera, take ⌥-click. The range filters and Capture Date do not.
The filters
Rating, Label and Flag
The five label colors are Red, Yellow, Green, Blue and Purple.
Point at a mark to see how many photos it would show, for example "Red — 12 photos".
Kind
| Row | What it shows |
|---|---|
| All Items | Clears this filter. |
| File Format > Photos | Every format at once. |
| File Format > Raw, JPEG, HEIC, AVIF, JPEG XL, PSD, TIFF | Only that format. Pick several to see them all. HEIC includes .heic, .heif and .hif. |
| Edit State > Edited / Not Edited | Photos with or without an edit in Radiant Photo or Radiant Raw. A rating alone isn't an edit. Choose one or the other. |
Capture Date
Click Capture Date to open a timeline, Photos over time, with a bar for each month. Drag the two ends to choose a range. The presets are All, Today, Last 7 Days, Last 30 Days and This Year. Choose Custom Range… to type two dates or pick them on a calendar.
One range applies at a time. Choosing a lit preset again clears it. The chip shows the dates the preset stood for when you chose it. A "Last 7 Days" picked on Tuesday still shows Tuesday's dates on Thursday.
Film Sim, Camera and Lens
Each value in these menus has a count.
- Film Sim lists Fujifilm film simulations. All Film Simulations clears it.
- Camera and Lens have a Search field at the top. All Cameras and All Lenses clear them.
- While Flow is still reading the folder, the menu says Still reading photos….
ISO, Aperture, Shutter Speed and Focal Length
Each button opens a range with two handles and a small bar chart of how many photos sit at each step.
- Drag the two handles to the lowest and highest value you want, and read the count beside the range.
- Click All values to clear it.
ISO steps are 100, 200, 400, 800, 1600, 3200, 6400 and 12800 and up. The other three list the values your photos actually carry. A range shows as one chip, for example "ISO 400 – 1600".
Filters hidden by default
These filters are off the row until you add them in Customize Filter Row…:
| Filter | What it filters by |
|---|---|
| Folder | Subfolders of the folder you are in. Needs Include Subfolders. All Folders clears it. |
| Orientation | Landscape, portrait or square. |
| Aspect Ratio | Square, standard, wide or panorama. |
| Rights | The AI training declaration. See Copyright cards and AI training. |
| White Balance, Exposure Bias, Metering Mode, Focus Mode, Flash, Cropped | The camera settings recorded in the photo. |
| Location | Whether the photo says where it was taken, with GPS coordinates in its metadata: Has location or No location. Any Location clears it. |
| Keywords | Words you type. |
To filter by keyword, type a word in the Keywords field and press ⏎. A list suggests keywords from the folder as you type. Photos match ANY of your keywords. Click ANY to switch to ALL, so a photo must carry every keyword.
Eyes closed
The Eyes button sits after the row's other filters, just before Filter Sets. Its menu shows only the photos where the main face has its eyes closed, Eyes closed (12), or hides them, Hide eyes closed (228). Its chip reads Eyes closed or Hiding eyes closed.
The button isn't part of Customize Filter Row…, so it can't be moved or hidden. It shows for folders on your disks, not for Apple Photos or a catalog. See Eyes closed.
Change the filter row
The row scrolls sideways when the filters do not fit. The scope switch stays at the start, and Filter Sets and the gear stay at the end.
- Click the gear, or right-click the filter row and choose Customize Filter Row…. A panel titled Filter Row opens. It lists the filters in the row's order. Untick a filter to hide it. It keeps its place in the list, so when you tick it again, it comes back where it was. To move a filter, drag it by its grip, or press ⌥↑ or ⌥↓ (Alt+↑ or Alt+↓ on Windows). Reset to Defaults puts back the default row.
- Right-click a filter and choose Hide and the filter's name, for example Hide Camera. Most filter menus end with the same row.
- Right-click the row and choose Hide Filter Row.
Radiant Flow remembers the order and the hidden filters.
Search by file name
Type in the Filter box at the top right and press ⏎ to show the photos whose file names contain what you typed. Capitals don't matter for the letters A to Z. Choose Edit > Filter (⌘F, Ctrl+F on Windows) to put the cursor in the box. The search appears as a chip like any other filter.
Filter from the keyboard
The rating filters are also in View > Filter by Rating.
| Command | Key |
|---|---|
| 1 Star and Up to 5 Stars and Up | ⌃1 to ⌃5 (Ctrl+1 to Ctrl+5 on Windows) |
| Exactly 1 Star to Exactly 5 Stars | ⌃⇧1 to ⌃⇧5 (Ctrl+Shift+1 to Ctrl+Shift+5 on Windows) |
| View > Show Rejected Photos | ⌃⇧X (Ctrl+Shift+X on Windows) |
| View > Clear all filters | ⌃0 (Ctrl+0 on Windows) |
| View > Include Subfolders | ⌥⌘S (Ctrl+Shift+S on Windows) |
On Windows, Ctrl+1, Ctrl+2 and Ctrl+0 zoom the photo instead while one photo fills the view or Compare is open.
Show Rejected Photos is on by default, and Radiant Flow remembers it. Turn it off to hide every rejected photo. While rejects are hidden, a "Not Rejected" chip shows in the Filter box. Clear all filters leaves that chip in place. Click its ✕, or turn Show Rejected Photos back on.
Save a set of filters
A filter set is a saved question, such as "picks from the 85 mm lens". Applying it filters whatever folder you are in. It holds no photos.
- Turn on the filters you want to keep.
- Choose View > Save Filter Set…, or click Filter Sets and save from there.
- Type a name. You can also choose a collection and add a description.
- Click Save. If the name is already used in that collection, the button reads Replace.
To apply a set, choose it in View > Filter Sets or click it in the Filter Sets panel. The panel stays open, so you can try several sets in a row. Manage Filter Sets… renames, re-files and deletes them.
Applying a set replaces the filters you had on. It never adds to them.
Flow starts you with 12 sets in five collections: Culling (5 Stars, Needs Culling, Picked, Rejected and Unrated), Editing (Needs Editing and Ready to Export), Files (RAW Originals), Rights (Rights Not Declared) and Recent (Shot Today, Last 7 Days and Last 30 Days). They are ordinary sets you can change or delete. Restore Default Sets in Manage Filter Sets adds back the ones you deleted.
Where a place can't answer part of a set, such as a catalog, its row is dimmed. Point at it to see why, for example Not available here: Kind. A fully dimmed set can't be applied there. When some of it applies, the tip reads Not available here: Kind. The rest of this set still applies. and a click applies the rest.
You can keep up to 50 filter sets, with names up to 64 characters. With 50, Save Filter Set… is grayed out with The filter set list is full. Delete one to save another. A filter set never stores a Folder filter, because folders differ from place to place. With no filter on, Flow says "Set a filter first — a filter set with no conditions would select everything."
Filters stay as you move
Filters stay on from folder to folder, so the cull you set up follows you. The chips in the Filter box always show what is hidden. The Folder filter clears when you leave. When you close Radiant Flow, every filter clears, except a Job's: a Job puts back its own filters when you open it again. See Jobs.
Note
Filters do not work everywhere. In Apple Photos, the filter row says, for example, Filters are not available for Apple Photos — 2 filters are suspended. In an Aperture library, only the rating, flag, label and keyword filters work. A Lightroom Classic catalog has those four, plus its own collection and people filters. In a Capture One catalog, the rating, label and keyword filters work. Elsewhere the row says how many filters are suspended, for example Other filters are not available for Lightroom Classic catalogs — 1 filter is suspended. A filter that cannot apply still shows its chip, so you can remove it.