
Editing metadata
The IPTC Core section of the Metadata panel lets you add a title, caption, keywords, credits and rights to your photos. You can edit one photo or a whole selection, and other apps read what you write.
Open the panel with View > Metadata (⌘I, Ctrl+I on Windows), then click IPTC Core to unfold it.
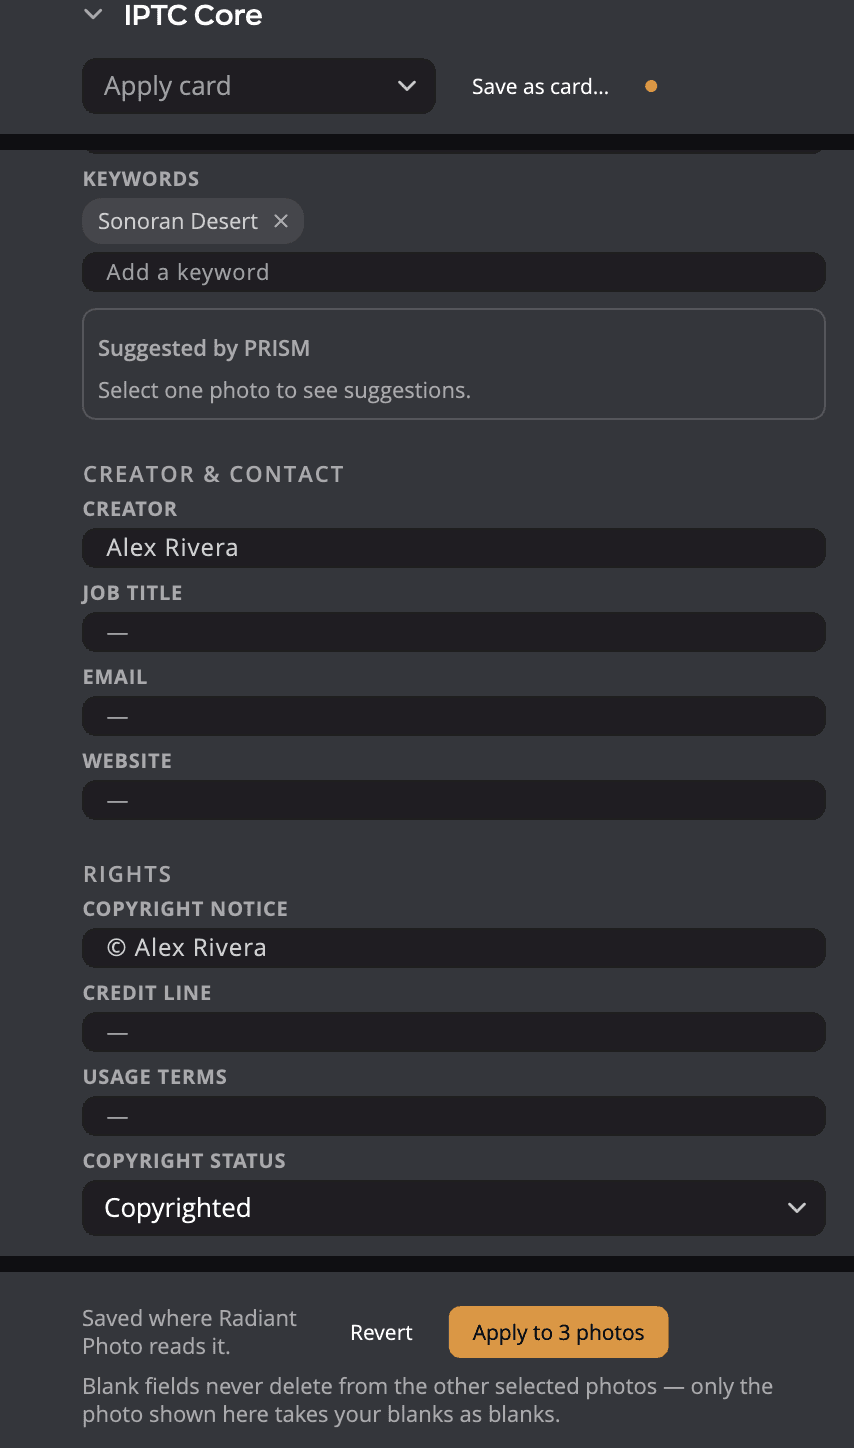
| # | Control | What it does |
|---|---|---|
| 1 | Apply card | Fills the fields from a saved copyright card. Reads No cards saved when you have none. |
| 2 | Save as card… | Saves the fields you see as a new copyright card. |
| 3 | Unsaved-changes dot | Shows that you have unsaved edits. |
| 4 | Text fields | The photo's title, caption, creator, rights and location. |
| 5 | Keywords | The photo's keywords as chips, the box to add one, and the Keyword Set panel. |
| 6 | Suggested by PRISM | Keywords and a caption PRISM suggests for one photo. |
| 7 | Copyright status | Unknown, Copyrighted or Public domain. |
| 8 | Note line | Saved where Radiant Photo reads it. |
| 9 | Revert | Throws away your unsaved edits. |
| 10 | Save / Apply to N photos | Writes your edits. With several photos selected, it reads Apply to 3 photos. |
| 11 | Blank-field sentence | Reminds you that a blank field never erases the other photos' values. |
Edit one photo
- Select the photo.
- Type in the fields you want. A dot appears beside Save as card… while you have unsaved edits.
- Click Save.
Nothing is written until you click Save or move to another photo. Click Revert to go back to what the photo carries.
Note
When you select another photo, Flow saves your unsaved edits to the photo you leave, as Save does. Edit > Undo takes that save back. If you open Apple Photos, a library or a catalog instead, your unsaved edits are dropped.
To caption a shoot photo by photo, keep the cursor in a field and press ⌘→ or ⌘← (Ctrl+Right Arrow or Ctrl+Left Arrow on Windows), the keys of Next Photo, Keep Zoom and Previous Photo, Keep Zoom. Flow moves to the next or previous photo and puts the cursor back in the same field. What you typed is saved to the photo you leave. On the Stage and in Quick Look the zoom stays as it is. A keyword you typed in the box without pressing Return is entered first, as Return would. With several photos selected, the keys don't step while you have unsaved typing: click Apply to 12 photos first.
Press ⌘K (Ctrl+K on Windows) anywhere in the window to put the cursor in the Keywords box. Flow opens the panel and IPTC Core first if they're closed. While Quick Look or Compare is open, ⌘K does nothing.
To clear a field, delete its text and click Save. With one photo, a blank field is saved as blank.
The fields
| Group | Fields |
|---|---|
| Description | Title, Headline, Caption, Keywords |
| Creator & contact | Creator, Job title, Email, Website |
| Rights | Copyright notice, Credit line, Usage terms, Copyright status |
| Location taken | City, State / province, Country, Country code, GPS |
Country code takes the ISO 3166-1 code, for example USA. Flow writes it in capitals.
Copyright status reads Copyrighted (implied) when the photo has a copyright notice but no status. Choose a value to state it outright.
Click More rights fields under Copyright status to see eight more fields. They are Source, Web statement of rights, Copyright owner, Image creator, Licensor, Licensor URL, Licensor email and Licensor phone.
The AI training declaration has a section of its own, AI & Data Mining, under Copyright. It shares the same Save button. See Copyright cards and AI training.
Keywords
- Click in the box that reads Add a keyword, or a path such as Weddings > Ceremony.
- Type a keyword and press Return. To file it under another keyword, type both with > between them, such as
Weddings > Ceremony. - To remove one, click the × on its chip.
As you type, a list under the box offers matching keywords from this Job, this folder and the Lightroom Classic catalogs Flow has open, with how many photos carry each where Flow knows it. Press ↓ or ↑ to light one and Return to add it. The last row, Make “Ceremony” a new keyword, adds just what you typed, and Esc closes the list.
A keyword with levels shows as one chip, such as Weddings › Ceremony. Flow writes the whole path where Lightroom
Classic reads it, and the last level, Ceremony, as a plain keyword that every app can read.
A keyword the photo already has is not added twice. Keyword edits are saved with Save, like every other field.
Keyword Set
The Keyword Set panel under the keyword box holds nine keywords you use often, one in each slot. Select photos in the grid and press ⌥1 to ⌥9 (Alt+Shift+1 to Alt+Shift+9 on Windows), or click a slot. A slot adds its keyword to every selected photo. When all of them have it already, it takes the keyword off all of them.
A slot writes at once, with no Save to click, and Edit > Undo takes it back. Each slot shows its key; you can change the keys in Keyboard shortcuts. In a Job whose card has a Base keyword, the slot's keyword goes under the base keyword.
- Click Edit set.
- Type a keyword or a path in each slot you want, and a Set name.
- Click Done.
The pop-up at the top of the panel switches sets, and New set… adds one. A set listed as My keywords (all Jobs) is offered everywhere. One listed as Okafor wedding (this Job) belongs to the Job you're in.
Flow starts you with seven sets of nine keywords: Wedding, Portrait, Landscape & Nature, Travel, Event, Aerial and Pets. They are added once, in the app's language at that time, and Landscape & Nature shows first. They are ordinary sets, listed as Pets (all Jobs). Restore starter sets, the last row of the pop-up, brings back any you deleted or changed and leaves your own sets alone. While you edit one of your "(all Jobs)" sets, Delete set removes it; a Job's own set and Recent Keywords can't be deleted.
Recent Keywords is the pop-up's first entry: the last nine keywords you used, from a slot or the Keywords box, newest in slot 1. Its slots work like any set's, but you can't edit it.
Press ⌥0 or ⇧⌥0 (Alt+Shift+0 or Alt+Shift+Minus on Windows) in the grid to step to the next or previous set. The set's name shows over the grid, for example Keyword Set: Travel
Keywords suggested by PRISM
Under Keywords, the Suggested by PRISM card offers up to eight keywords and one caption for the selected photo. PRISM reads the photo on this computer. It offers at most two keywords of one kind, and never words about a person's looks, such as their age or gender, or brand names.
- Click a suggested keyword to add it to Keywords.
- With two or more suggestions, click Add all to add every one.
- While the Caption field is empty, click Use beside the suggested caption to fill it.
- Click × to hide the card for this photo. Click the eye to Show suggestions for this photo again.
A click only changes the form. Nothing is written until you click Save, and Revert puts the suggestions back on the card.
When IPTC Core is folded, its header ends with the number of suggestions, for example 5 suggested.
| The card says | Why |
|---|---|
| PRISM could not read this photo. | PRISM's read of this photo failed, for example on a file it can't open. Nothing is added; you can still type keywords and a caption yourself. |
| PRISM is reading this photo. | PRISM reads a photo after you stay on it for a moment. |
| No suggestions for this photo. | PRISM has nothing to add that the photo does not already carry. |
| You added every suggestion. | Every suggested keyword is in the form. |
| Select one photo to see suggestions. | Suggestions work on one photo at a time. |
| PRISM is still getting ready on this computer. | PRISM is still being set up. Try again shortly. See Scene recognition. |
| PRISM Photo Score is turned off in Settings ▸ General. | Suggestions need PRISM Photo Score. When Radiant Photo is installed, the switch is in Radiant Photo's Settings instead. |
In a language other than English, suggestions may still arrive in English. An EN tag marks them.
Edit several photos at once
- Select the photos. The panel header says how many, for example 12 selected.
- Change the fields you want. The fields show one photo of the selection.
- Click Apply to 12 photos. The button reads Applying 3 of 12… while it works.
Only what you change travels to the other photos, and only if you leave it filled in:
- Blank fields never delete. Clearing a field clears it on the photo the panel shows, and leaves the others alone.
- Keywords are added. New keywords join each photo's own keywords. A keyword you remove is removed from the shown photo only.
- Untouched fields stay as they are. They are not written to the other photos.
- GPS never travels. One photo's location is never copied to the others. To give several photos one location, use the GPS row or Paste Metadata.
A closed stack counts as all of its photos.
With up to 100 photos selected, a keyword that only some of them carry has a plus mark on its chip. Keywords that only the other selected photos carry follow the photo's own, dimmed, with the mark and no ×. Point at a mark to see how many photos carry it, for example On 2 of 3 selected photos. Click to add “beach” to all 3. Click the mark to add the keyword to every selected photo that lacks it. This writes at once, without Apply to 12 photos, and Edit > Undo takes it back.
If some photos refuse the write, the panel says so, for example 2 photos could not be written. Your edits stay unsaved, so you can fix the problem and click Apply to 12 photos again.
Note
You can take back a Save or an Apply to N photos with Edit > Undo. Each is one step for every photo it wrote, and in a Lightroom Classic catalog the earlier values go back to Lightroom Classic too. Card applies can be undone the same way; see Copyright cards and AI training.
Stamp your name and copyright
The stamp is the creator and rights information you put on every photo. It lives at the top of the panel's Copyright section.
- On one photo, fill in your creator and rights fields and click Save.
- In the Copyright section, click Remember as stamp.
- Select the photos to stamp, then click Stamp creator & copyright.
The stamp holds seven fields: Creator, Job title, Email, Website, Copyright notice, Credit line and Usage terms. It never carries a title, caption, keywords or location.
Stamp creator & copyright writes straight away, to every selected photo, including the one the panel shows. A blank stamp field never erases what a photo already carries. You can take back a stamp with Edit > Undo. The line above the buttons shows the remembered creator and copyright notice.
Copy and paste metadata
You can copy the details of one photo and paste them onto others.
- Select the photo whose details you want. The Metadata panel shows it.
- Choose Edit > Copy Metadata. A message says Metadata copied.
- Select the photos that should get the details.
- Choose Edit > Paste Metadata, then a row:
| Row | What it pastes |
|---|---|
| Everything (⇧⌘V, Ctrl+Shift+V on Windows) | Every group below. |
| Title & Caption | The title, headline and caption. |
| Creator & Contact | The creator, job title, email and website. |
| Rights & Licensing | The copyright notice, credit line, usage terms, source and license. |
| Location (place names) | The event and the place names, such as the city and the country. Not the coordinates. |
| GPS Coordinates | Only the GPS coordinates. |
A message then says how many photos changed, for example "Metadata pasted to 24 photos."
- A paste goes to every selected photo. A closed stack counts as all of its photos.
- Blank fields never delete. A field that is empty in the copy leaves the photo's own value alone.
- Keywords, ratings, flags and labels never travel.
- A location a photo has stays. A photo that already has GPS coordinates keeps them, and the message says The location was skipped where a photo already has one.
- AI training and copyright status never change. A paste leaves each photo's AI training declaration and copyright status as they are.
Paste Metadata is grayed out until you copy. Copy Metadata takes what the photo carries, not edits you haven't saved. The copy belongs to this window and lasts until you quit Flow. It is separate from the system clipboard. You can take back a paste with Edit > Undo, in one step.
GPS location
The GPS row ends the Location taken group. Its buttons write the photo's location at once. There is no Save to click.
A photo with no location reads No GPS. To give it one:
- Click Set…, type or paste coordinates or a map link, and click Set. Decimal coordinates, degrees, minutes and seconds, and Apple Maps or Google Maps links all work.
- Click Paste coordinates to use the coordinates or map link you copied.
- Click Same as previous photo to copy the location of the photo just before it in the grid.
- On a Mac, click Set from map pin…. Click the map to drop the pin, then click Set. To find a place first, type its name in Search for a place and press Return. What you type is sent to Apple to find the place, as the line under the box says. Choose a place from the list to move the map there, then drop the pin. Flow looks near the map and around the whole world. With the map zoomed far out, places from around the world come first.
A photo that already has a location shows it, marked already set or from the camera. Outside a Lightroom Classic catalog, Flow never writes over a location. To change it, click Clear first, then set the new one.
With several photos selected, the row counts how many carry GPS. Set for 5 untagged… writes only the photos with no location, and the others keep theirs. Clear… asks before it removes any location.
Some cameras and phones write the location into the file itself. For a JPEG, TIFF or HEIC file, Clear removes that location from the file too, and Flow asks first. A raw file, or any other kind of file, is never changed, so a location its camera wrote stays.
You can take back a Set or a Clear with Edit > Undo.
The capture card shows the location too. Click Show on map to see the place. On a Mac it opens in Maps. On Windows it opens Google Maps in your web browser.
In a Lightroom Classic catalog, the location, altitude and direction go to Lightroom Classic, one photo at a time. See Fields Lightroom Classic can't take.
Altitude and direction
A location can also carry the altitude where the photo was taken and the compass direction the camera faced. With one photo selected, a line under its coordinates shows them, for example Altitude 82.3 m · Direction 312.23°. Each part appears only when the photo carries it.
To set or change them:
- Select one photo that has a location.
- On the GPS row, click Altitude and direction….
- Type the height above sea level in Altitude in meters, and the direction in Direction in degrees. 0 is north.
- Click Set.
To remove one of them, empty its field and click Set. Clear on the row removes the altitude and direction along with the location.
- The altitude is always in meters, from -11,000 to 100,000. Below sea level is negative, for example -12.
- The direction is from 0 to 360 degrees. 360 is saved as 0.
- A comma works as the decimal point too.
If a field holds something else, the sheet says Type a number for the altitude, and a direction from 0 to 360. and Set stays grayed out until you fix it.
Set saves at once, the way Save does, so any other field you typed and didn't save yet is saved with it. You can take it back with Edit > Undo. With several photos selected, the row shows no altitude or direction, and you can't change them there.
In a Lightroom Classic catalog, the line shows the altitude and direction you set while the change waits for Lightroom Classic. It keeps showing them until Flow reads the catalog again after Lightroom Classic takes the change.
When you can't edit
| The panel says | Why |
|---|---|
| Apple Photos assets have no file to write metadata beside. | Apple Photos keeps the original. You can still set AI training; see Copyright cards and AI training. |
| Read-only — this library is never written to. | The photo is in an Aperture library, which Flow never changes. |
In a Lightroom Classic catalog, edits go to Lightroom Classic, and fields it can't take are grayed out.
In a Capture One catalog or Session on a Mac, your edits go to Capture One, and the location can't be changed. Fields Capture One has no place for, such as Copyright status, are kept in Flow. On Windows, the fields are read-only. See Capture One catalogs and Sessions.
Where your edits go
Save writes your edits where Radiant Photo reads them, and into the photo or its .xmp sidecar so other apps
read them too. See Where ratings and metadata are written.
With Inside the photo checked and Sidecar (.xmp) unchecked in Settings > Sidecars, a photo that can't hold your edits inside, such as a HEIC file, and has no .xmp sidecar yet doesn't get one. Flow keeps the edits where Radiant Photo reads them, and the line under
Save says so. Other apps don't see them. See
When Sidecar (.xmp) is unchecked.