
Curves
Curves reshapes the tones of your photo with a line you can bend. Use it for contrast, for a soft matte look, or to brighten one tonal range without touching the others. You'll find Curves in the right panel, just below Levels.
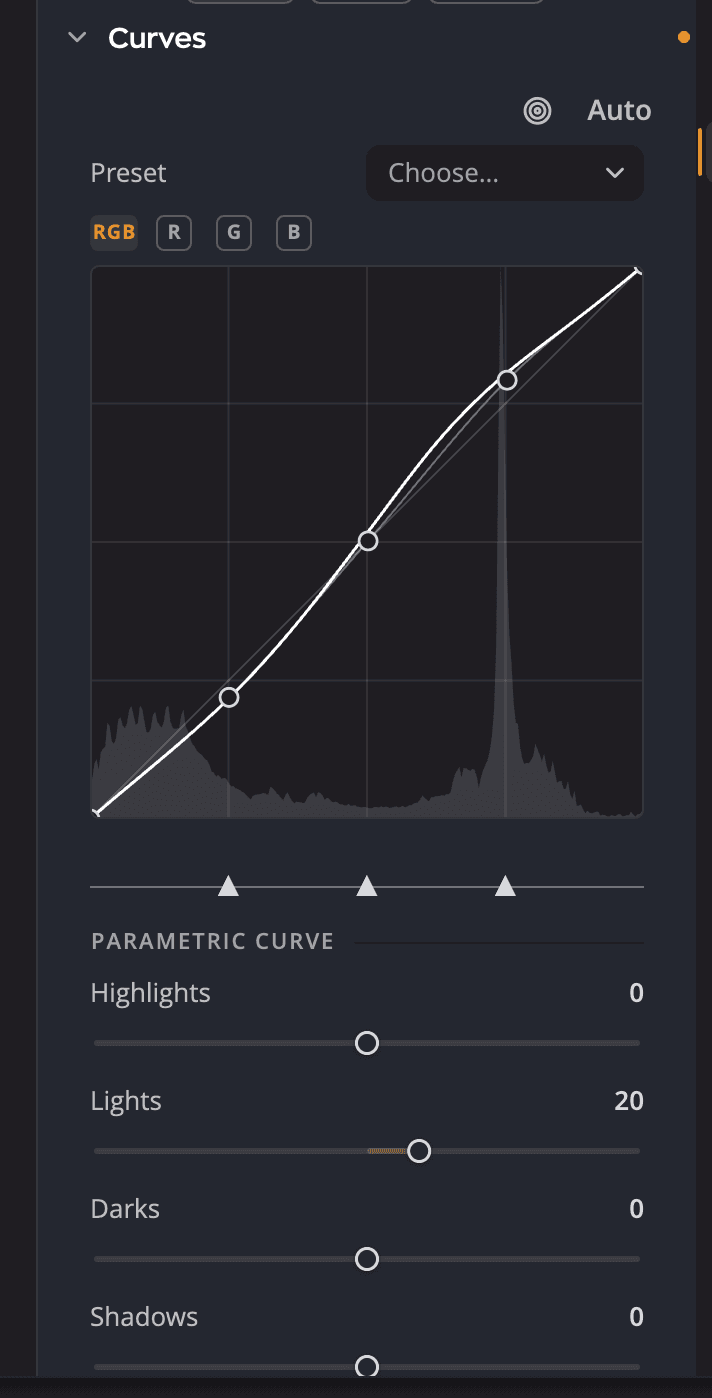
| # | Control | What it does |
|---|---|---|
| 1 | Targeted Adjustment | Lets you drag on the photo to move the curve at that tone. |
| 2 | Auto | Applies Auto Color Correction, as in Levels. |
| 3 | Preset | Built-in and saved curves, and .acv import. |
| 4 | Channel chips | RGB, R, G and B. |
| 5 | Curve point | Drag to reshape the curve. |
| 6 | Input / Output | The values under the pointer or the selected point, 0 to 255. |
| 7 | Split handles | Where the four Parametric Curve regions meet. |
| 8 | Parametric Curve | Highlights, Lights, Darks and Shadows. |
Two ways to bend the curve
Radiant Photo gives you a point curve and a Parametric Curve in the same graph, and both work at once. The region sliders bow the line, and your points shape whatever comes out of that bow.
Drag points
- Click on the line to add a point and drag it. A curve can have up to 16 points.
- Drag a point far off the top or bottom of the graph to delete it, or double-click it.
- The two end points move up and down only.
- Double-click an empty part of the graph to reset the curve.
The graph shows the histogram of the photo as it is now, with the other channels' curves drawn faintly behind the active one.
Use the region sliders
| Slider | Range (default) | What it does |
|---|---|---|
| Highlights | −100 to +100 (0) | Brightens or darkens the brightest tones. |
| Lights | −100 to +100 (0) | The upper midtones. |
| Darks | −100 to +100 (0) | The lower midtones. |
| Shadows | −100 to +100 (0) | The darkest tones. |
Hold the pointer over a slider to light up its region on the graph. Drag the three small split handles under the graph to move the borders between regions. They start at 25, 50 and 75; double-click the strip to put them back. The region sliders work on the RGB curve only.
Work on one channel
Click R, G or B to edit one color channel. Pull a channel's curve up to add that color, or down to add its opposite: lowering B in the highlights warms them. Click RGB to go back to the composite curve.
Drag on the photo
- Click the Targeted Adjustment button at the top of the section.
- Press on the photo where the tone you want to change is, and drag up or down.
The tone under the pointer becomes the point you move. If a point is already close to that tone, you move it instead of adding another. Nothing changes until you actually drag. ⌥-drag (Alt-drag on Windows) moves the region slider that owns that tone instead.
Presets and .acv files
The Preset menu has six built-ins: Linear, Medium Contrast, Strong Contrast, Lighter, Darker and Negative. A saved preset keeps all four channels' curves and the Parametric Curve, so applying one replaces the whole tool. Linear clears every channel.
- Save current curve as… saves your own preset.
- Delete a custom curve preset… removes one.
- Import curve file (.acv)… opens a Photoshop curve file. A channel the file doesn't include is reset.
Auto
Auto works as it does in Levels: a click applies your default, and ⌥-click (Alt-click) opens the Auto Color Correction dialog. See Levels.
Use the keyboard
Click the graph, then use these keys:
| Key | What it does |
|---|---|
| [ and ] | Select the previous or next point. |
| ← and → | Move the selected point's input. Add ⇧ for bigger steps. |
| ↑ and ↓ | Move its output. Add ⇧ for bigger steps. |
| Home and End | Select the first or last point. |
| Delete | Remove the selected point. End points stay. |
Turn it off or reset it
The eye in the Curves header turns the curves off and keeps your work. The header's reset button clears the point curves, the region sliders and the split handles, and turns Curves off. Like Levels, Curves belongs to the Tone group, so using it turns Tone on if Tone was off.
Tip
Levels runs first, then Curves. Set the end points in Levels, then shape the midtones in Curves.