
Skin Tone
The Skin Tone tools give people natural, accurate skin. They recognize the skin tone of your subject and balance the light, color and depth of the whole photo around it. They're made for portraits of one person but help group photos too. You'll find the Skin Tone panel on the Adjustments page of the right panel. Press Y to open it.
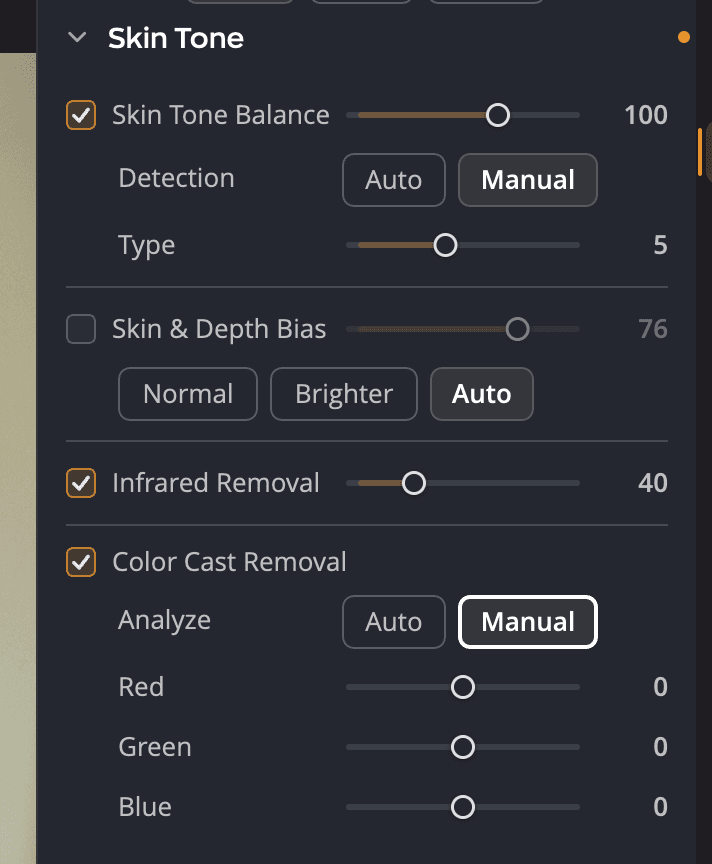
| # | Control | Range (default) | What it does |
|---|---|---|---|
| 1 | Skin Tone Balance | 0 to 150 (20) | Balances the scene's light, color and depth for your subject's skin |
| 2 | Detection | Auto / Manual | Lets Radiant Photo recognize the skin tone, or lets you set it |
| 3 | Type | 0 to 12 (1) | The skin tone to balance for, from light to dark. Shown only with Manual. |
| 4 | Skin & Depth Bias | 0 to 100 (100) | Removes red from skin and adds depth to the background |
| 5 | Infrared Removal | 0 to 150 (40) | Removes the extra red that cameras record from infrared light |
| 6 | Color Cast Removal | On / off | Removes color spill from backdrops and mixed light |
| 7 | Analyze | Auto / Manual | Lets Radiant Photo set the correction, or lets you set it |
| 8 | Red, Green, Blue | −20 to +20 (0) | Your own correction for each color. Shown only with Manual. |
Balance skin tones
Accurate skin is hard to capture. Mixed light, the environment and the camera itself all get in the way. Skin Tone Balance doesn't only change the skin. It balances the light, color and depth of the whole scene so your subject looks natural, with the right mix of warmth and accuracy.
The effect is often subtle. It's the difference between a portrait that feels right and one that feels a little off.
Note
The Skin Tone slider in Smart Editing is the same setting as Skin Tone Balance. Move one and the other follows.
Choose how the skin tone is found
Radiant Photo detects the skin tone of your main subject and uses it for Skin Tone Balance.
- Auto: Radiant Photo recognizes the skin tone on each photo. Use it when you build a recipe for a batch.
- Manual: you choose the skin tone yourself with the Type slider. Values 1 to 12 run from light to dark skin. At 0, no skin tone is set.
Repair camera exposure flaws
Skin & Depth Bias repairs exposure flaws common to digital cameras and controls how much depth you add. Choose a style:
| Choice | What it does |
|---|---|
| Normal | Removes red from skin tones and adds depth to the background |
| Brighter | The same as Normal, with a brighter photo and more detail in the shadows |
| Auto | Applies the correction only when Radiant Photo finds the photo needs it. Best for recipes. |
Infrared Removal fixes skin that looks redder than it was. Cameras record more infrared light than your eyes see, especially indoors and with flash. The tool removes that red from skin and keeps the true reds elsewhere in the photo.
Remove color spill
A colored or dark backdrop, artificial light or deep shade can spill color onto your subject. Color Cast Removal calculates a white balance that neutralizes the spill.
- Select the Color Cast Removal checkbox. Analyze is set to Auto.
- To adjust the result, set Analyze to Manual.
- Move Red, Green and Blue to taste.
Start over
Point at the panel header and click the reset button (Reset Skin Tone) to turn off every Skin Tone tool and return its sliders to their defaults.