
The top toolbar
The top toolbar holds the controls you use on every photo: zoom, view modes, workspaces, the Develop slider and saving. It stays at the top of the window and can't be hidden.

What's on the toolbar
| # | Control | What it does |
|---|---|---|
| 1 | Quick settings (gear) | Raw open choices and a few system settings. See below. |
| 2 | Open photos… | Opens photos from your disk. ⌘O (Ctrl+O). |
| 3 | Radiant Flow | Opens Radiant Flow to browse and cull photos. ⇧⌘O (Ctrl+Shift+O). |
| 4 | Store | Opens the in-app Store for Looks, Develop Collections, recipes and Workflows. ⌥⌘B (Ctrl+Shift+B). |
| 5 | Zoom | Zoom out, the zoom level, and Zoom in |
| 6 | HDR badge | Appears only when the photo has color outside sRGB, so it has no marker in the picture above |
| 7 | Preview quality | Performance or High fidelity |
| 8 | View modes | Edited Only, Before/After and Split |
| 9 | Review Photos | Opens Review, to pick and reject photos. Press R. |
| 10 | Crop & Straighten, Magnifier, Color Sampler | Press C, ` (backquote) and I |
| 11 | Workspace | Chooses which tools the right panel shows |
| 12 | Develop and Color Grade | Global sliders that scale your edit |
| 13 | Undo, Redo, reset, Save all and Save | Step through your edit, start over, or save |
Some controls fold away when the window is narrow. The preview quality buttons go first, then Color Grade and Save all. In the narrowest windows Review Photos and Color Sampler fold too. The Save all choices move into the Save arrow menu. The menus and shortcuts still work.
Quick settings
Click the gear to open Quick settings.
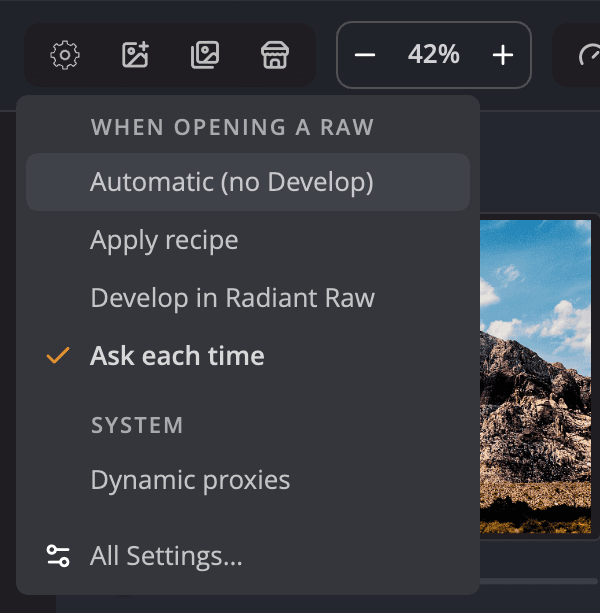
- When opening a Raw chooses what happens when you open a raw file: Automatic (no Develop), Apply recipe, Develop in Radiant Raw or Ask each time. Develop in Radiant Raw appears only when Radiant Raw is installed. Until Radiant Raw is activated, it has a lock, and choosing it opens Radiant Raw so you can activate it. With Apply recipe on, a Recipe list follows.
- System has Dynamic proxies. When it's on, Radiant Photo draws a fast preview first, then refines it.
- All Settings… opens the Settings window.
Zoom
- Click Zoom out or Zoom in, or press ⌘− and ⌘= (Ctrl+− and Ctrl+=).
- Click the zoom level to switch between Fit to screen and 100%. ⌘0 (Ctrl+0) does the same.
- Press Z to fit the photo, ⇧Z to fill the window, and ⌘1 (Ctrl+1) for 100%.
When you zoom in past Fit, a small map of the whole photo appears at the lower right of the canvas, with the part you're looking at outlined in your accent color. Point at it and it grows. Press or drag inside it to move around the photo. At Fit it goes away. It also doesn't show while two views are side by side, or while an HDR photo shows in full HDR. The Navigator in the left panel does the same job.
Once the zoomed photo covers the two small pills at the bottom right of the photo, the camera readout and the zoom pill (not the toolbar's zoom), they slide down to the canvas's bottom edge, and the map rides above them. They come back when you return to Fit. With Reduce motion on, they move at once.
Preview quality and HDR
Performance — 8-bit canvas draws the photo quickly. High fidelity — float canvas, wide gamut and HDR shows colors outside sRGB and HDR highlights on a display that can show them. Press ⇧⌘H (Ctrl+Shift+H) to switch. Hold the pointer over either button to see why it might show no difference on this photo.
The HDR badge appears when the photo has color outside sRGB. Its tooltip tells you whether that color is reaching your display. Click it to switch between HDR and the standard preview.
View modes
| Mode | Shortcut | What you see |
|---|---|---|
| Edited Only | ⌥1 (Alt+1) | Your edit, full size |
| Before/After | ⌥2 (Alt+2) | The original and your edit side by side |
| Split | ⌥3 (Alt+3) | One photo, the original on one side of a divider and your edit on the other |
Click Before/After or Split again, or press its shortcut again, to switch between a horizontal and a vertical layout. In any mode, press Space and hold to see the original. See Comparing before and after.
Review Photos is described in Reviewing photos, the Magnifier in The Magnifier, and the Color Sampler in Color Sampler. The HDR badge and preview quality are covered in HDR photos.
Workspace menu
The workspace button shows the current workspace. Click it to choose another one, or to use Manage Workspaces…, Reset Professional, Solo mode and Show active tools only. See Using Workspaces.
The Develop and Color Grade sliders
Develop strengthens or softens the automatic Tone, Color and Details corrections together. Color Grade appears when a Look is applied and changes its strength. See The Develop and Color Grade sliders.
Undo, Redo and reset
- Undo ⌘Z (Ctrl+Z) and Redo ⇧⌘Z (Ctrl+Y) step through your changes to this photo.
- The reset button, Reset to workflow defaults, detects the photo's scene again and applies the recipe your Workflow chooses for it. Your manual changes are replaced.
Save and Save all
Each save button has two parts. Click the main part to save. Click the arrow for more choices.
| Button | Main part | Arrow menu |
|---|---|---|
| Save | Saves this photo with the settings you used last time. The first time, it opens the Save dialog. | Save with Options…, Save as JPEG, Save as PNG, Save as 16-bit TIFF, Save as 16-bit PNG |
| Save all | Opens one Save dialog for every open photo | Save all with Options…, Save all as JPEG, Save all as PNG |
Save all as JPEG and Save all as PNG skip the dialog and use your export defaults in Settings > Files. When Selects is on, Save all reads Save Selects and saves only those photos.
Tip
To see the whole Save dialog again, choose File > Save with Options… or press ⇧⌘S (Ctrl+Shift+S).