
Keyboard shortcuts
Keyboard shortcuts let you edit without reaching for the menus. Every shortcut below is the default, and you can change any of them in Settings > Keyboard Shortcuts.
To see the list in the app, choose Help > Keyboard Shortcuts or press ⌘/ (Ctrl+/ on Windows).
Note
Single-key shortcuts, such as T for Tone, work while you're in the editor and not typing in a text field.
File
| Action | macOS | Windows |
|---|---|---|
| Open… | ⌘O | Ctrl+O |
| Open Folder… | ⌥⌘O | Ctrl+Shift+D |
| Browse Photos… | ⇧⌘O | Ctrl+Shift+O |
| Export | ⌘E | Ctrl+E |
| Save | ⌘S | Ctrl+S |
| Save All | ⌥⌘S | Ctrl+Shift+A |
| Save with Options… | ⇧⌘S | Ctrl+Shift+S |
| Batch Export… | ⇧⌘E | Ctrl+Shift+E |
| Browse Store | ⌥⌘B | Ctrl+Shift+B |
| Close Photo | ⌘W | Ctrl+W |
| Close All Photos | ⇧⌘W | Ctrl+Shift+W |
| Print… | ⌘P | Ctrl+P |
| Settings… | ⌘, | Ctrl+, |
| Personalize Radiant Photo… | Not set | Not set |
| Find a Setting | ⌘F | Ctrl+F |
| Keyboard Shortcuts | ⌘/ | Ctrl+/ |
| Radiant Photo Help | ⇧⌘/ | F1 |
Edit
| Action | macOS | Windows |
|---|---|---|
| Undo | ⌘Z | Ctrl+Z |
| Redo | ⇧⌘Z | Ctrl+Y or Ctrl+Shift+Z |
| Copy All Settings | ⌘C | Ctrl+C |
| Copy Selected Settings | ⇧⌘C | Ctrl+Shift+C |
| Paste Settings | ⌘V | Ctrl+V |
| Paste Metadata | ⇧⌘V | Ctrl+Shift+V |
| Sync Forward | ⌥⇧⌘V | Ctrl+Shift+N |
| Sync to All Open Photos | ⌥⌘V | Ctrl+Shift+M |
| Find a Recipe | ⇧⌘P | Ctrl+Shift+Q |
View
| Action | macOS | Windows |
|---|---|---|
| Review Photos | R | R |
| Selects | ⌥⌘F | Ctrl+Shift+F |
| Grid | ⌘G | Ctrl+G |
| Fit | Z | Z |
| Fill | ⇧Z | Shift+Z |
| 100% | ⌘1 | Ctrl+1 |
| 200% | ⌘2 | Ctrl+2 |
| Zoom In | ⌘= | Ctrl+= |
| Zoom Out | ⌘− | Ctrl+− |
| Toggle Zoom (Fit / 100%) | ⌘0 | Ctrl+0 |
| Edited Only | ⌥1 | Alt+1 |
| Before/After | ⌥2 | Alt+2 |
| Split | ⌥3 | Alt+3 |
| Set Photo as Compare A | ⇧A | Shift+A |
| Set Photo as Compare B | ⇧B | Shift+B |
| Compare A ↔ B | ⇧K | Shift+K |
| Performance / High Fidelity | ⇧⌘H | Ctrl+Shift+H |
| Clipping Warnings | J | J |
| Focus Mask (Sharp Areas) | ⇧J | Shift+J |
| Focus Points | ⌥J | Alt+J |
| Cycle Focus Mask Channels | ⌥⌘J | Ctrl+Shift+J |
| Magnifier | ` | ` |
| Soft Proofing | ⇧S | Shift+S |
| Gamut Warning | ⇧⌘Y | Ctrl+Shift+Y |
| LUT Preview | ⌥⌘L | Ctrl+Shift+L |
| Show Original (hold) | Space | Space |
| Collapse / Expand Filmstrip | ⇧Space | Shift+Space |
| Hide / Show Filmstrip | ⇧⌘Space | Ctrl+Shift+Space |
| Hide / Show Side Panels | ⌥Tab | Ctrl+Tab |
| Hide / Show Panels + Filmstrip | ⇧⌥Tab | Ctrl+Shift+Tab |
| Cycle Panels | ⌥⌘P | Ctrl+Shift+P |
| Lights Out | ⇧L | Shift+L |
| Cycle Layout | ⌥⇧⌘P | Ctrl+Shift+T |
| Info | ⌘I | Ctrl+I |
| Info Only | ⌃⌘I | Ctrl+Shift+I |
| Show or Hide Scopes on Photo | ⌃⌘G | Ctrl+Shift+G |
| Show or Hide Scopes Window | ⌃⌘W | Ctrl+Shift+U |
| Move Focus Forward | F6 | F6 |
| Move Focus Backward | ⇧F6 | Shift+F6 |
Scopes are described in Histogram and scopes.
The Magnifier key, `, is the key left of 1. On a Mac, the menu and Keyboard Shortcuts show it as your keyboard types it, for example ^ on a German keyboard.
Tip
Press Space and hold to see the original photo. Let go to see your edit again.
Navigate
| Action | macOS | Windows |
|---|---|---|
| Previous Image / Next Image | ⌘← / ⌘→ | Ctrl+Left Arrow / Ctrl+Right Arrow |
| First Image / Last Image | ⇧⌘← / ⇧⌘→ | Ctrl+Shift+Left Arrow / Ctrl+Shift+Right Arrow |
| Jump to First Image / Jump to Last Image | Home / End | Home / End |
| Previous Page of Images / Next Page of Images | Page Up / Page Down | Page Up / Page Down |
| Previous / next image, when you're not cropping or removing spots | ← → or ↑ ↓ | Left Arrow, Right Arrow or Up Arrow, Down Arrow |
| Extend the selection to the previous / next image | ⇧← ⇧→ or ⇧↑ ⇧↓ | Shift+Left Arrow, Shift+Right Arrow or Shift+Up Arrow, Shift+Down Arrow |
Tools
| Action | macOS | Windows |
|---|---|---|
| Crop & Straighten | C | C |
| Auto Crop | ⌥C | Alt+C |
| Compare Crops | ⇧C | Shift+C |
| Portrait | ⌥⌘K | Ctrl+Shift+K |
| Portrait Selected Photos | ⌥⇧⌘K | Ctrl+Shift+X |
| Spot Removal | Q | Q |
| Color Sampler | I | I |
| Crop: Swap Orientation | ⌥X | Alt+X |
| Rotate right | ⌥R | Alt+R |
| Rotate left | ⌥⌘R | Ctrl+Shift+R |
| Crop: Next Guide Overlay | O | O |
| Crop: Flip Guide Overlay | ⇧O | Shift+O |
| Magnifier: Fixed or At-Cursor Focus | ⌥P | Alt+P |
| Magnifier: Increase Magnification | ⌥= | Alt+= |
| Magnifier: Decrease Magnification | ⌥− | Alt+− |
| Magnifier: Larger Lens | ⌥] | Alt+] |
| Magnifier: Smaller Lens | ⌥[ | Alt+[ |
| Magnifier: Snap Aim to Eye | ⇧E | Shift+E |
While you crop
These keys are fixed and can't be changed.
| Action | macOS | Windows |
|---|---|---|
| Finish cropping | Return | Enter |
| Cancel | Esc | Esc |
| Choose which edge or corner the arrow keys move | [ and ] | [ and ] |
| Move the crop 1 px (10 px with Shift) | Arrow keys | Arrow keys |
| Straighten by 1° (10° with Shift) | ⌥↑ / ⌥↓ | Alt+Up Arrow / Alt+Down Arrow |
Spot Removal
These work while the Spot Removal tool is active. They take the place of the editor's shortcuts on the same keys.
| Action | macOS | Windows |
|---|---|---|
| Spot Removal: Cycle Show Pins | ⇧H | Shift+H |
| Spot Removal: Softer Brush Edge | ⌥[ | Alt+[ |
| Spot Removal: Harder Brush Edge | ⌥] | Alt+] |
| Spot Removal: Move Source | → | Right Arrow |
| Spot Removal: Move Selected Spot | ⌥→ | Alt+Right Arrow |
| Spot Removal: Set Source at Reticle | ⌘Return | Ctrl+Enter |
| Spot Removal: Continue Last Fix to Reticle | ⇧Return | Shift+Enter |
| Spot Removal: Pan (hold) | Space | Space |
| Spot Removal: Hand | H | H |
| Spot Removal: Zoom | Z | Z |
| Spot Removal: Visualize Spots | A | A |
| Spot Removal: Scroll Up / Spot Removal: Scroll Down, when zoomed in past Fit | Page Up / Page Down | Page Up / Page Down |
| Spot Removal: Scroll to Top Left / Spot Removal: Scroll to Bottom Right, when zoomed in past Fit | Home / End | Home / End |
| Spot Removal: Hide / Show Mask Overlay | O | O |
| Spot Removal: Hide / Show Mask Overlay (Second Key) | \ | \ |
| Spot Removal: Cycle Mask Overlay Color | ⇧O | Shift+O |
| Spot Removal: New Source, with a spot selected | / | / |
| Spot Removal: Nudge Set Source, with no spot revealed | ⌥⇧→ | Alt+Shift+Right Arrow |
| Spot Removal: Opacity (0–9): 1 is 10%, 0 is 100% | 0 … 9 | 0 … 9 |
| Spot Removal: Clone | S | S |
| Spot Removal: Heal | J | J |
| Spot Removal: Rotate Source Left | ⌥⇧, | Alt+Shift+, |
| Spot Removal: Rotate Source Right | ⌥⇧. | Alt+Shift+. |
| Spot Removal: Scale Source Up | ⌥⇧] | Alt+Shift+] |
| Spot Removal: Scale Source Down | ⌥⇧[ | Alt+Shift+[ |
Spot Removal: Continue Last Fix to Reticle adds a straight segment from your last fix to the reticle, as a Shift-click does. With no fix yet, it paints a dab at the reticle. It's also in the menu bar, under View > Tools > Continue Last Fix to Reticle.
These fixed keys also work in Spot Removal and can't be changed:
| Action | macOS | Windows |
|---|---|---|
| Make the brush smaller or larger | [ and ] (or ⇧ with the scroll wheel) | [ and ] (or Shift with the scroll wheel) |
| Move the placement reticle | Arrow keys | Arrow keys |
| Paint a dab at the reticle | Return | Enter |
| Delete the selected spot | Delete | Delete or Backspace |
| Delete spots with the pointer | ⌥-drag a box around them | Alt-drag a box around them |
| Set the source with the pointer | ⌥-click the photo | Alt-click the photo |
| Put the Hand tool away, hide a revealed source, then leave the tool | Esc | Esc |
See Spot Removal.
Panels
Press a letter to open or close a section of the right panel.
| Section | Key | Section | Key |
|---|---|---|---|
| Tone | T | Makeup | M |
| Color | K | Looks (the Color Grading section) | L |
| Skin Tone | Y | Selective Color | H |
| Details | D | Black & White | B |
| Face Selection | A | Graduated Filter | G |
| Face | F | Finishing (the Finishing Tools section) | V |
| Eyes | E | ||
| Skin | S |
Workspaces
| Action | macOS | Windows |
|---|---|---|
| Workspace 1 … Workspace 9 | ⌃⌘1 … ⌃⌘9 | Ctrl+Shift+1 … Ctrl+Shift+9 |
| Workspace 10 | ⌃⌘0 | Not set |
Ratings, flags and labels
These work in the editor and the filmstrip. Add Shift to any of them to mark the photo and move to the next one. On Windows that works for every key except No label, which has no Shift version. On the Mac, ⌥⇧⌘0 still works.
| Action | macOS | Windows |
|---|---|---|
| Rate 1 star … Rate 5 stars | 1 … 5 | 1 … 5 |
| Clear rating | 0 | 0 |
| Pick | P | P |
| Reject | X | X |
| Clear flag | U | U |
| Label Red | 6 | 6 |
| Label Yellow | 7 | 7 |
| Label Green | 8 | 8 |
| Label Blue | 9 | 9 |
| Label Purple | - (minus) | - (minus) |
| No label | ⌥⌘0 | Alt+0 |
Reviewing photos
While you review photos (press R), these keys apply.
| Action | macOS | Windows |
|---|---|---|
| Previous Image / Next Image | ← / → | Left Arrow / Right Arrow |
| First Image / Last Image | Home / End | Home / End |
| Back 10 photos / Forward 10 photos | Page Up / Page Down | Page Up / Page Down |
| Pick / Reject / Clear flag | P / X / U | P / X / U |
| Rate 1 star … Rate 5 stars, Clear rating | 1 … 5, 0 | 1 … 5, 0 |
| Label Red … Label Purple | 6, 7, 8, 9, - | 6, 7, 8, 9, - |
| No label | ⌥⌘0 | Alt+0 |
| Rotate left / Rotate right | [ / ] | [ / ] |
| Undo | ⌘Z | Ctrl+Z |
| Hide / Show Filmstrip | ⇧⌘Space | Ctrl+Shift+Space |
| Crop & Straighten / Compare Crops / Portrait | C / ⇧C / ⌥⌘K | C / Shift+C / Ctrl+Shift+K |
| Show Faces | Not set | Not set |
These extra keys are fixed and can't be changed:
| Key | Action |
|---|---|
| Esc | Leave the review |
| Space or D, ↓ | Next photo |
| A, ↑ | Previous photo |
| W | Pick |
| S | Reject |
| Number keypad 0–9 and - (minus) | The same as the number keys above them |
While the face row is up (View > Show Faces), these fixed keys work in it:
| Key | Action |
|---|---|
| ← / → | Previous / next face |
| Home / End | First / last face |
| Space | The face's nearer eye at 100%, then back to Fit. With no face to go to, Space is Next photo. |
| Esc | Close the row. Press Esc again to leave the review. |
See Check every face.
Compare Crops
| Action | macOS | Windows |
|---|---|---|
| Grid / One at a Time | G | G |
| Previous Framing / Next Framing | ← / → | Left Arrow / Right Arrow |
| Framing Above / Framing Below | ↑ / ↓ | Up Arrow / Down Arrow |
| First Framing / Last Framing | Home / End | Home / End |
| Use This Crop | Return | Enter |
| Close | Space | Space |
Other fixed keys
| Key | Action |
|---|---|
| Esc | Leaves an A/B compare, then brings the lights back after Lights Out |
| Return (Enter on Windows) | In Grid, shows the current photo full size |
| F11 | Windows only: full screen |
Change a shortcut
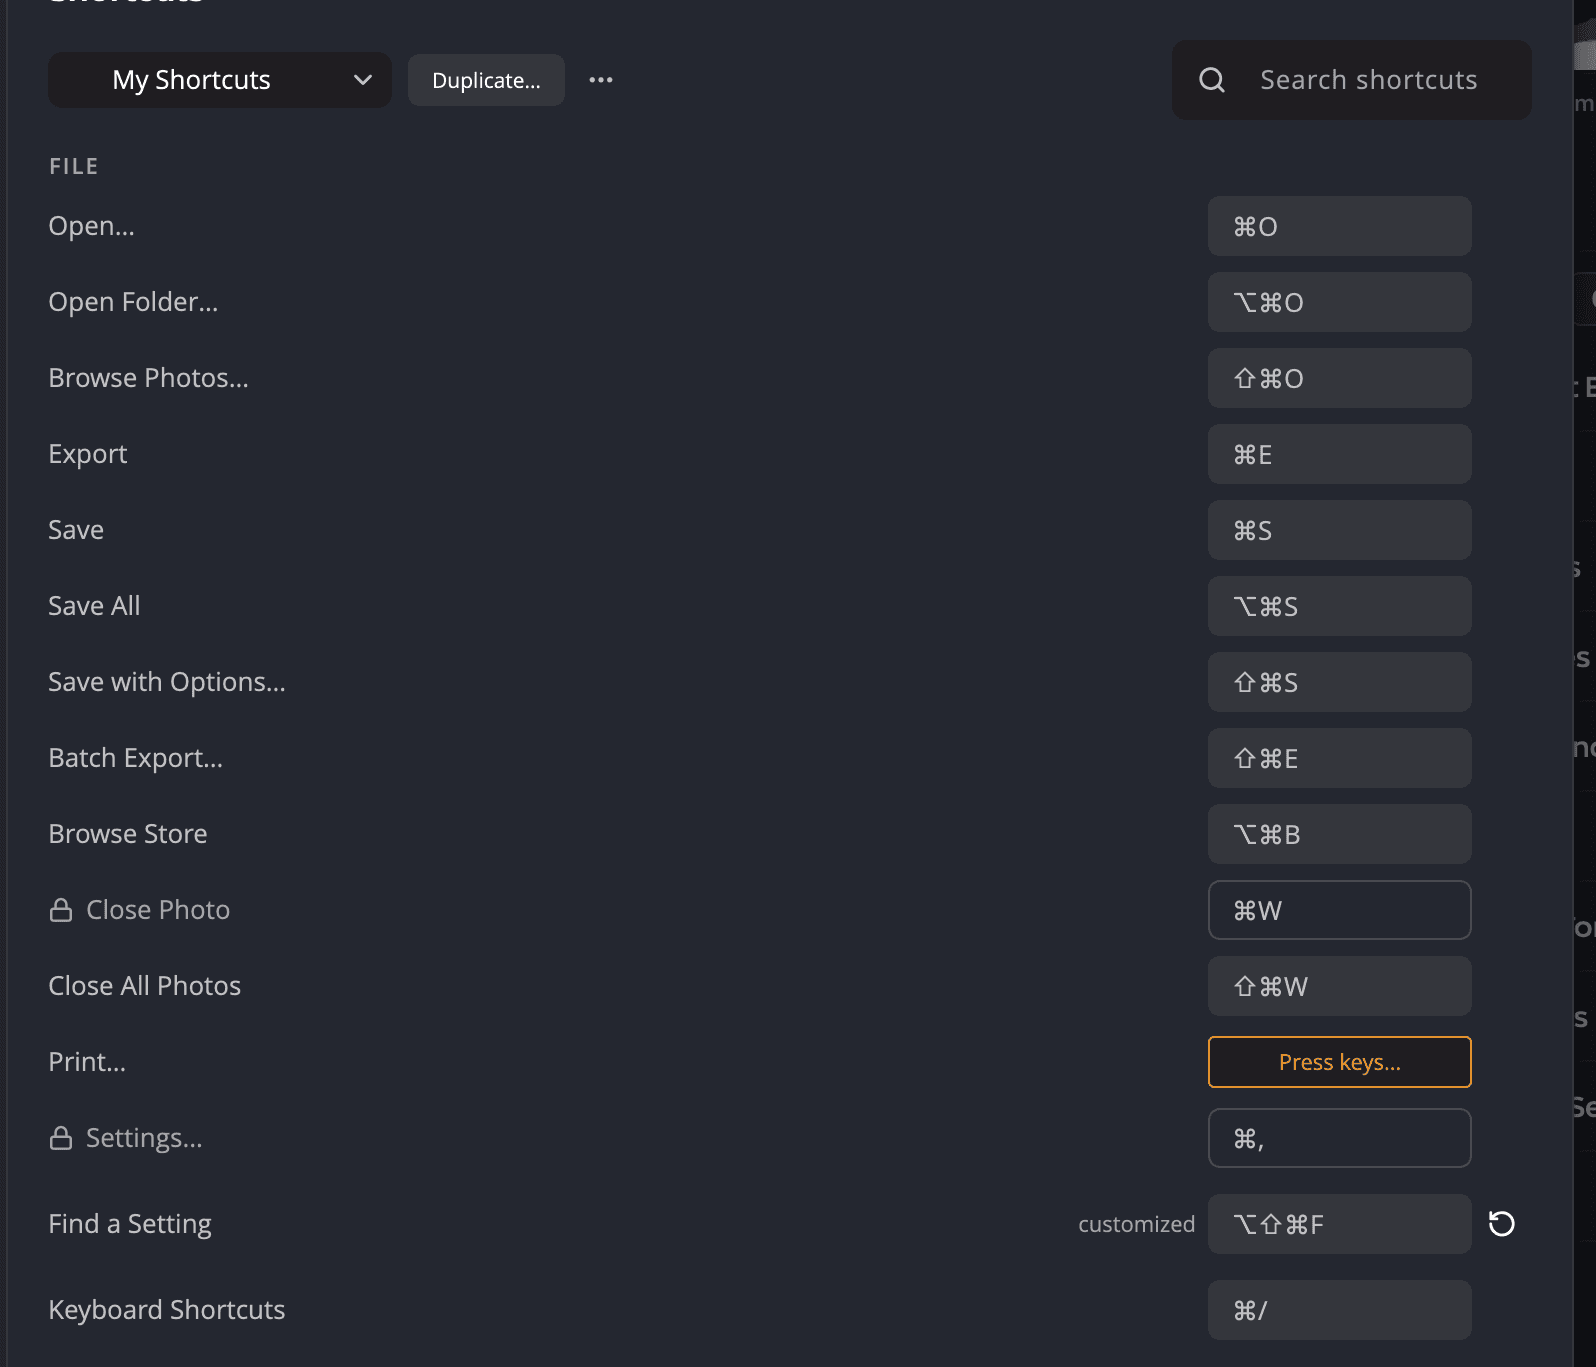
- Open Settings > Keyboard Shortcuts, or choose Help > Keyboard Shortcuts.
- Find the command. Type in Search shortcuts to narrow the list.
- Click its key. The row says Press keys…. Press the new combination.
If those keys already belong to another command, Radiant Photo tells you which one. To undo a change, click Reset to and the original key. To take a shortcut away, choose Reset to not set, and the row shows Not set.
The built-in set, Radiant Default, is locked. Your first change creates a set called My Shortcuts. You can keep several sets:
- Duplicate… copies the current set.
- The More set actions button has Rename… and Delete…, plus Import… and Export… to load and save a set as a file, so you can use it on another computer.
- Restore Defaults… clears all of your changes in the current set.
Some keys are reserved by the system. Their rows say Reserved by the system and can't be changed.