
Recipes
A recipe is a saved set of adjustments you can apply to any photo with one click. The recipes on the Recipes tab sit behind Develop Collections in the left panel. Unlike the recipes in Develop Collections, they don't follow scene detection: a recipe on this tab applies the same way whatever the photo shows.
| Control | What it does |
|---|---|
| Applied | Names the recipe on the current photo. |
| Save current settings as a recipe (+) | After the filter field. Saves the current edit as a new recipe. |
| Recipes options (…) | Two settings; collapses or expands all groups; imports, exports and gets more recipes. |
| FAVORITES | The recipes you bookmarked. |
| A collection heading | Groups the recipes in one collection. |
| A recipe | Point at it to preview; click it to apply. The bookmark adds it to Favorites. |
| More options (…) | Applies or bookmarks the recipe; your own recipes can also be renamed, moved, duplicated, updated or deleted. |
Apply a recipe
- In the left panel, click the Recipes tab, behind Develop Collections.
- Point at a recipe. The photo previews it while the pointer stays there.
- Click the recipe to apply it. It's one step, so ⌘Z (Ctrl+Z on Windows) undoes it.
The collections that come with Radiant Photo are listed first, then your own. To keep a recipe at hand, click its bookmark (Add to Favorites). It appears under FAVORITES, just below Radiant Essentials.
To jump to the tab and its filter field, choose Edit > Find a Recipe (⇧⌘P, Ctrl+Shift+Q on Windows).
Tip
Want a recipe that adapts to each scene? Save it in Develop Collections instead. See Recipes and Develop Collections.
Save your own recipe
- Edit a photo until you like it.
- Click Save current settings as a recipe (+) after the filter field on the Recipes tab, or choose Edit > Save Settings as Recipe…. The Save recipe dialog opens.
- Enter a name in Recipe name.
- Choose a Collection. Your first recipes go to User Presets. Choose New collection… to make another and type its New collection name.
- Add a Description (optional) if you like.
- Click Save.
If a recipe with that name is already in the collection, Radiant Photo asks Replace recipe? Click Replace to update it.
Rename, move or delete your recipes
Point at a recipe and click More options (…). Every recipe has Apply and Add to Favorites; your own recipes have the rest too:
| Choice | What it does |
|---|---|
| Apply | Applies the recipe to the photo. |
| Add to Favorites | Bookmarks it under FAVORITES. On a bookmarked recipe it reads Remove from Favorites. |
| Show in Its Group | Under FAVORITES or in a filtered list only. Shows the recipe in its own collection. |
| Rename… | Gives the recipe a new name. |
| Move to Collection… | Moves it to another of your collections, or a new one. |
| Duplicate | Makes a copy named Golden Hour copy. |
| Update with Current Settings… | After you confirm, the recipe keeps its name and takes the photo's current settings. |
| Delete… | Removes it. Radiant Photo asks first, because this can't be undone. |
The recipes that come with Radiant Photo can't be renamed, moved, duplicated, updated or deleted.
Organize your collections
Point at a collection heading and click Group options (…), or right-click the heading:
| Choice | What it does |
|---|---|
| Pin to Top | Keeps the collection at the top of the list. On a pinned collection it reads Unpin. |
| Hide Group | Takes the collection out of the list. |
| Rename Collection… | Your own collections only. Gives the collection a new name. |
| Export Collection… | Your own collections only. Saves this one collection as a .radiant file. |
| Delete Collection… | Your own collections only. Removes the collection and its recipes, after you confirm. |
| Remove Import… | A collection you imported from Radiant Photo 1. Deletes Radiant Photo's copy; your original file stays as it is. |
| Show in Store | A collection from the Store. Opens its page in the Store. |
Import, export and get more
Click Recipes options (…) at the end of the tab row:
| Choice | What it does |
|---|---|
| Solo mode | On or off (on). With it on, opening one collection closes the others. It's the same setting the right panel's tools use, so turning it off here turns it off there too. |
| Preview on hover | On or off (on). Rest the pointer on a recipe to see it on your photo before you apply it. |
| Collapse All Groups, Expand All Groups | Folds or opens every collection in the list. |
| Show Hidden Groups (2) | Only when you've hidden collections. Puts them back in the list. |
| Import Recipes… | Adds the recipe collections in a .radiant file. Paid collections in the file are left out. |
| Import Radiant Photo 1 Recipes… | Brings in your recipes from Radiant Photo 1, under Legacy. |
| Export My Recipes… | Saves all your own collections to one .radiant file. Collections that come with Radiant Photo or from the Store are left out. |
| Get more recipes… | Opens the recipes in the Store. |
Tool presets
Several tools keep their own presets, for just that tool's sliders. Applying one changes only that tool.
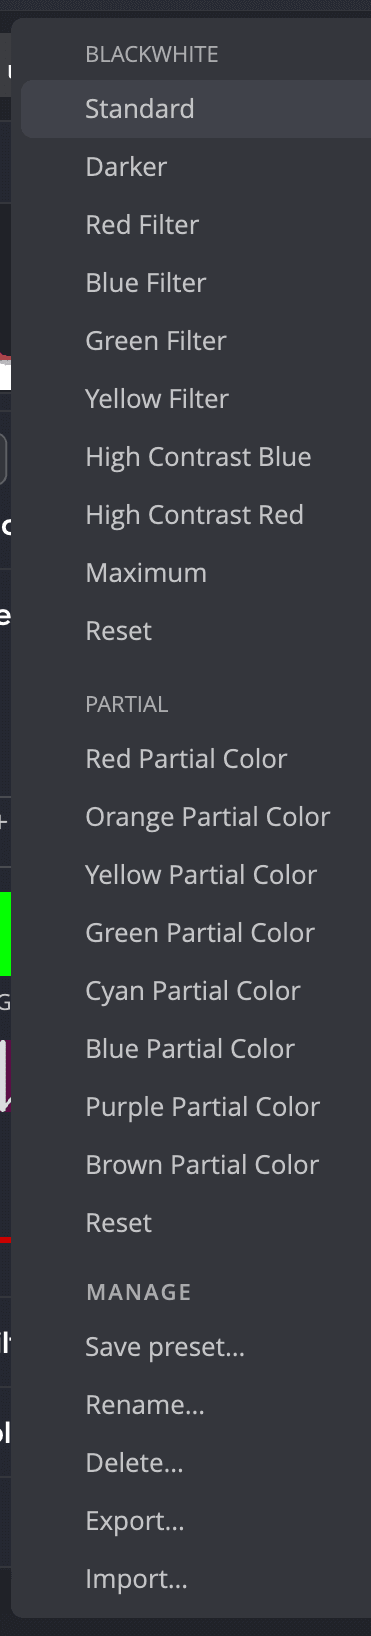
Selective Color, Black & White, Finishing Tools and Makeup each have a Preset row. It shows the active preset's name, or a dash when no preset matches. In Selective Color and Black & White, the row reads Custom once you've changed the tool's sliders. Open the menu for the built-in presets, then your own, then these items:
| Item | When it appears | What it does |
|---|---|---|
| Save preset… | No preset is active | Saves the tool's current settings. |
| Rename…, Delete… | One of your presets is active | Manages that preset. |
| Export…, Import… | Always | Shares tool presets as files. |
Levels and Curves have their own preset menus too, with Save current levels as… and Save current curve as…. Curves can also Import curve file (.acv)….
Recipes from Radiant Photo 1
Recipes from Radiant Photo 1 are listed under Legacy, at the bottom of the recipes list. To bring them in, click Recipes options (…) and choose Import Radiant Photo 1 Recipes…. Click a legacy recipe to apply it.