
The Save dialog
The Save dialog sets where your new files go, what they're called and what kind of files they are. It opens the first time you save, and whenever you choose Save with Options… (⇧⌘S, Ctrl+Shift+S on Windows).
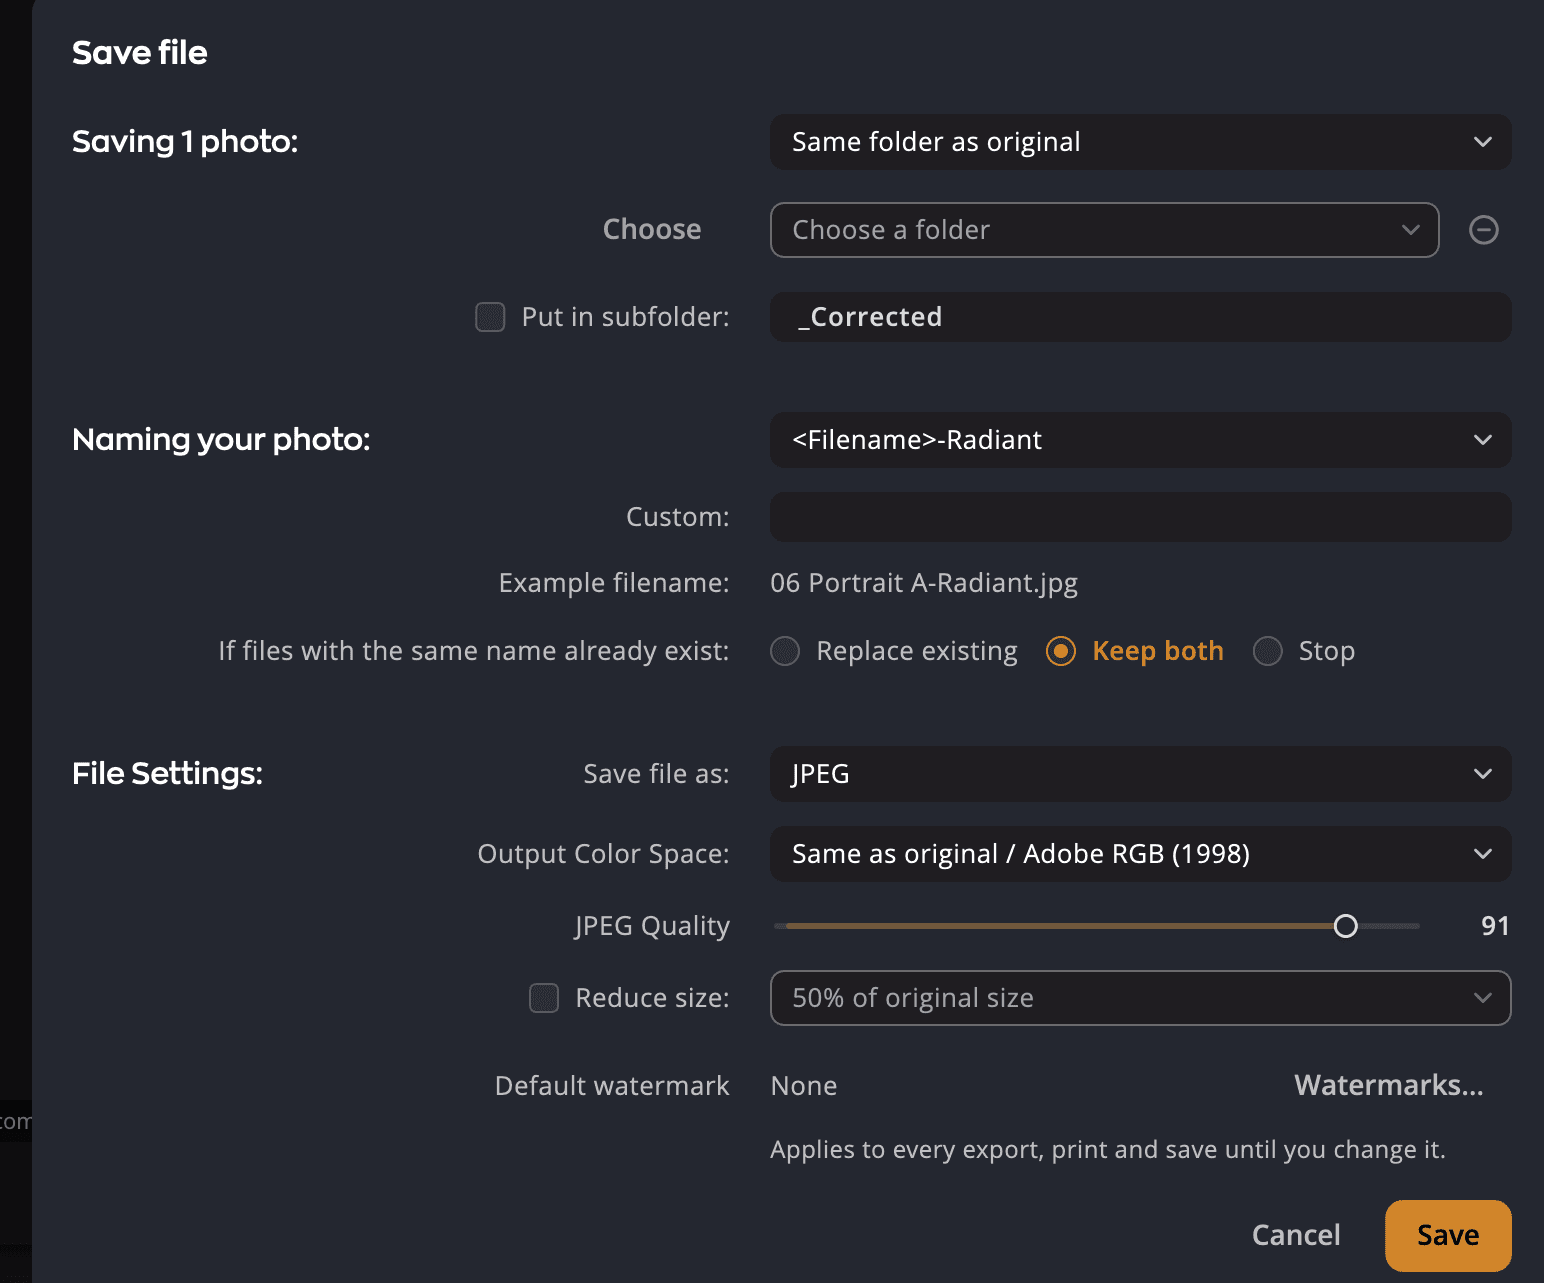
| # | Control | What it does |
|---|---|---|
| 1 | Location menu | Same folder as original or Custom |
| 2 | Choose and the folder menu | Picks the folder for Custom, or one you used before |
| 3 | Put in subfolder: | Saves into a subfolder of that folder |
| 4 | Naming your photo: | The pattern for the new file names |
| 5 | Custom: | Your own text, for the patterns that use it |
| 6 | Example filename: | What the first file will be called |
| 7 | If files with the same name already exist: | Replace existing, Keep both or Stop |
| 8 | Save file as: | The file type |
| 9 | Output Color Space: | The color space of the new files |
| 10 | JPEG Quality | Compression for JPEG files |
| 11 | Reduce size: | Makes the new files smaller |
| 12 | Watermark | The watermark these saves add |
The title reads Save file for one photo and Save files for several. The first line counts the photos, for example Saving 3 photos:. Click Save when you're ready.
Choose where to save
| Choice | Where the files go |
|---|---|
| Same folder as original | Next to each original photo. Useful when another app manages your folders. |
| Custom | A folder you pick. Click Choose, or pick a recent one from the menu. |
The folder menu remembers up to 10 folders. To remove one, click its minus button. The tooltip says Forget this folder — it is not deleted from disk.
To keep the new files apart from the originals, select Put in subfolder: and type a name (default
_Corrected). Radiant Photo creates the subfolder if needed.
Name your files
Choose a pattern from Naming your photo:.
| Pattern | Example for IMG_0042.jpg | Notes |
|---|---|---|
| <Filename>-Radiant | IMG_0042-Radiant.jpg | The default |
| <Custom>-<Sequence> | Wedding-1.jpg, Wedding-2.jpg | Your text plus a number that counts up |
| <Filename><Custom> | IMG_0042_final.jpg | The original name plus your text |
| <Filename>_<Preset> | IMG_0042_Portrait.jpg | The original name plus the name of the applied recipe. Only listed when the photo has one. |
| <Filename>_display | IMG_0042_display.jpg | For catalog apps that show a display copy in place of the original |
For the two patterns with <Custom>, type your text in Custom:. Save stays unavailable until you do. Example filename: shows the result as you type.
When a file with the same name exists
Choose what happens under If files with the same name already exist:
| Choice | What happens |
|---|---|
| Replace existing | The new file replaces the old one. |
| Keep both | The default. The new file gets a number: IMG_0042-Radiant-2.jpg, then -3, and so on. |
| Stop | The File already exists dialog opens for each clash. |
In the File already exists dialog, choose Replace, Keep both, Rename… (type a new name) or Skip (don't save this photo).
Radiant Photo never replaces the original photo itself, whatever you choose here.
Choose the file type
Save file as: lists the file types that make sense for the photos you're saving.
| File type | Best for |
|---|---|
| JPEG | The web, email and most sharing. Always 8-bit. |
| JPEG XL | A newer format that keeps more detail than JPEG in a file of the same size. 8-bit or 16-bit. Not every app opens it yet. |
| TIFF | Printing and further editing in another app. |
| PNG | Lossless files for the web or design apps. |
| DNG | Raw editors that read DNG. Last in every list. |
When you save only raw files, TIFF is at the top of the list. For some sets of photos, extra choices appear:
| Choice | When it appears | What it saves |
|---|---|---|
| Raw to TIFF, others to JPEG or Raw to TIFF, others to PNG | Raw files mixed with other photos | Raw files as TIFF, everything else as JPEG or PNG |
| To original format | Photos that include formats other than JPEG, and no raw files | Each JPEG, PNG and TIFF in its own format. Other formats, such as HEIC, become TIFF. |
When you save one photo that has HDR, more rows appear: JPEG HDR, JPEG XL HDR and TIFF HDR, and on macOS 27 or later also AVIF HDR. See HDR photos for what each one keeps.
DNG
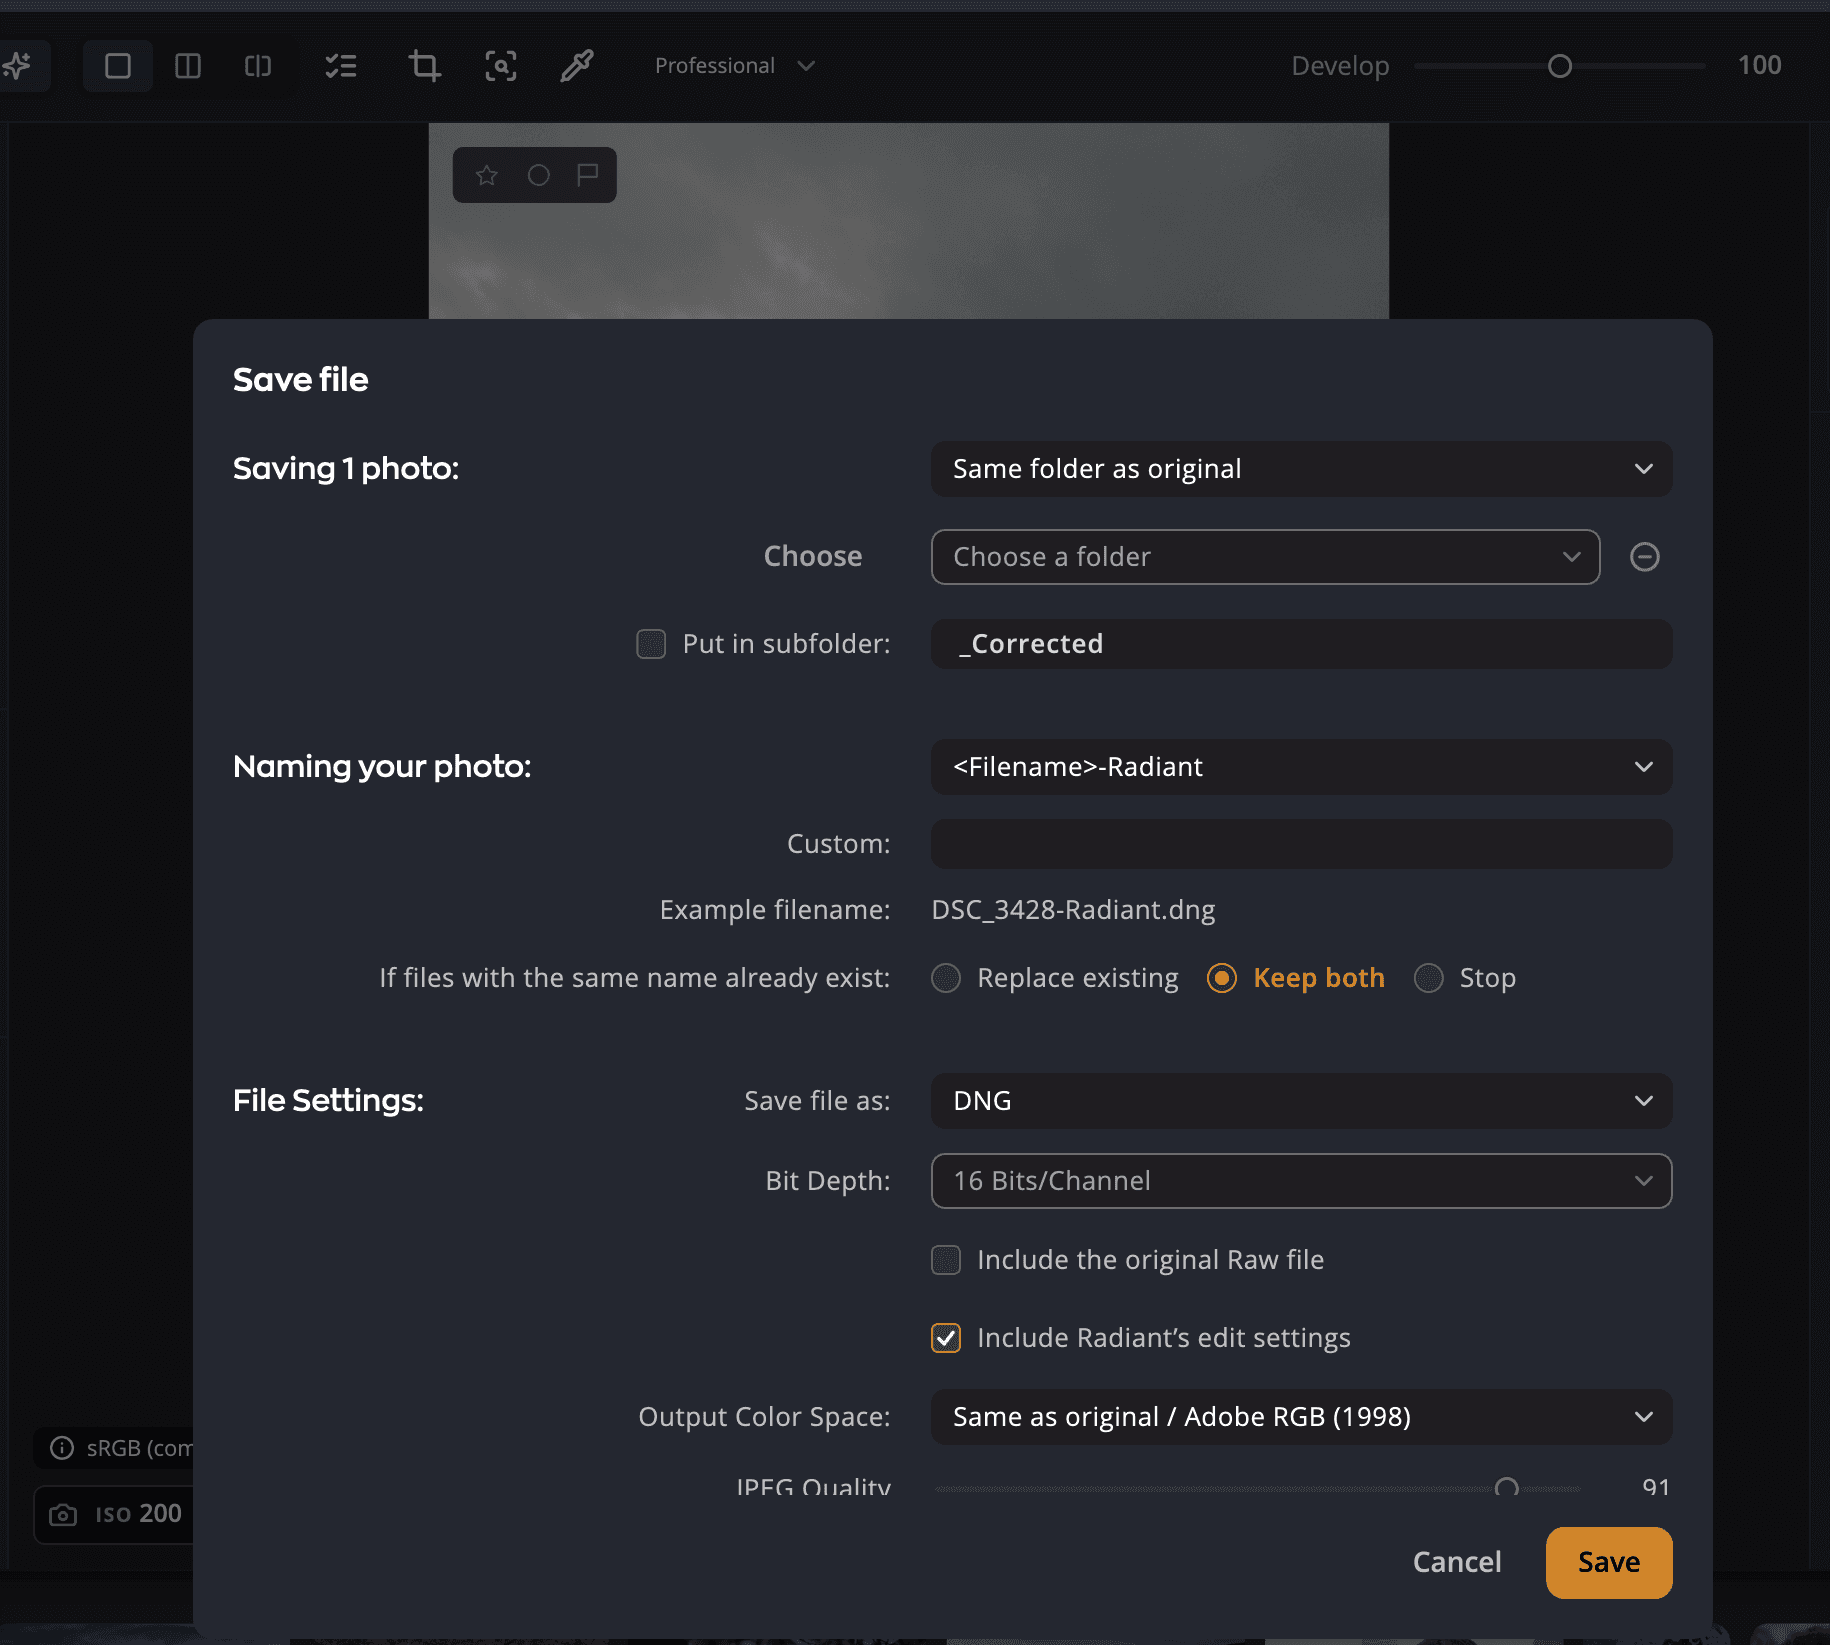
A DNG from Radiant Photo holds your finished edit as a 16-bit linear photo. Two checkboxes appear under it:
| Checkbox | Default | What it does |
|---|---|---|
| Include the original Raw file | Off | Stores the original raw file inside the DNG. Shown only when you save a raw file. |
| Include Radiant’s edit settings | On | Stores the photo's develop settings inside the DNG, so the edit can travel with it. |
If your export settings remove metadata, a note replaces the first checkbox: The original Raw file is left out: your export settings remove metadata, and the Raw file keeps all of it. See SafeShare.
Bit depth
For TIFF, JPEG XL and PNG, Bit Depth: offers 8 Bits/Channel and 16 Bits/Channel. 16-bit keeps much more tonal detail for later editing. 8-bit files are half the size.
Radiant Photo sets 16-bit for you, and grays out the menu, when:
- the original is already 16-bit, or
- Output Color Space: is anything other than sRGB. Wide color needs 16 bits to avoid banding.
The Bit Depth: row appears only for TIFF, JPEG XL, PNG and DNG. A DNG is always 16-bit.
Color space
| Choice | What you get |
|---|---|
| sRGB | The safest choice for the web and most screens. The narrowest range of colors. |
| ProPhoto RGB | The widest range. The only space that holds every color a raw file can capture. |
| Adobe RGB (1998) | A wide space used for printing and in many editing apps. |
| Same as original / sRGB | Photos without a profile get sRGB. |
| Same as original / ProPhoto RGB | Photos without a profile get ProPhoto RGB. |
| Same as original / Adobe RGB (1998) | The default. Photos without a profile get Adobe RGB (1998). |
The "Same as original" choices keep each photo's own color profile. They matter most when you save a mix of photos. A JPEG keeps the profile it had, and a raw file, which has none, gets the space you named.
A JPEG, or any other 8-bit file, is never saved in ProPhoto RGB. Eight bits are too few for its wide range. When you choose ProPhoto RGB, or the original is in ProPhoto RGB, Radiant Photo saves such a file in Adobe RGB (1998) instead. A 16-bit file stays in ProPhoto RGB.
JPEG quality
JPEG Quality runs from 10 to 100 (default 91). Higher keeps more detail in a bigger file. Around 90 is visually lossless for most photos and keeps files small enough for the web. The slider works for JPEG, JPEG XL, their HDR rows, AVIF HDR and Raw to TIFF, others to JPEG, and is grayed out for the other file types. For JPEG XL, 100 means lossless.
Make the files smaller
Radiant Photo keeps the full pixel dimensions unless you select Reduce size: and choose a size. Every choice is a limit, so a photo that's already smaller isn't enlarged.
| Choice | Result |
|---|---|
| 50% of original size | Half the width and height |
| 25% of original size | A quarter of the width and height |
| For social media | The long edge at most 2048 px |
| For email | The long edge at most 1024 px |
| 24 megapixels … 1 megapixel | At most that many pixels (24, 12, 10, 6, 5, 2 or 1) |
| Custom width | Type a maximum width in pixels. The height follows. |
| Custom height | Type a maximum height in pixels. The width follows. |
| Fit within W×H | Type a width and height. The photo fits inside that box. |
| Fill W×H (center-crop) | Type a width and height. The photo fills the box and the edges are cropped. |
Add a watermark
The Watermark row picks the watermark these saves add. Default (Signature) follows your default watermark; you can also choose another watermark or None. Click Edit… to create or change a watermark. The choice is kept for your next save, and the Share page's Export uses it too; the page's other rows and Batch Export keep their own. See Watermarks.
Where the starting values come from
The Save dialog opens with your export defaults from Settings > Files: the file type, bit depth, color space, naming pattern and JPEG quality. The location, subfolder, size and collision choices come from your last save. See Settings.
Tip
Set Settings > Files once to the way you usually deliver. Then Save gives you that file every time.