
Batch Export
Batch Export saves a whole set of photos in one go. Use it for the photos you have open, or for a folder of photos you haven't opened at all.
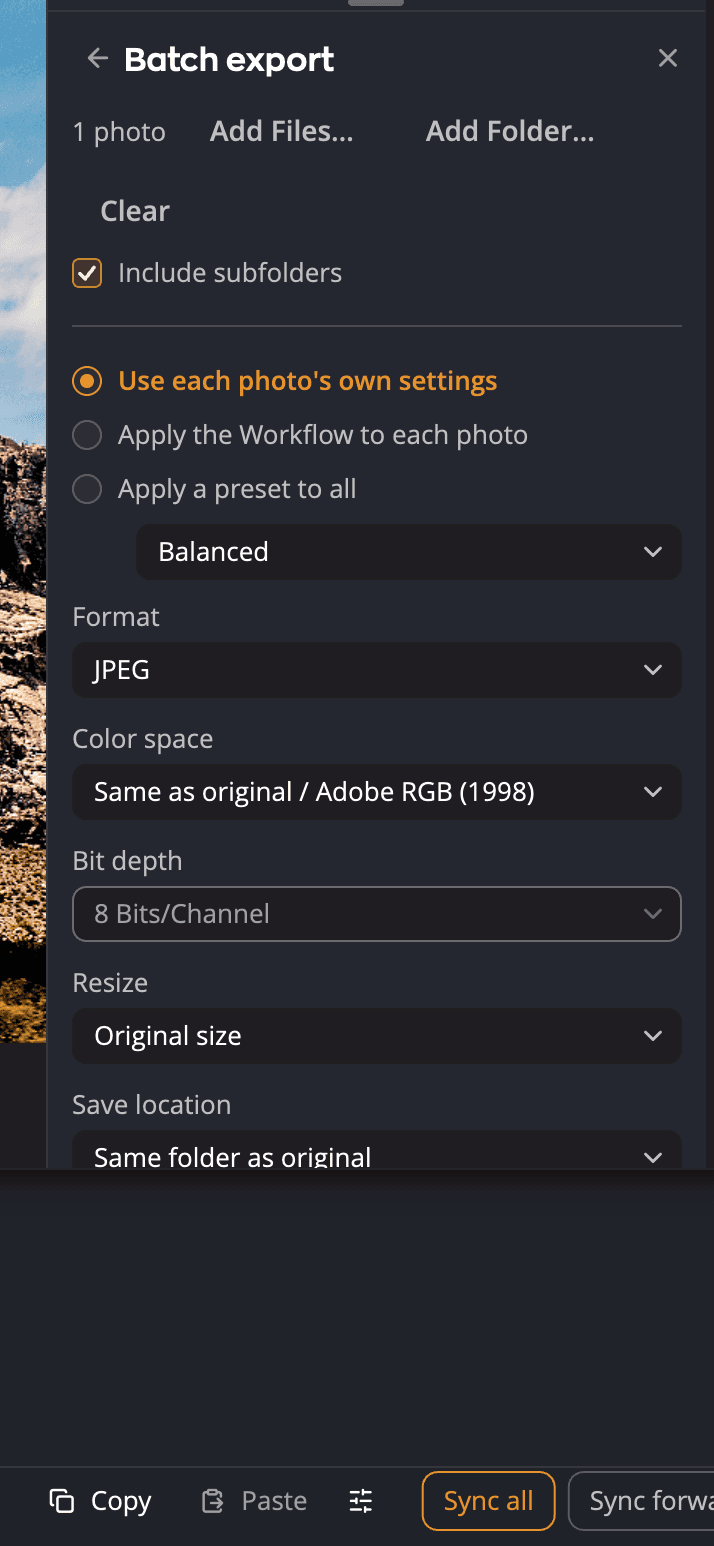
| # | Control | What it does |
|---|---|---|
| 1 | Add Files… | Adds photos to the list |
| 2 | Add Folder… | Adds every photo in a folder |
| 3 | Include subfolders | Also adds the photos in the folder's subfolders (on by default) |
| 4 | Settings choice | Which edit each photo gets (see below) |
| 5 | Format | The file type |
| 6 | Color space | The color space of the new files |
| 7 | Bit depth | 8 or 16 bits per channel |
| 8 | Resize | Makes the new files smaller |
| 9 | Save location | Same folder as original or Custom |
| 10 | Name | The pattern for the new file names |
| 11 | On conflict | What to do when a file with that name exists |
| 12 | Quality | JPEG or JPEG XL quality, 10 to 100 |
| 13 | Export | Starts the batch. It shows how many photos will be saved, for example Export 24. |
Open Batch Export
Choose File > Batch Export… or press ⇧⌘E (Ctrl+Shift+E on Windows).
- With a photo open, Batch Export opens in the Share panel on the right. You can keep editing while it runs.
- With no photo open, it opens as the Batch export dialog. This is the quickest way to process a folder without opening it first.
The list starts with the photo you're looking at. When Selects is on, it starts with the photos in Selects.
Choose the photos
- Click Add Files… to add photos, or Add Folder… to add a whole folder.
- Turn off Include subfolders if you want only the photos at the top of the folder.
- To start over, click Clear.
Next to the buttons, the form counts the photos, for example 24 photos, or says No photos added.
Choose which edit each photo gets
| Choice | What each photo gets |
|---|---|
| Use each photo's own settings | The default. Each photo is saved with the edits you made to it. A photo you never edited gets the recipe in the menu below, or the default settings if you have no recipes. |
| Apply the Workflow to each photo | Radiant Photo detects each photo's scene and applies the matching recipe from your Workflow, as if you had just opened it. |
| Apply a recipe to all | One recipe for every photo, in place of any edits they already have. Choose the recipe from the menu below. |
Apply a recipe to all is available when you have at least one recipe.
Tip
Apply the Workflow to each photo turns a folder of straight-from-camera photos into finished files without opening a single one.
Choose the file settings
These work like the same settings in the Save dialog. See The Save dialog for the details of each one.
| Setting | Choices |
|---|---|
| Format | JPEG, JPEG XL, TIFF, JPEG (Raw → TIFF), PNG (Raw → TIFF), PNG, Original (Raw → TIFF), DNG |
| Color space | sRGB, ProPhoto RGB, Adobe RGB (1998), and the three Same as original choices |
| Bit depth | 8 Bits/Channel, 16 Bits/Channel. Set for you and grayed out for JPEG (8-bit), for DNG (16-bit) and for any color space other than sRGB (16-bit). |
| Resize | Original size, or the same sizes as Reduce size in the Save dialog |
| Save location | Same folder as original, or Custom with Choose |
| Name | <Filename>-Radiant, <Filename>_<Preset>, <Filename>_display, <Custom>-<Sequence>, <Filename><Custom> |
| On conflict | Keep both, Replace existing, Stop |
| Quality | 10 to 100. Shown only for JPEG and JPEG XL. |
The three "Raw → TIFF" formats save raw files as TIFF and the other photos as JPEG, as PNG, or in their own format.
DNG saves each photo as a 16-bit linear DNG with your edit. Two checkboxes appear under the size rows: Include the original Raw file (off by default; it applies only to raw files) and Include Radiant’s edit settings (on by default). If your export settings remove metadata, a note replaces the first checkbox. See The Save dialog.
Batch Export starts from your export defaults in Settings > Files. Change them there once, and every batch starts the way you like. See Settings.
Check, then export
Before you start, the summary line tells you what will happen, for example 24 files · 2 skipped (exists). If you chose Apply the Workflow to each photo with a name that uses the recipe's name (<Preset>), it adds names may change after scene detection.
Click Export to start. The button stays unavailable until the list has photos and every setting is complete, such as a Custom: text or a Custom folder.
Follow the progress
The progress shows as Exporting 7 of 24…, in the dialog or in the Jobs section of the Share panel.
- Stop after current finishes the photo being saved, then stops. Files already saved stay on disk.
- When the batch ends, it says Done — 24 of 24, or Stopped — 7 of 24 done.
- If some photos fail, the count shows 2 failed, with a plain reason for each one. Click Copy failure list to paste the list somewhere.
- Notes such as 3 saved at 8-bit or 1 saved in sRGB tell you when a file couldn't be saved exactly as asked.
If you quit Radiant Photo during a batch, it offers to finish the job the next time you open it. Click Finish export to carry on, or Discard to drop the rest. The photos already saved stay either way.