
Tone
The Tone tools set the light in your photo: its exposure, its contrast and its depth. Work with Tone first, because tone changes affect how every color looks. You'll find the Tone panel on the Adjustments page of the right panel. Press T to open it.
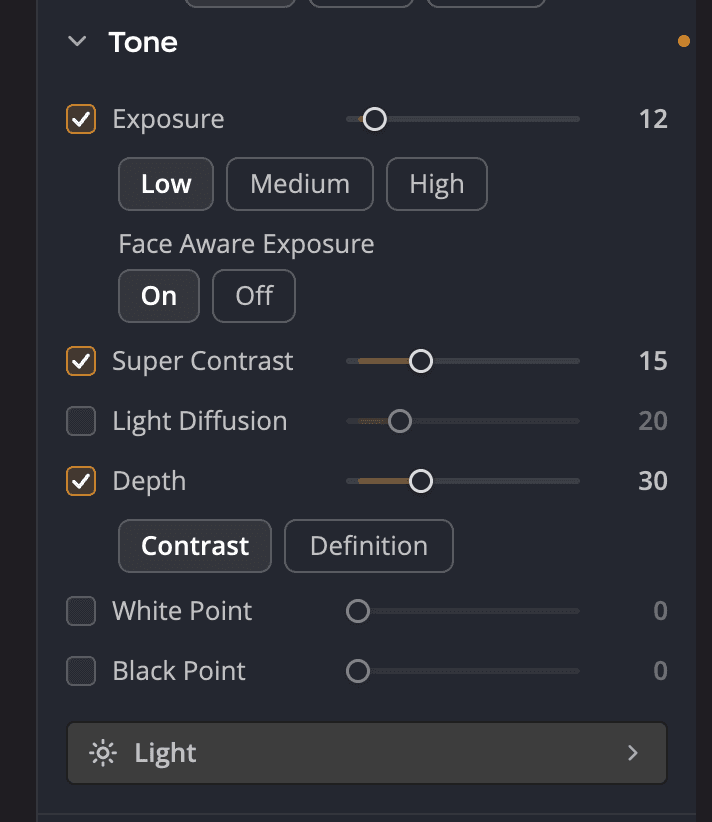
| # | Control | Range (default) | What it does |
|---|---|---|---|
| 1 | Exposure | 0 to 150 (100) | Corrects the light in every pixel of the photo |
| 2 | Face Aware Exposure | On / Off | Takes faces into account when Exposure works |
| 3 | Super Contrast | 0 to 50 (0) | Adds depth and pop to a flat photo |
| 4 | Light Diffusion | 0 to 100 (10) | Softens the light and lowers contrast |
| 5 | Depth | 0 to 100 (20) | Adds contrast in every pixel so details stand out |
| 6 | White Point, Black Point | 0 to 100 (0) | Fine-tune the brightest and darkest areas |
| 7 | Light | − | Six manual sliders for exposure and contrast |
Each tool has a checkbox. Moving a tool's slider selects its checkbox for you. Double-click any slider to return it to its default.
Correct the exposure
Exposure looks at every pixel and gives each one the light it needs. It's as if every pixel had its own aperture, blended smoothly, with no masks or selections. This is the tool with the greatest effect on the rest of your edit, which is why it comes first.
When Radiant Photo opens a photo, it picks an exposure correction for that photo on its own. That's why the Exposure value changes from photo to photo. Choose how strong that automatic correction is:
| Choice | What it does |
|---|---|
| Low | The smallest correction this photo needs |
| Medium | A standard correction. Sets Exposure to 100. |
| High | A brighter correction. Sets Exposure to 150. |
To set the amount yourself, drag the Exposure slider. This turns off the automatic choice, so none of Low, Medium or High stays selected.
Tip
The Enhance slider in Smart Editing also changes exposure. Use the two together. See The Smart Editing tools.
Protect faces
For photos of people, set Face Aware Exposure to On. Exposure then balances the faces it finds against the background light, so people are neither too dark nor too bright. Leave it on when you build a recipe for a batch of portraits.
Note
Dragging the Exposure slider sets Face Aware Exposure to Off. Set it back to On if you want faces to guide the correction again.
Add contrast and depth
- Super Contrast adds depth and pop. It also makes many photos look sharper. Try it on a photo that looks flat after an exposure correction, or one shot in harsh light.
- Light Diffusion gives softer light with less contrast. It's lovely on portraits, where it also softens blemishes. Skin tones often turn a little warmer, so keep the amount modest.
- Depth increases the contrast in each pixel, so fine details are easier to see. Choose how it works:
| Choice | What it does |
|---|---|
| Contrast | Increases the difference between light and dark areas |
| Definition | Brings out detail in shadows and highlights, and corrects faces better |
Tip
More Depth makes a photo slightly darker overall. Raise Exposure a little to compensate. On a very dark photo, try turning Depth off to reveal shadow detail.
Set the white and black points
White Point fine-tunes the brightest pixels and how much the correction targets bright areas. Black Point sets where black begins. A higher Black Point value leaves more of the dark areas alone.
Tip
Press J to show clipping warnings while you work. Avoid pushing large areas into pure white or pure black, because you lose detail there.
Fine-tune by hand with the Light card
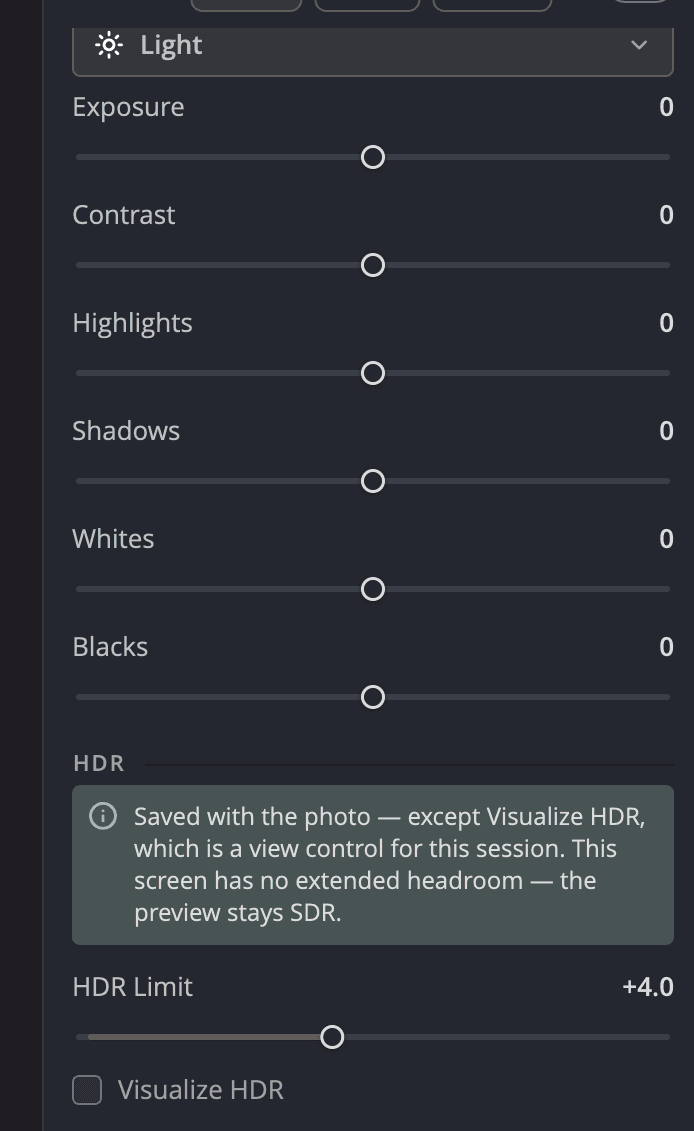
Click Light to open a card of six manual sliders: Exposure, Contrast, Highlights, Shadows, Whites and Blacks. Each runs from −100 to +100 (default 0).
These are the same six settings as in Finishing Tools. A change in one place shows in the other. You can also drag on the histogram to move five of them. See Histogram and scopes.
HDR photos
The Light card ends with an HDR section for photos with high dynamic range.
| Control | Range (default) | What it does |
|---|---|---|
| HDR Limit | 1.0 to 8.0 stops (4.0) | Sets how far above standard white the brightest areas can reach. Moves in steps of 0.5. |
| Visualize HDR | On / off | Paints the bright range above standard white as bands, so you can see where it is |
Visualize HDR works only while HDR preview is on and your display shows HDR. HDR Limit is saved with the photo. When you change it, a Reset HDR button appears in the section heading.
For HDR preview, the HDR mode in the Edit header and saving HDR files, see HDR photos.
Start over
Point at the panel header and click the reset button (Reset Tone) to return the Tone tools to their defaults. The Light card's six sliders belong to Finishing Tools, so Reset Tone leaves them as they are. Reset them from the Finishing Tools panel.