
Levels
Levels sets where your photo's blacks, midtones and whites fall, for all colors at once or for one channel at a time. It's the classic way to stretch a flat photo to full contrast or to take a color cast out at the black or white point. You'll find Levels in the right panel, just below Tone.
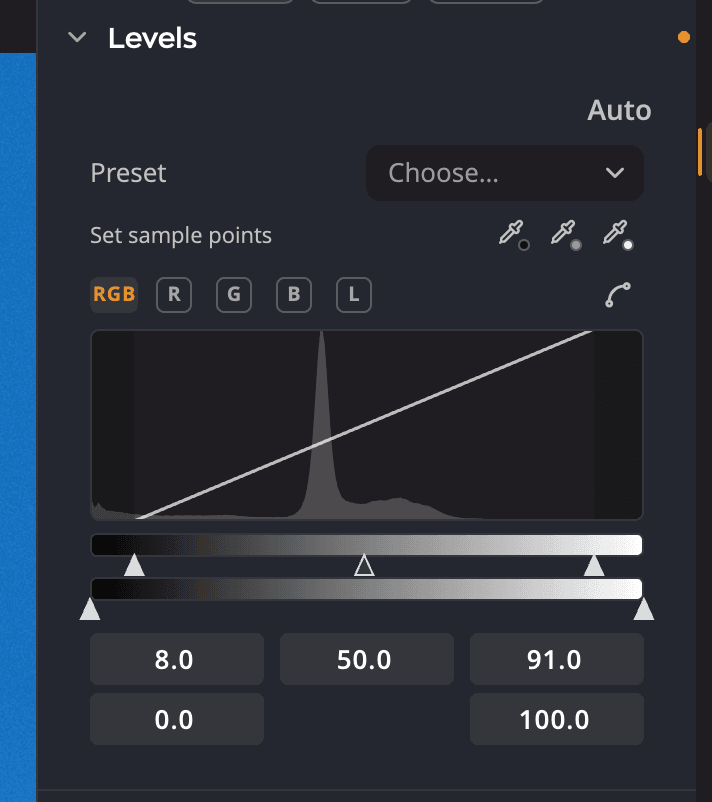
| # | Control | What it does |
|---|---|---|
| 1 | Auto | Applies Auto Color Correction. ⌥-click (Alt-click on Windows) opens its options. |
| 2 | Preset | Applies a built-in or saved Levels preset. |
| 3 | Eyedroppers | Set sample points: black, gray and white. |
| 4 | Channel chips | RGB, R, G, B and L. Each channel has its own pins. |
| 5 | Smoothing button | Rounds the corners of the ramp (Smooth the ramp corners), or makes them hard again. |
| 6 | Input pins | Black, gamma (the hollow middle pin) and white. |
| 7 | Output pins | Where black and white end up. |
| 8 | Number fields | The five pins as numbers, 0 to 100. |
Set the black and white points
- Open Levels in the right panel.
- Drag the black pin right to where the histogram starts, and the white pin left to where it ends.
- Drag the middle pin to brighten or darken the midtones. Left brightens, right darkens.
Tones outside the input pins are clipped, and the plot dims them so you can see how much. Behind the pins is the histogram of your photo before Levels changed it, so it doesn't move while you drag.
The two output pins below compress the result. Pull the black output pin right to lift the blacks into a matte gray. Pull the white output pin left to hold back the whites.
Tip
Type exact values into the five fields under the plot. Press Return to commit, or Esc to put the old value back. Double-click the plot to put every pin back where it started.
Work on one channel
Click a chip to choose what the pins edit:
| Chip | What it edits |
|---|---|
| RGB | All three color channels together. |
| R, G, B | One color channel. Use these to remove a color cast at the black or white point. |
| L | Brightness only. Lifting the L black point turns black into a neutral gray, with no tint. |
RGB and L are not the same. RGB can shift colors where it bends tones; L never changes hue.
Use the eyedroppers
Click an eyedropper, then click once on the photo. The pointer shows the value you're about to set, for example Black 12.4 · click to set.
| Eyedropper | What a click does |
|---|---|
| Black point | Sets the input black points from that pixel. |
| Gray point | Neutralizes that pixel's color, keeping its brightness. |
| White point | Sets the input white points from that pixel. |
The eyedroppers read your original photo, never the edited one, so repeated clicks don't drift. They never move the output pins. After one click the eyedropper turns itself off; press Esc to cancel it without clicking.
Let Auto do it
Click Auto to apply Auto Color Correction. With the default method it sets the black, white and gamma pins of the R, G and B channels, so the RGB fields stay at 0, 50 and 100. It leaves your output pins and the L channel alone.
It refines over a few frames, then settles as one undo step.
To choose how Auto works, ⌥-click (Alt-click) Auto. The Auto Color Correction dialog previews each choice on the photo as you click it.
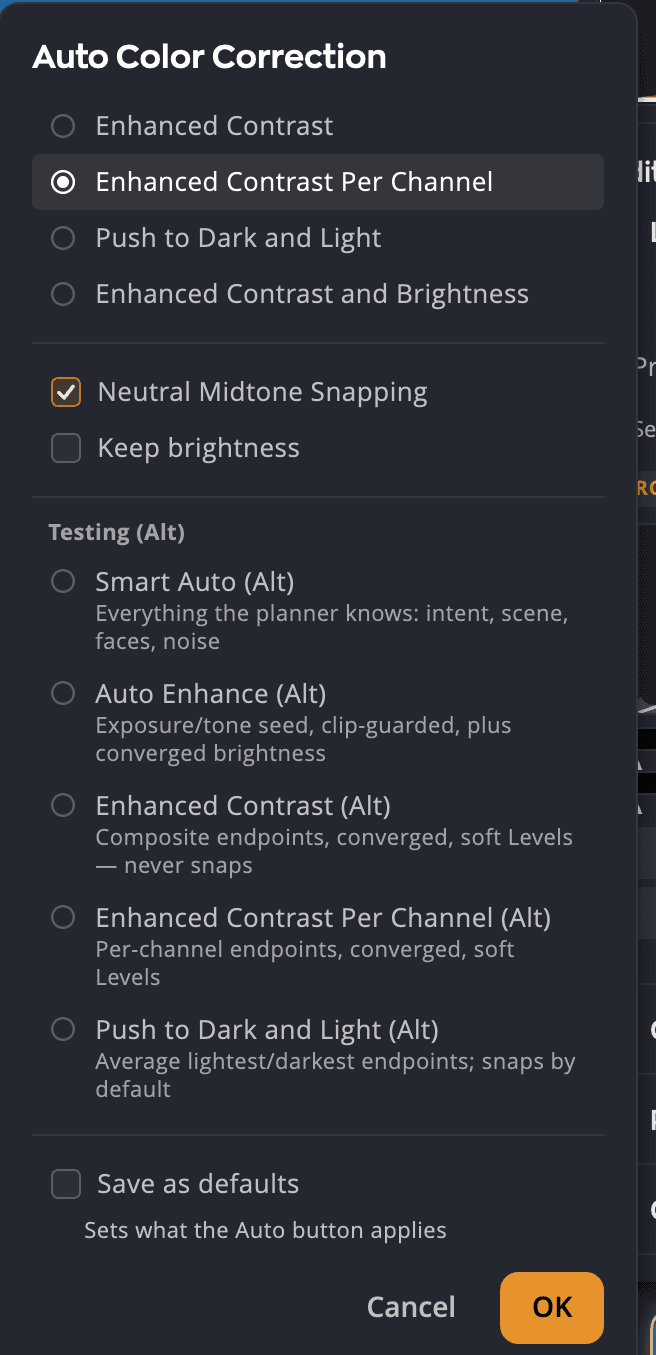
| Algorithm | What it does |
|---|---|
| Enhanced Contrast | Clips all channels the same way. Lighter highlights, darker shadows, colors kept in proportion. |
| Enhanced Contrast Per Channel (default) | Stretches each channel on its own for a stronger correction. It can remove or add a color cast. |
| Push to Dark and Light | Uses the average lightest and darkest colors as the end points, to add contrast with little clipping. |
| Enhanced Contrast and Brightness | Balances brightness and contrast together, based on the photo's content. |
Neutral Midtone Snapping (on by default) finds a near-neutral color and makes it a true gray. Keep brightness keeps the midtones as bright as they were while it does. Select Save as defaults to make the plain Auto click use your choice. The same Auto and the same defaults work in Curves.
Presets
The Preset menu has eight built-ins: Brighter, Darker, Increase Contrast, Strong Contrast, Lighten Shadows, Midtones Brighter, Midtones Darker and Matte Fade. Choose Save current levels as… to keep your own, and Delete a custom levels preset… to remove one. A preset sets all five channels at once, as one undo step.
Turn it off or reset it
The eye in the Levels header turns Levels off without losing your pins. Hold the pointer over the header and click its reset button to put all five channels back and turn Levels off.
Levels belongs to the Tone group. If Tone is turned off, using a Levels control turns Tone back on.