
Histogram and scopes
The histogram and scopes show how the light and color in your photo are spread out. Use them to judge exposure and color by numbers, not only by eye. The Histogram panel sits at the top of the right column; you can also open the scopes in their own window or over the photo.
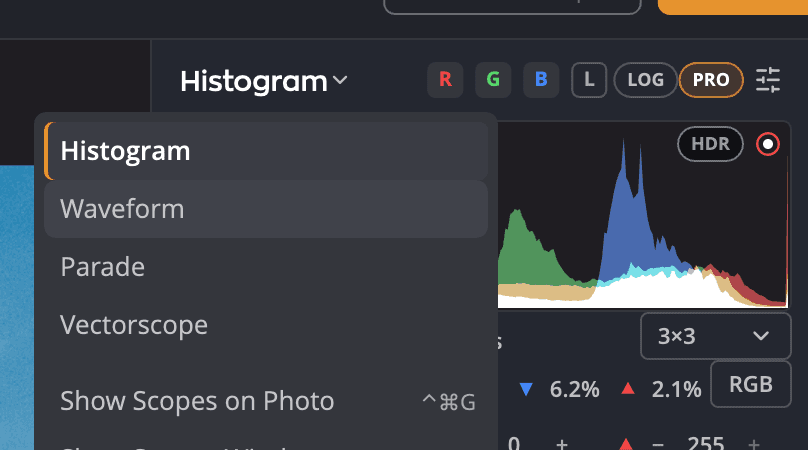
| # | Control | What it does |
|---|---|---|
| 1 | Scope menu | Switches between Histogram, Waveform, Parade and Vectorscope. Appears when Pro histogram is on. |
| 2 | Pro histogram | Adds channel toggles, statistics and a readout of the pixel under the pointer. |
| 3 | Logarithmic histogram scale | Lifts sparse shadow and highlight counts so you can see them. |
| 4 | Show shadow clipping and Show highlight clipping | Paint clipped pixels on the photo. |
| 5 | Stats line | Mean brightness from 0 to 255, then, while the gamut warning is on, Out of gamut, then Shadows clipped and Highlights clipped, as percentages. |
To show or hide the panel, click Histogram at the top of the right rail, or choose View > Panels > Histogram.
Read the histogram
Shadows are on the left, midtones in the middle and highlights on the right. A pile-up against either edge means detail is clipped to pure black or pure white.
- Press J (View > Overlays > Clipping Warnings) to paint clipped pixels on the photo. Clipped shadows show in blue and clipped highlights in red. You can change both colors in Settings > Color.
- With Pro histogram on, Clip at sets the level that counts as clipped. 0 is pure black and 255 is pure white. Double-click a value to reset it.
- Click the readout line to cycle its color space: RGB, %, HSV and Lab.
- Turn on As shot in the Scope menu, or in Scope Settings…, to draw a dashed outline of the photo before your edits behind the live histogram. It shows on every histogram, Scopes on Photo and the Scopes window included, and Radiant Raw shares the switch. It's off until you turn it on.
Adjust tone on the histogram
With Pro histogram on or off, you can drag on the histogram to change your photo's tone, at the speed Lightroom Classic uses. The histogram has five parts. From left to right, they move Blacks, Shadows, Exposure, Highlights and Whites.
- Point at a part of the histogram. It's shaded, and it shows the name of the slider it moves.
- Drag left or right. The slider moves, and the photo changes as you drag.
- For finer steps, hold Shift. For even finer steps, hold ⌘ (Ctrl on Windows).
Double-click a part to put its slider back at 0. These are the same sliders as in Tone > Light and in Finishing Tools. Each drag is one step: ⌘Z (Ctrl+Z on Windows) undoes it.
This works on every histogram: the Histogram panel, a Histogram pane in the Scopes window, and a Histogram in the corner card of Scopes on Photo, except while a tool on the photo is active. The other scopes don't change tone.
Choose a scope
| Scope | Shows | Use it to |
|---|---|---|
| Histogram | How many pixels sit at each brightness | Check exposure and clipping |
| Waveform | Brightness across the width of the photo, left to right | See where in the frame the highlights and shadows are |
| Parade | The waveform split into red, green and blue | Spot a color cast in the whites or the blacks |
| Vectorscope | Hue around the circle, saturation out from the center | Check saturation, and skin tones against the Skin-tone line |
Choose Scope Settings… from the Scope menu to adjust the scope you're looking at. The choices change with the scope:
| Scope | Settings |
|---|---|
| Histogram | Display (Overlaid or Stacked), Vertical axis (Linear or Log) |
| Waveform and Parade | Brightness, Trace, Scale (0–100 % or 0–255), Guides (2 % and 98 %, for print), Extents, Orientation (Horizontal or Vertical) |
| Parade | Panels (YRGB or RGB) |
| Vectorscope | Targets (75 % or 100 %), Zoom, Range (All, Shadows, Mids, Highlights), Skin-tone line, Colorize, Brightness, Trace |
Reset to Defaults puts the card back the way it came.
Turn the waveform for portrait photos
Set Orientation to Vertical to run the Waveform or the Parade down the photo instead of across it. The photo's rows then go from top to bottom and brightness from left to right, so the trace of a portrait photo lines up with the photo. Horizontal is the default.
- Only the panel's first scope has this setting. The second scope, the Scopes window and Scopes on Photo always run across the photo.
- On a vertical scope, the mark for the pixel under the pointer still shows, but pointing at the scope doesn't dim the photo.
Show two scopes in the panel
With Pro histogram on, the panel can show a second scope under the first, so you can watch brightness and color at the same time.
- Open the Scope menu and choose Show Second Scope. A Vectorscope appears under the first scope, or a Histogram when the first scope is the Vectorscope.
- To pick another scope, open the second scope's own Scope menu.
- To adjust it, choose Scope Settings… from that menu. The card is tagged Second Scope, and its settings are separate from the first scope's.
The channel toggles apply to both scopes. To go back to one scope, choose Hide Second Scope from either scope's menu. Turning Pro histogram off hides the second scope too, and turning it on again brings it back.
Open the Scopes window
The Scopes window floats over the photo and can be much larger than the panel. Choose View > Scopes > Show Scopes Window or press ⌃⌘W (Ctrl+Shift+U on Windows).
- Drag the window's header to move it. Double-click the header to fill the canvas, and again to go back.
- Drag the corner grip to resize it.
- Layout sets how many scopes it shows: One scope, Two, side by side, Two, stacked, One plus two or Two by two. Pick a scope for each pane.
- Link with Photo links the scopes and the photo both ways. The pixel under the pointer shows as a mark on each scope. Point at a spot on a scope, and the photo dims everywhere except the pixels behind that spot. It's on by default, and View > Scopes > Unlink Scopes from Photo turns it off.
Show scopes on the photo
Scopes on Photo draws a scope over the canvas, so you can watch it while you work full screen. Choose View > Scopes > Show Scopes on Photo or press ⌃⌘G (Ctrl+Shift+G).
| Setting | Choices |
|---|---|
| Placement | Band across the bottom, Full frame over the photo, or a Corner card you can move and resize |
| Opacity | How strongly the scope covers the photo |
| Band height | How tall the band is, for Band |
A tag on the scope says what it measures: Whole photo, the Visible area when you're zoomed in, or Proof while soft proofing.
While you compare
When you compare your edit with the original (see Comparing before and after), Scopes on Photo follows the view:
- In Split, it stays where you placed it and measures the photo as you see it: the original on one side of the divider and your edit on the other. Drag the divider, and the scope follows. A Histogram in the Corner card updates when you let go.
- In Before/After, it moves to a corner card, whatever its placement, and measures your edit. It also moves to a corner card in Compare A ↔ B.
- The Histogram panel and the Scopes window always measure your edit.
In Split, Scopes on Photo leaves out the HDR scale in stops.
Tip
On an HDR photo the histogram adds a scale in stops above SDR white. See HDR photos.