
Face
The Face tools shape and light the faces in your photo: they contour, whiten teeth, sharpen lips and add soft light where the face is. Each correction adapts to the face it works on. You'll find Face in the right panel, below Eyes (press F).
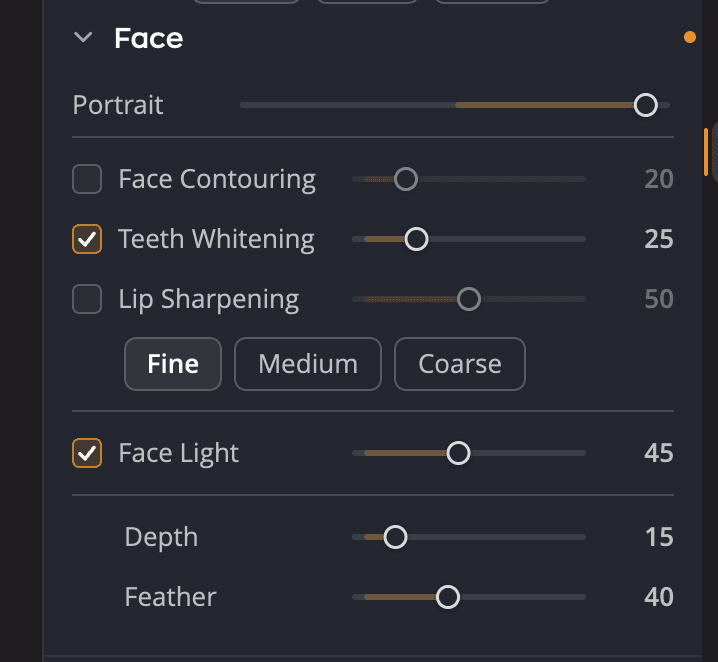
| # | Control | Range (default) | What it does |
|---|---|---|---|
| 1 | Portrait | 0 to 200 (100) | Scales the whole portrait retouch. See Portrait tools. |
| 2 | Face Contouring | 0 to 100 (25) | Slims the face naturally, or corrects wide-angle distortion. |
| 3 | Teeth Whitening | 0 to 100 (25) | Finds the teeth and brightens them without an artificial look. |
| 4 | Lip Sharpening | 0 to 100 (25), Fine, Medium, Coarse | Gives lips a crisp, sharp look. |
| 5 | Face Light | 0 to 100 (0) | Adds soft light to each face, like a softbox on set. |
| 6 | Depth | 0 to 100 (0) | Restores contrast inside the lit area. |
| 7 | Feather | 0 to 100 (25) | Softens the edge of the added light. |
Dragging a slider turns its tool on. Double-click a slider to put it back at its default.
Contour the face
Face Contouring gently slims the face. It also helps when a wide-angle lens has stretched a face near the edge of the frame. The detail around the face is kept, so the result doesn't look manipulated.
Whiten teeth and sharpen lips
Teeth Whitening finds the teeth and applies just enough whitening. Lip Sharpening adds crisp detail to the lips. Choose Fine, Medium or Coarse for the size of the detail it brings out. Medium is the default.
Light the face
Face Light lifts the light on faces and leaves the rest of the photo alone. Use it for backlit portraits, faces under a hat brim, or flash that didn't reach the subject.
- Drag Face Light up from 0. The checkbox turns on by itself.
- Stop where the face looks naturally lit against the scene. For most photos that is well below 100.
- If you can see where the light stops, raise Feather until the edge disappears.
- If the face looks flat, raise Depth a little. It adds contrast inside the lit area without making it brighter.
Depth and Feather shape the light that Face Light adds. Moving either one turns Face Light on, but nothing changes on the photo while Face Light is at 0.
If no faces were found, the section says No faces were detected, so Face Light has nothing to aim at. Add one by hand from the Face Selection panel. Face Light works on faces you add by hand, too. See Face Selection.
Light each face differently
With two or more faces, Apply to lets you choose All faces or Per face.
| Control | What it does |
|---|---|
| Apply to | All faces lights every face the same. Per face gives each face its own row. |
| Face checkbox | Include this face in Face Light. Clear it to leave one person unlit. |
| Light | 0 to 100 (100): this face's share of the Face Light amount. |
| Feather | The edge softness for this face. |
| Depth | Stays shared by every face. |
The rows are listed largest face first. Face Light stays the master amount, so raising it lifts every face in proportion to its Light share.
Turn Face off, or reset it
Click the eye icon in the Face header to turn the section off and compare. The header's reset button (Reset Face) puts every tool back to its default, including each face's own Face Light values.
Tip
Add any missing faces before you set Face Light. A face added later gets the amount you already chose.