
Finishing Tools
Finishing Tools give you direct, manual control of white balance, light and color as a last step. They work on top of every other correction, so you can fine-tune the result without changing what the automatic tools did. You'll find them in the Finishing Tools panel (press V).
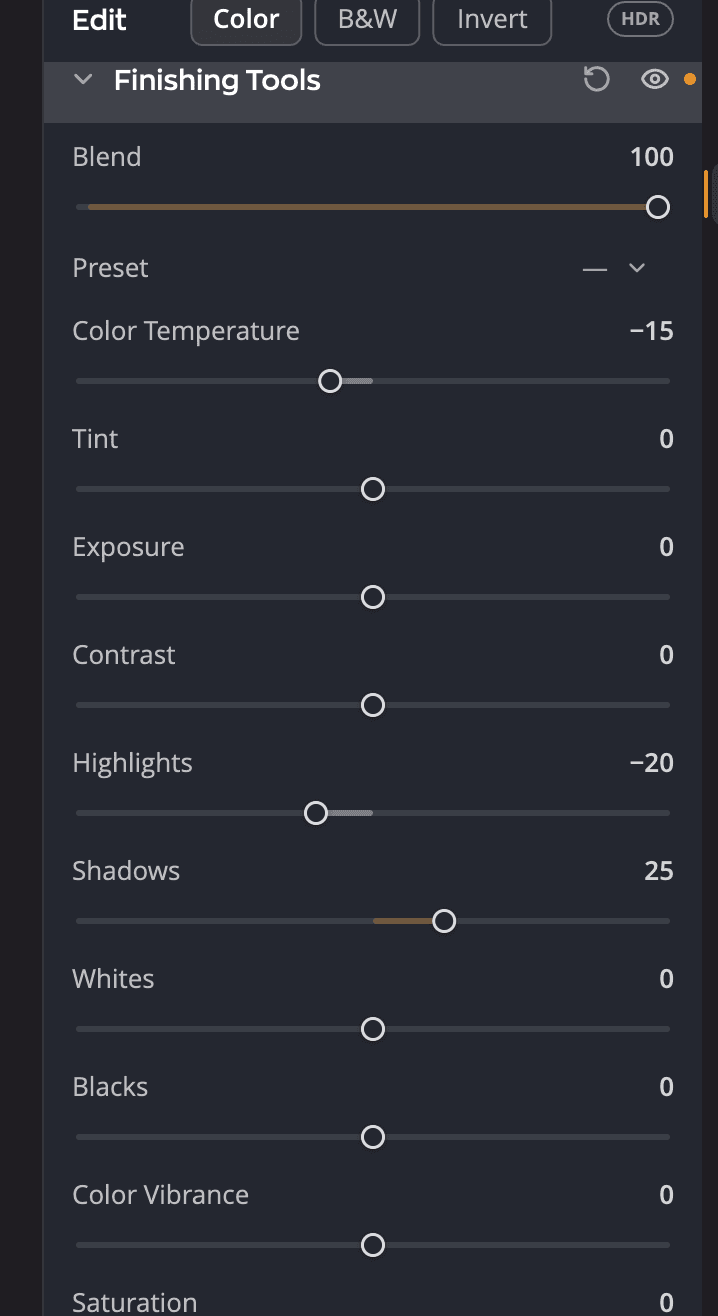
| # | Control | What it does |
|---|---|---|
| 1 | Eye | Turns all of Finishing Tools off and on, so you can compare. |
| 2 | Reset | Puts every slider back to 0 and Blend to 100. |
| 3 | Blend | Fades all ten sliders together. |
| 4 | Preset | Ready-made finishing looks, and your own. |
| 5 | Sliders | The ten finishing adjustments. |
The sliders
Each slider runs from −100 to +100 (default 0). Moving one turns it on. Double-click a slider to put it back at 0.
| Slider | What it does |
|---|---|
| Color Temperature | Warms or cools the photo. Move right to correct light that was too blue, left to correct light that was too orange. |
| Tint | Corrects a green or magenta cast. Move left to add green, right to add magenta. |
| Exposure | Brightens or darkens the whole photo, like opening or closing the aperture. |
| Contrast | Mostly affects the midtones. Move right to darken the darker middle tones and brighten the lighter ones. |
| Highlights | Controls the bright areas. Move left to recover blown highlights, right to brighten them. |
| Shadows | Controls the dark areas. Move right to open up shadow detail, left to deepen it. |
| Whites | Sets where the brightest tones clip. Move left to reduce highlight clipping. |
| Blacks | Sets where the darkest tones clip. Move left for deeper, purer blacks. |
| Color Vibrance | Raises the saturation of the less saturated colors more than the strong ones, which protects skin tones. |
| Saturation | Changes the saturation of every color equally. At −100 the photo is black and white. |
Blend
Blend (0 to 100, default 100) fades the whole Finishing Tools result in and out. Set your sliders a little strong, then lower Blend until the photo looks right. It changes only Finishing Tools, not the rest of your edit.
Presets
The Preset menu has ready-made finishing looks. Pick one to set all the sliders at once, then fine-tune.
- Save preset… keeps your current sliders as a preset of your own.
- Rename… and Delete… manage the presets you saved.
- The menu shows — when your sliders don't match any preset.
The same sliders in the Tone panel
Exposure, Contrast, Highlights, Shadows, Whites and Blacks also appear in the Light card of the Tone panel. They are the same settings, not copies: move one in either place and the other follows.
Note
Resetting Finishing Tools also resets Tone > Light, because the same settings appear in both panels. Resetting the Tone panel leaves the Light card alone.
When to use Finishing Tools
- To correct white balance after the automatic corrections, with Color Temperature and Tint.
- To recover a sky or open up shadows by hand, with Highlights and Shadows.
- To apply a finishing look to a whole shoot, with a preset and Copying and syncing settings.
Tip
Need these adjustments on part of the photo only? The Graduated Filter has the same ten sliders for each side of its mask.